Programmable Voice Quickstart for Node.js
With just a few lines of code, your Node.js application can make and receive phone calls with Twilio Programmable Voice.
This Node.js quickstart will teach you how to do this using our REST API and the Twilio Node.js helper library to ease development.
In this quickstart, you will learn how to:
- Sign up for Twilio and get your first voice-enabled Twilio phone number
- Set up your development environment to make and receive phone calls
- Make an outbound phone call which plays an MP3
- Receive and respond to an inbound phone call which reads a message to the caller using Text to Speech
Prefer to get started by watching a video? Check out our video on how to send and receive phone calls with Node.js on Youtube.
Info
If you already have a Twilio account and a voice-enabled Twilio phone number you're all set here! Log in then feel free to jump to the next step.
Before you can make a call from Node.js, you'll need to sign up for a Twilio account or log in to an account you already have.
The next thing you'll need is a voice-capable Twilio phone number. If you don't currently own a Twilio phone number with voice call functionality, you'll need to purchase one. After navigating to the Buy a Number page, check the "Voice" box and click "Search."
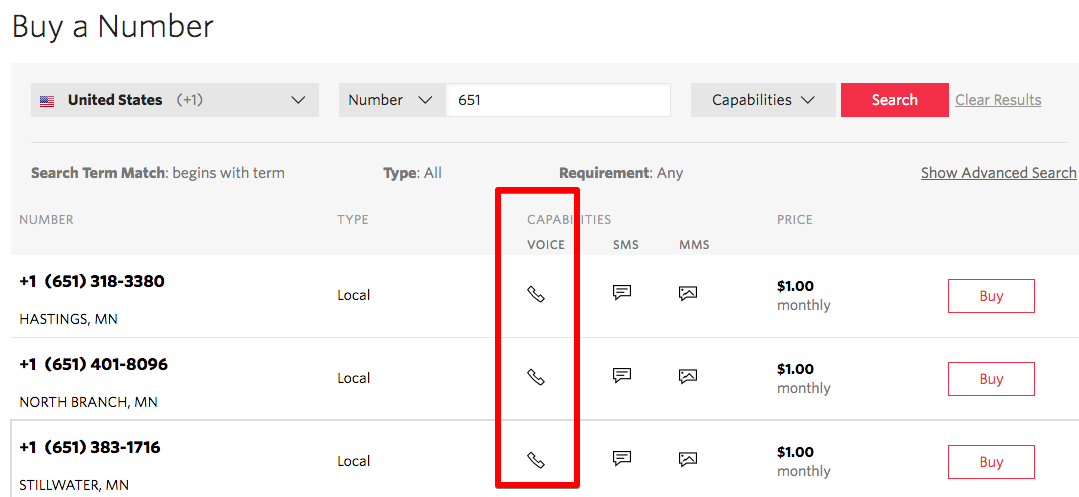
You'll then see a list of available phone numbers and their capabilities. Find a number that suits your fancy and click "Buy" to add it to your account.
Now that you have a Twilio account and a programmable phone number, you have the basic tools you need to make a phone call.
You could use Twilio's HTTP API to make your phone calls, but we'll make things even more simple by using the Twilio module for Node.js. Let's install that now.
Info
If you've gone through one of our Node.js quickstarts already and have Node.js and the Twilio Node.js module installed, you can skip this step and get straight to making your first phone call.
You can check if you already have Node.js installed on your machine by opening up a terminal and running the following command:
_10node --version
You should see something like:
_10$ node --version_10v8.9.1
If you're on version 2.11 or earlier, we recommend you upgrade with the most recent version.
If you don't have Node.js already installed, you can install it with homebrew, another package manager by going into your terminal and typing this on the command line:
_10brew install node
If you have a Windows machine, you should install nvm-windows to install both Node.js as well as npm, the Node.js package manager. Windows users can follow this excellent tutorial here.
Install the Twilio Node.js Module
The easiest way to install the library is using npm, the Node.js package manager that lets you install the libraries you need. Simply fire up a terminal or command line interface on your machine that already has Node and npm installed, and run the following command in a new directory.
_10npm install twilio
Let's put that Twilio Node.js library to good use.
With a single API request, we can make an outbound call from the Twilio phone number we just purchased. Open a new file called "make_call.js" and type or paste in the following code.
This code starts a phone call between the two phone numbers that we pass as arguments. The 'from' number is our Twilio number, and the 'to' number is who we want to call.
The URL argument points to some TwiML, which tells Twilio what to do next when our recipient answers their phone. This TwiML instructs Twilio to read a message using text to speech and then play an MP3.
Before this code works, though, we need to edit it a little to work with your Twilio account.
Swap the placeholder values for accountSid and authToken with your personal Twilio credentials.
Go to https://www.twilio.com/console and log in. On this page, you'll find your unique Account SID and Auth Token, which you'll need any time you send messages through the Twilio client like this. You can reveal your auth token by clicking on the eyeball icon:
Open make_call.js and replace the values for accountSid and authToken with your unique values.
Danger
Please note: it's okay to hardcode your credentials when getting started, but you should use environment variables to keep them secret before deploying to production. Check out how to set environment variables for more information.
Remember that voice-enabled phone number you bought just a few minutes ago? Go ahead and replace the existing from number with that one, making sure to use E.164 formatting:
[+][country code][phone number including area code]
Next, replace the to phone number with your mobile phone number. This number can be for any phone that can receive calls, but it's a good idea to test with your phone so that you can see the magic happen! As above, you should use E.164 formatting for this value.
Save your changes and run the code by running the following command from your terminal:
_10node make_call.js
That's it! Your phone should ring with a call from your Twilio number, and you'll hear our short message for you. 😉
Warning
If you're using a Twilio trial account, outgoing phone calls are limited to phone numbers you have verified with Twilio. Phone numbers can be verified via your Twilio Console's Verified Caller IDs. For other trial account restrictions and limitations, check out our guide on how to work with your free Twilio trial account.
Next, we'll learn how to respond to a call made to your Twilio phone number. First, we'll need to get an Express server up and running.
When your Twilio number receives an incoming phone call, it will send an HTTP request to a server you control. This callback mechanism is known as a webhook. When Twilio sends your application a request, it expects a response in the TwiML XML format that tells it how to respond to the call.
To handle incoming phone calls we'll need a lightweight web application to accept incoming HTTP requests from Twilio. While you can use any number of web frameworks to make and receive calls from your application, we'll use Node.js with the Express framework in this quickstart.
On the command line, run
_10npm install express --save
Now let's create a file called "server.js" and use the following code to create a server that can handle incoming messages.
Run this server with the following command:
_10node server.js
If you open up the local port at http://127.0.0.1:1337/, you will see that the server running on port 1337 returns some XML to your browser with the message we'd like to read to incoming calls.
Now, all we have to do is expose this endpoint to Twilio.
Before you can instruct Twilio on what to do in response to an incoming call, you first need to expose your server to the public. When you run your local development server, the odds are very high it is only accessible from your local network. But don't worry - we'll show you an easy way to test your server.
Many Twilio products and services use webhooks to communicate with your application. For example, when Twilio receives an incoming call, it reaches out to a specific URL you provide to search for instructions on how to handle the response.
The small piece of code in server.js is an example of one instruction you can use to 'speak' back to the caller. We just have to find a way to expose this server to the public.
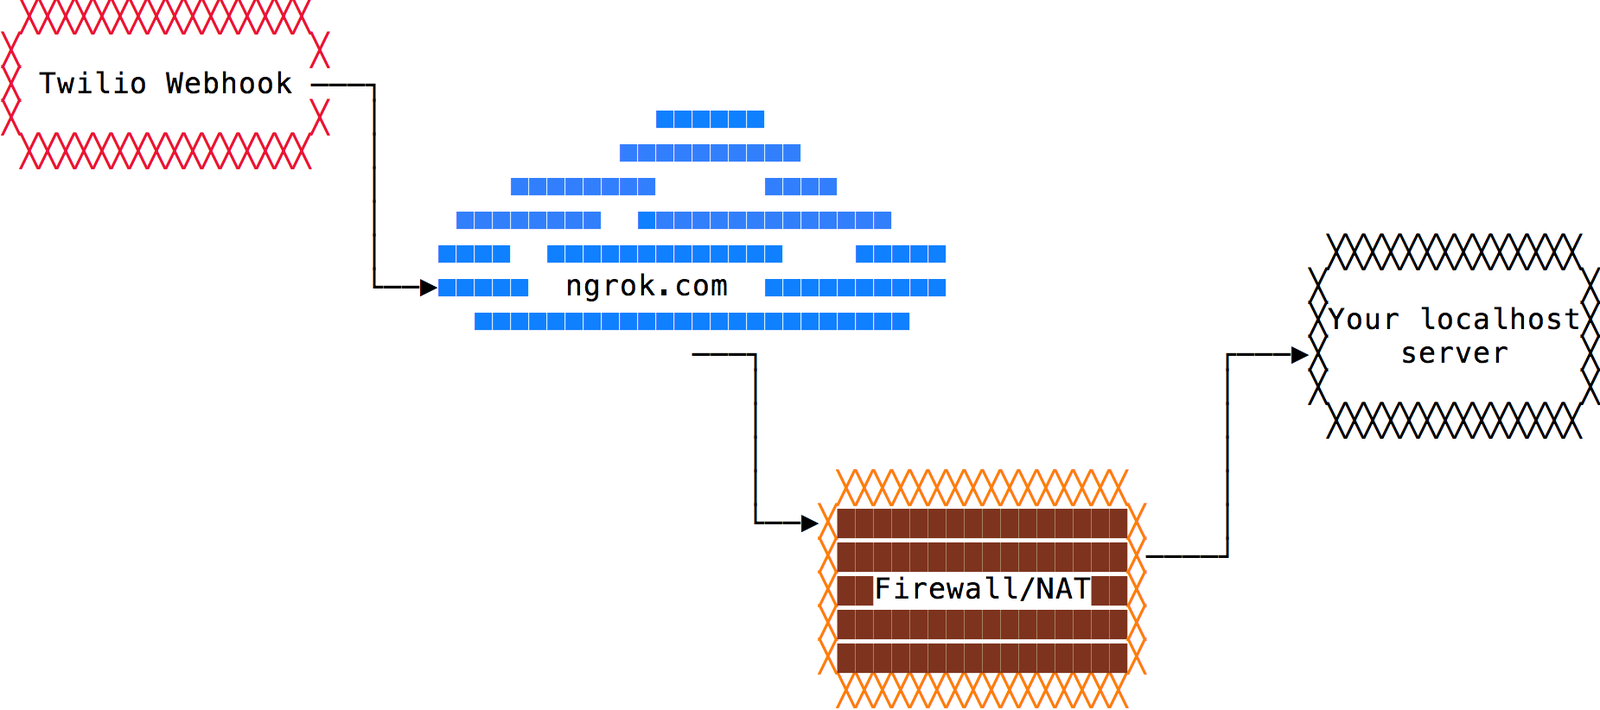
While there are many ways to make this code public (for example by deploying it to a host), we recommend a tool called ngrok. When you start ngrok, it provides a unique URL on the ngrok.io domain and forwards incoming requests to your local development environment.
The architecture looks like this:
If you don't already use ngrok, head over to their download page and grab the appropriate binary for your operating system. Once downloaded, unzip the package.
If you're working on a Mac or Linux, you're all set. If you're on Windows, follow our guide on how to install and configure ngrok on Windows. For more info on ngrok, including some great tips and tricks, check out this in-depth blog post.
Once downloaded, try running the server file we made previously:
_10node server.js
Your local application must be running locally for ngrok to do its magic.
Then open a new terminal tab or window and start ngrok with this command:
_10ngrok http 1337
If your local server is running on a different port, replace 1337 with the correct port number.
You should see output similar to this:
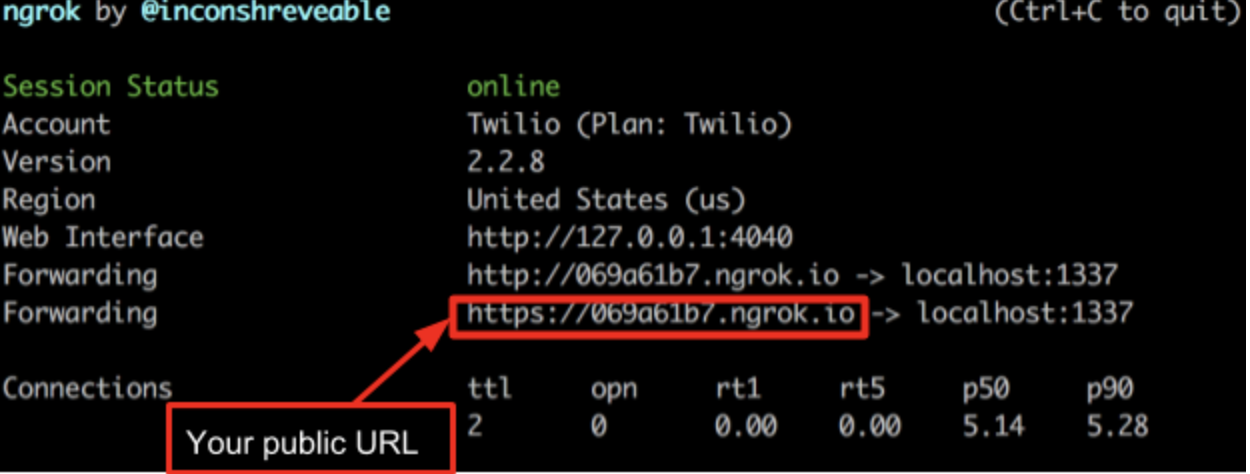
Copy your public URL from this output and paste it into your browser. You should see your Express application's "Hello from your pals at Twilio!" message.
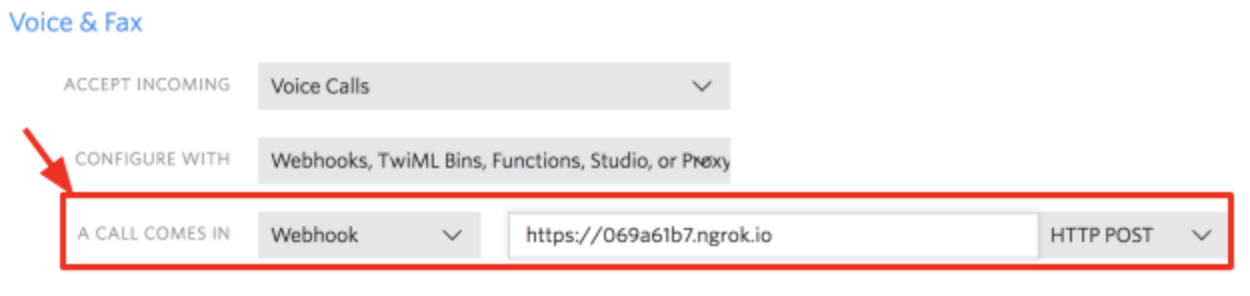
Now, you must take that public URL and configure this as a webhook for one of your phone numbers in the console. Go back to the console, select your phone number, change "A CALL COMES IN" to Webhook, and then put in the external URL to your service, such as "https://069a61b7.ngrok.io/", as shown above.
Make sure to click "save", and head back to your terminal. Make sure ngrok is still running in one tab, and in another, run node server.jsif it is not running already.
Make a phone call to your Twilio phone number. Within a few moments, you'll see an HTTP request in your ngrok console, and you'll hear a short message once the call connects.
And there you go - you've successfully made and received a call with Node.js.
Now you know the basics of making and responding to phone calls with Node.js.
This app only used the <Say> TwiML verb to read a message to the caller using text to speech. With different TwiML verbs, you can create other powerful constructs and call flows. Try a few, such as <Record>, <Gather>, and <Conference>.
Check out these pages to learn more:
- Dig into the Programmable Voice API reference documentation
- Gather user input via keypad (DTMF tones) in Node.js
- Learn how to record incoming and outgoing Twilio Voice phone calls using Node.js and Express
- Create conference calls with Node.js
- Learn how to modify calls in progress
- Check out our full sample application tutorial on how to transfer calls from one support agent to another using Node.js and Express
We can't wait to see what you build!