How to Share Information Between Your Applications
Many telephony use-cases require the ability to associate metadata or other application specific information with a call that is being created. For example, when connecting a customer to an agent, you might want to send the customer's ID or their display name to the agent's application so that they can have more information about the customer that is calling. These use cases are often referred to as contextual calling, as you are providing additional context about the call.
Twilio enables these use cases through the use of custom parameters. Custom parameters can be exchanged between your backend and frontend applications (through Twilio) at call connection time.
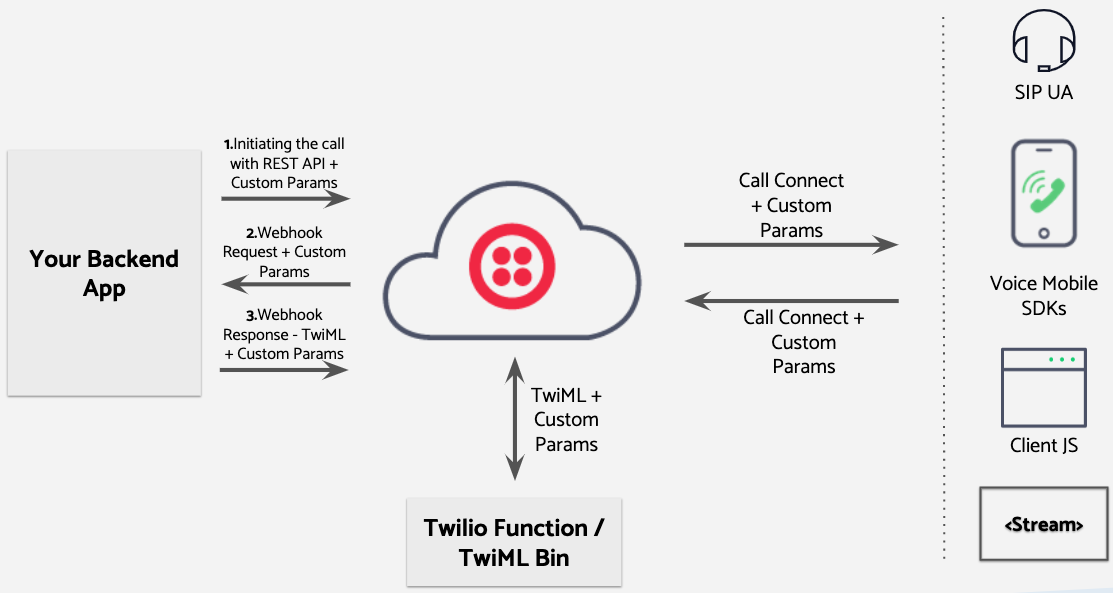
This guide will show you how to exchange custom parameters between your backend and frontend applications. The diagram below illustrates where custom parameters can be exchanged.
Warning
This document outlines how to exchange custom parameters between your backend and frontend applications. It assumes that you have basic knowledge in Programmable Voice concepts including, TwiML, REST APIs and Voice SDKs.
In some examples it also assumes you have experience with setting up TwiML Apps, making API requests to initiate a call, and using one of the Twilio Voice SDKs to make/receive calls.
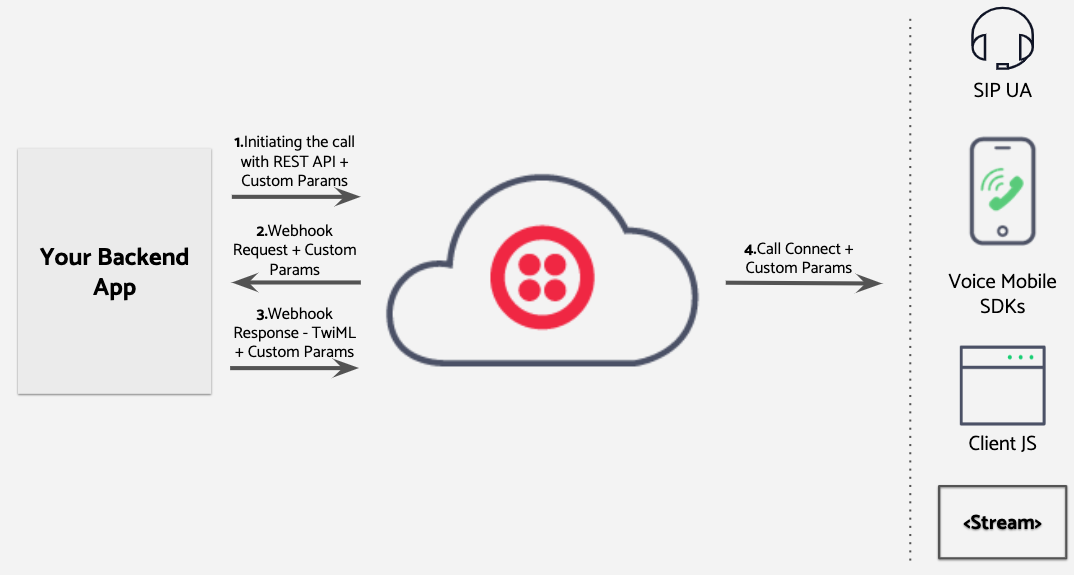
This section shows how you can setup a call using the REST API and pass parameters to your Client applications. The diagram below illustrates the custom parameter flow:
A call may be initiated using the Call or Conference Participant Resource. Both of these resources support passing custom parameters.
When the callee is a SIP endpoint, you can pass custom parameters by appending them to the To parameter:
_10curl -X POST https://api.twilio.com/2010-04-01/Accounts/ACxxxxxxxxxx/Calls.json _10--data-urlencode "Url=https://website.com/instructions" _10--data-urlencode "To=sip:bob@example.com?displayName=Alice&customerID=375d1d60-083b-404d&selectedProductID=87144192-73e2-45a6" _10--data-urlencode "From=+15017122661" _10-u ACXXXXXXXXXXXXXXXXXXXXXXXXXXXXXXXX:your_auth_token
When the callee is a Client endpoint, you can pass custom parameters by appending them to the To parameter:
_10curl -X POST https://api.twilio.com/2010-04-01/Accounts/ACXXXXXXXXXXXXXXXXXXXXXXXXXXXXXXXX/Calls.json_10--data-urlencode "From=+15017122661" _10--data-urlencode "To=client:agentBob?displayName=Alice&customerID=375d1d60-083b-404d&selectedProductID=87144192-73e2-45a6" _10-u ACXXXXXXXXXXXXXXXXXXXXXXXXXXXXXXXX:your_auth_token
To pass parameters to your application, you specify the custom parameters in the Url parameter. For example, to pass the caller display name, customerID and selectedProductID:
_10curl -X POST https://api.twilio.com/2010-04-01/Accounts/ACxxxxxxxxxx/Calls.json _10--data-urlencode "Url=https://website.com/instructions?displayName=Alice&customerID=375d1d60-083b-404d&selectedProductID=87144192-73e2-45a6" _10--data-urlencode "To=+1415555555" _10--data-urlencode "From=+15017122661"
See Retrieving Custom Parameters for how you can read these parameters in your endpoint applications.
With the Conference Participant Resource, you connect an end point to a conference. You can pass Custom Parameters during call setup. For example, if a customer called in regarding a product, you can pass the customerID and selectedProductID to the agent with the following request:
_10curl -X POST https://api.twilio.com/2010-04-01/Accounts/ACXXXXXXXXXXXXXXXXXXXXXXXXXXXXXXXX/Conferences/CFXXXXXXXXXXXXXXXXXXXXXXXXXXXXXXXX/Participants.json _10--data-urlencode "From=+15017122661" _10--data-urlencode "To=client:agentBob?displayName=Alice&customerID=375d1d60-083b-404d&selectedProductID=87144192-73e2-45a6" _10-u ACXXXXXXXXXXXXXXXXXXXXXXXXXXXXXXXX:your_auth_token
See Retrieving Custom Parameters for how you can read these parameters in your endpoint applications.
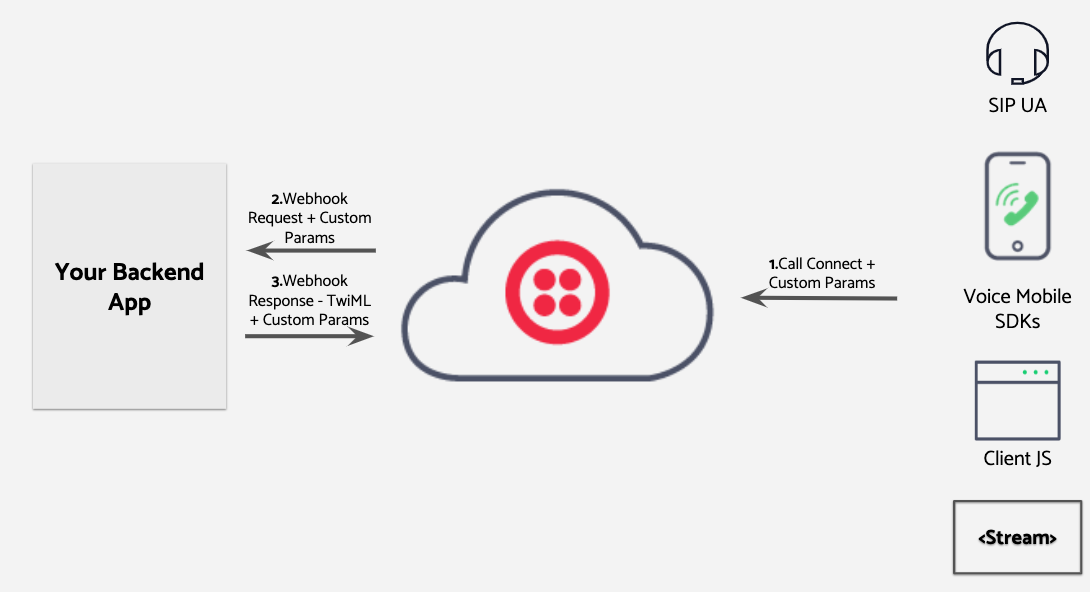
Twilio retrieves the instructions to connect a call by sending a request to the address you configured. Twilio will populate the request with all the custom parameters that was received from the REST API (or from the end points).
For example, if you configured your TwiML app with the request URL https://webstite.com/instructions, Twilio will append all Custom Parameters https://webstite.com/instructions?displayName=Alice&customerID=12345678&selectedProductId=77788 before sending the request to your server at that URL.
The TwiML instructions you respond with can also include custom parameters that Twilio will forward to the end points. You can send custom parameters to Voice JavaScript SK, Voice Mobile SDKs, SIP user agents, and to MediaStreams.
The following TwiML illustrates how you could send a customerID custom parameter to Voice SDKs:
_11<?xml version="1.0" encoding="UTF-8"?>_11<Response>_11 <Dial>_11 <Client>_11 <Identity>alice</Identity>_11 <Parameter name="displayName" value="Alice"/>_11 <Parameter name="customerID" value="375d1d60-083b-404d"/>_11 <Parameter name="selectedProductID" value="87144192-73e2-45a6"/>_11 </Client>_11 </Dial>_11</Response>
The following TwiML example illustrates how you can send the same parameter to a SIP user agent:
_10<?xml version="1.0" encoding="UTF-8"?>_10<Response>_10 <Dial>_10 <Sip>sip:+15105555555@yourdomain.com?X-displayName=Alice&X-customerID=375d1d60-083b-404d&X-selectedProductID=87144192-73e2-45a6</Sip>_10 </Dial>_10</Response>
For more information about using custom parameters with SIP user agents, refer to Sending SIP X-Headers, Receiving SIP X-Headers and Custom Headers.
You can also pass custom parameters when starting a Media Stream:
_10<?xml version="1.0" encoding="UTF-8"?>_10<Response>_10 <Start>_10 <Stream url="wss://mystream.ngrok.io/example" >_10 <Parameter name="customerID" value="375d1d60-083b-404d"/>_10 <Parameter name="selectedProductID" value="87144192-73e2-45a6"/>_10 </Stream>_10 </Start>_10</Response>
Once Twilio receives the TwiML instructions to connect a call, it will initiate the call to the end point and pass along the associated custom parameters. The end points can now read these parameters. The following sections show how to read custom parameters in the supporting end points.
Continuing from the previous example, you can use call.customParameters to read the custom parameters you sent to your front-end application.
_14if (call.customParameters.hasOwnProperty("displayName")) {_14 let displayName = call.customParameters.get("displayName");_14 // Do something with displayName_14}_14_14if (call.customParameters.hasOwnProperty("customerID")) {_14 let customerID = call.customParameters.get("customerID");_14 // Do something with customerID_14}_14_14if (call.customParameters.hasOwnProperty("selectedProductID")) {_14 let selectedProductID = call.customParameters.get("selectedProductID");_14 // Do something with selectedProductID _14}
To read the custom parameters sent to your mobile app, use TVOCallInvite.customParameters (iOS), CallInvite.getCustomParameters() (Android).
The parameters can then be retrieved from the Start Message start.customParameters attribute.
Just like you can pass custom parameters from your infrastructure to your frontend applications, the Twilio Voice SDKs allow you to pass Customer Parameters when connecting to Twilio.
When placing an outbound call, the Voice SDK allows you to pass Custom Parameters and when receiving a call, Voice SDK allows you to retrieve the Custom Parameters send via your TwiML instructions.
Let's say your user is navigating your site and needs help with a specific product. By enabling calling from the browser, you could use Custom Parameters to send the user's ID and the product they need help when setting up the call to your contact center.
_10let connection = Twilio.Device.connect({_10 "customerID": "375d1d60-083b-404d", _10 "selectedProductID": "87144192-73e2-45a6"_10});
More information can be found in the Device documentation.
Just like the Voice JavaScript SDKs, the Voice Mobile SDKs (iOS, Android, and React Native) support sending Custom Parameters when placing outbound calls and receiving custom parameters when receiving a call.
Info
Note, this feature is available from version 3.0 onwards.
_10let connectOptions: TVOConnectOptions = TVOConnectOptions(accessToken: accessToken) { (builder) in_10 builder.params = [_10 "customerId" : "375d1d60-083b-404d", _10 "productID" : "87144192-73e2-45a6"_10 ]_10 }_10 self.call = TwilioVoice.connect(with: connectOptions, delegate: self)
To send Custom Parameters from your mobile app, use TVOConnectOption.params (iOS) and ConnectOptions.Builder params(Map<String,String> params) (Android)
Twilio makes it possible to send custom parameters when calling using a SIP UA (User Agent). Simply prepend X- to your SIP header name and add it to the SIP message before sending it to Twilio. Here's an example header:
_10X-CustomerID: 375d1d60-083b-404d
The headers you prepend with X-, will be sent as request parameters in the webhook requested from your server.
For example, if you send the following SIP headers in your SIP message:
_10X-CustomerID: 375d1d60-083b-404d_10X-SelectedProductID: 87144192-73e2-45a6
Twilio will send the following webhook request to your server in the following format:
_10SipHeader_X-CustomerID: 375d1d60-083b-404d_10SipHeader_X-SelectedProductID: 87144192-73e2-45a6
If you configured your server URL to https://website.com/instructions, the request sent to your server will include the custom parameters:
https://website.com/instructions?SipHeader_X-CustomerID=375d1d60-083b-404d&SipHeader_X-SelectedProductID=87144192-73e2-45a6
For more information about SIP custom parameters, see sending SIP custom headers and receiving SIP custom headers. Note, SIP also supports the user to user information header for exchanging custom data.
With TwiML Bin templates, you can read the Custom Parameters from the request using the Mustache template syntax to dynamically insert content into your returned TwiML.
With a request https://twilio.com/twimlbin-1?customerID=375d1d60-083b-404d&selectedProductID=87144192-73e2-45a6 you can retrieve the values for customerID and selectedProductID as follows:
_10<?xml version="1.0" encoding="UTF-8"?>_10<Response>_10 <Dial>_10 <Client>_10 <Identity>alice</Identity>_10 <Parameter name="customerID" value="{{ customerID }}"/>_10 <Parameter name="selectedProductID" value="{{ selectedProductID }}"/>_10 </Client>_10 </Dial>_10</Response>
Learn more about template parameters and TwiML Bin dynamic content.
The following example shows how you can create a Twilio Function that returns TwiML with custom parameters:
_16exports.handler = function(context, event, callback) {_16 let twiml = new Twilio.twiml.VoiceResponse();_16_16 const dial = twiml.dial({_16 callerId: context.CALLER_ID_16 });_16_16 const client = dial.client({}, "alice");_16 const parameter = client.parameter({_16 name: "customerID", _16 value: event.customerID_16 }); // Read the value from the request parameter list_16_16_16 callback(null, twiml);_16};
Parameters may be sent over certain channels that restrict the length. We don't recommend sending more than a combined total of 800 bytes for the custom parameters.