Get Started with Super SIM eSIM Profiles for eUICCs
Traditional SIMs, whether they are in the form of cards or embedded chips, contain connectivity settings for a single connectivity provider. This provider may be a mobile network operator such as AT&T, or a company like Twilio that leverages networks from all over the world. Whoever the provider, their settings are stored in a profile. A traditional SIM's profile is baked in at manufacture and can't be changed. There is a one-to-one correspondence between SIM and profile.
eSIMs — which may be embedded, but need not be — are not bound to specific profiles, and the profiles they contain are not fixed in place. On the contrary: eSIMs, unlike traditional SIMs, can contain multiple profiles, can switch between them, and can download further profiles over the air.
You can think of each eSIM profile as a virtual SIM card. Switching from one profile to another is the digital equivalent of swapping SIM cards.
Info
An eSIM is embodied in a physical unit called an Embedded Universal Integrated Circuit Card (eUICC). For this reason, the term 'eUICC' is often used interchangeably with 'eSIM'. We'll use 'eSIM' here. eUICCs are chips, and may be integrated into a cellular module or the host device, or even implemented as a SIM card.
There's a clear benefit to this ability: an eSIM-equipped device can switch from one network provider to another just by downloading and activating a new profile. This can happen entirely under the control of the application — the end-user need never know a change has taken place. For remote devices in locations where it is unfeasible to send an engineer to swap SIM cards, it makes connectivity switches possible.
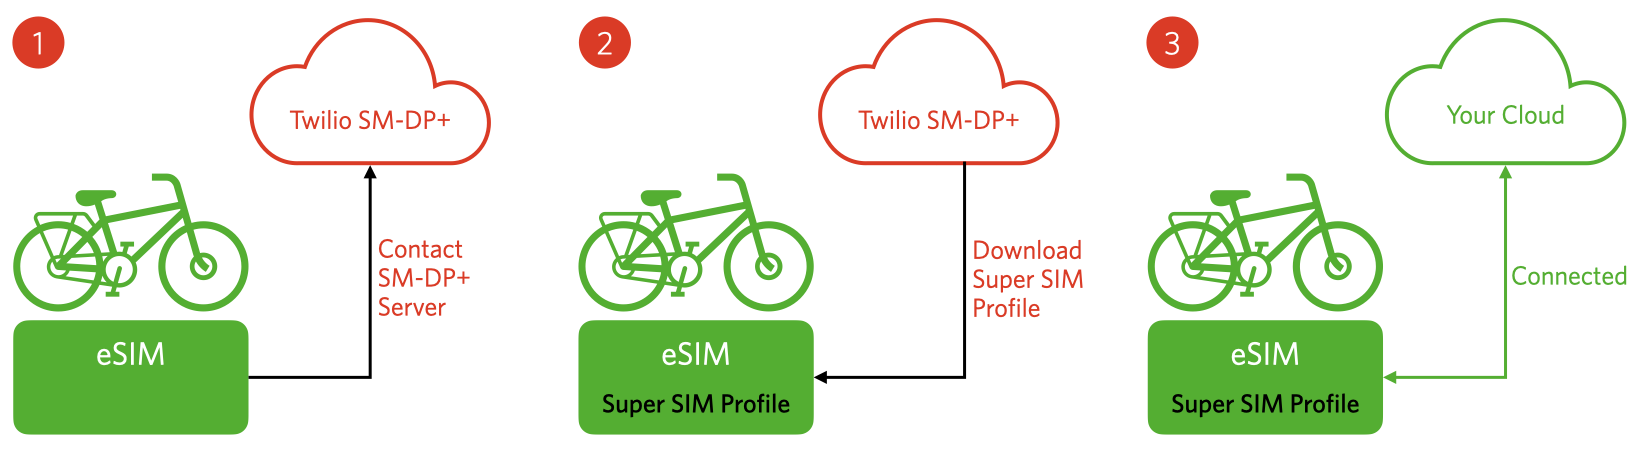
An eSIM example: the IoT device, a hire bike, powers up for the first time, It requests and downloads a Super SIM profile to its eSIM in order to get connected to its home base over cellular
No wonder that device manufacturers are increasingly demanding eSIMs for their connected products. The good news is, Twilio fully supports eSIMs to allow customers who have chosen to incorporate eSIMs into their products to take full advantage of Super SIM's global connectivity via multiple tier-1 networks.
This short guide will introduce you to working with Super SIM and an eSIM-equipped device. You can follow along to set up an eSIM-compatible tablet or phone as a stand-in for your IoT device to give you a clear picture of the device side of the process. However, all the API calls used in the walkthrough and the sequence of steps is the same whatever hardware your IoT product is based on.
Info
If you're ready to implement eSIM Profiles, you should visit How to Use Super SIM eSIM Profiles which contains more detail than this introductory guide, and is focused on using profiles with IoT devices.
You can get a clear picture of how Super SIM's eSIM profiles work by trying them out for yourself. Many leading Android devices, such as the Google Pixel 4, 5 and 6, support eSIMs via a built-in eUICC. Additionally, iPad Pros released since 2018, and iPads, iPad Airs and iPad Minis released since 2019, all feature an eUICC too. These devices all use the consumer eSIM architecture.
There are two different types of eSIM profile, consumer and M2M, and they are not interchangeable. Twilio currently supports consumer profiles only. If you'd like to learn more about the differences and why Twilio believes consumer profiles are best for IoT, read our blog post on the benefits of Consumer Profile eSIMs for IoT devices.
Warning
iOS doesn't always play well with Super SIM eSIM profiles. Every Super SIM will switch between multiple IMSIs depending on the country in which the device is being used. For some IMSIs, iOS, particularly on iPhones, may prevent you from changing from the APN. If you can't change the APN to super, you will not be able to use data. Tools like Apple Configurator can help you get around this limitation if iOS is preventing you from setting the APN. Unless you really need to use iOS, we recommend you try Super SIM profiles on an Android device.
In addition to a mobile device containing an eSIM, you'll also need a computer which you'll use to interact with the Super SIM API through a terminal app. The commands are shown from the perspective of a Unix machine like a Mac or a Linux box, but they can also be run under Windows 10 PowerShell or Windows Terminal — you'll just see a slightly different prompt. You'll use the cross-platform Twilio CLI tool, which you'll need to install and configure.
The crucial point is that, from an API perspective, the actions you'll perform in the steps below will be exactly the same as those you'll implement to provision the off-the-shelf eUICCs in your IoT devices.
There are a number of ways to install a Super SIM eSIM profile on your device. Super SIM supports the following methods:
Activation Code uses a code, often embedded in a QR code, which can be read using a device's camera, if it has one, or entered via a keypad. This is a better method for applications built on tablets or phones. It doesn't require you to know the EID of the device that will claim the profile, which any eSIM capable device can use — though once claimed, the profile can only be used with the device that claimed it.
Default SM-DP+ is more typically used by applications which don't need to allow the end-user to set up cellular connectivity, such as traditional IoT applications. The eSIM profile is bound to the eSIM's unique ID (EID), which you need to know up front, and can only be used with that eSIM. That said, it's also supported by iOS and Android, so we'll show how it's done there too.
On your computer, enter the following command in a terminal:
_10curl -X POST https://supersim.twilio.com/v1/ESimProfiles \_10 --data-urlencode "GenerateMatchingId=true" \_10 -u '<YOUR_ACCOUNT_SID>:<YOUR_AUTH_TOKEN>'
Info
We're using curl here because Activation Code has not yet been added to the Twilio CLI. We're working on it. Look out for an update shortly.
Warning
If you're using Windows, make sure you change the line continuation symbol shown here, ``, to one appropriate for the shell you're using.
This will create a new eSimProfile resource — the API's representation of the eSIM profile you are creating. The command will display information about the new eSimProfile. The command above will display information about the new eSimProfile. Make a note of its SID, which will be 32 characters long, starting with HP.
Run the following command:
_10twilio api:supersim:v1:esim-profiles:fetch \_10 -o=json --sid=<YOUR_ESIM_PROFILE_SID>
In the JSON displayed, check the value of the status key. When it is available, you're ready for the next step, but you may see reserving instead. This means Twilio is still in the process of setting up the new eSIM profile. Wait a couple of minutes and try again. In a real-world application, you'd add a callback URL to the API call. Twilio will then post notifications to this URL whenever the eSimProfile resource's status changes and when it is eventually downloaded to an eSIM.
When the eSIM Profile has been reserved, Twilio creates a Sim resource to represent the eSIM in your device. Note down the new Sim's SID, which is the value of the sim_sid key in the output from the previous step. Make a note too of the values of the smdp_plus_address key and matching_id keys. You'll use these values shortly to construct the Activation Code.
If you don't already have a Fleet resource, you'll need to create one now and set up its Network Access Profile — the list of global cellular networks its member SIMs are able to connect to. If you need a hand, jump to our Network Access Profiles guide and we'll show you how to do this. Whether you use an existing Fleet or create a new one, you'll need its SID, which you can grab from Console.
_10twilio api:supersim:v1:sims:update \_10 --sid=<YOUR_SIM_SID> \_10 --fleet=<YOUR_FLEET_SID> \_10 --status=active
Take the smdp_plus_address and matching_id values you got in Step 3, and paste them into a string as follows:
_101$<YOUR SMDP_PLUS_ADDRESS>$<YOUR_MATCHING_ID>
This is your eSimProfile's Activation Code. You can enter this manually into your device, but it's more fun to convert it into a QR code which your device can scan. To do so, first add LPA: to the start of the string — this tells the QR code scanner how to handle the decoded code:
_10LPA:1$<YOUR SMDP_PLUS_ADDRESS>$<YOUR_MATCHING_ID>
Now paste the complete string into any QR code generation software. There are many free services on the web, or you can use an API like Google's:
_10curl -X POST https://chart.googleapis.com/chart \_10 -d cht=qr \_10 -d chs=256x256 \_10 -d chl='LPA:1$<SM-DP_ADDRESS>$<MATCHING_ID>' \_10 -o qr-code.png
This will save a QR code graphic in your current working directory. Open it up so it's visible on your screen.
Go to your mobile device.
Warning
Due to the many difference between Android versions and the OS' implementation by phone and tablet manufacturers, the following references to sections, pages, and controls in the Android UI may not fully match those on your own device. However, you'll find items that are similar — use those.
- Go to the Settings > Network and Internet .
- In the SIMs section, tap the + icon on the right-hand side of the screen.
- On the Connect to Mobile Network page, tap Download a SIM instead? .
- You'll be asked if you want to use two SIMs — tap Yes .
- On the Download your SIM page, just tap Next .
- Scan the QR code displayed on your computer screen.
- On the Use page, tap Download .
- On the Download finished page, tap Settings .
- On the SIMs page, under DOWNLOADED SIM , tap Inactive .
- On the next page, turn the Use SIM toggle on.
- You'll be asked if you want to turn on the SIM — tap Yes .
- You'll be asked to select a SIM for mobile data — select your eSIM. This may be number 1 or number 2, depending on your device, and whether it also has a physical SIM fitted.
- Finally, on the next screen, turn the Roaming toggle on.
- Go to Settings > Mobile Data or Settings > Cellular Data . Which of these you'll see will depend on your region.
- Scroll down and tap Add Data Plan or Add Cellular Plan . If you're working with a new device, you'll see a list of network providers, but just tap Other… .
- Scan the QR code displayed on your computer screen.
- On the Add Data Plan panel, tap the Add Data Plan or Add Cellular Plan button.
- There'll be a short period while the plan is downloaded and activated. The main Mobile Data settings will be disabled while activation is taking place.
- Go to Settings > Mobile Networks > Advanced .
- Scroll down and tap Access Point Names .
- Tap the three dots menu icon and select New APN .
-
Tap
Name
, enter
Twilioin the pop up, then tap OK . -
Tap
APN
, enter
superin the pop up, then tap OK . - Tap the three dots menu icon and select Save .
- In the list of APNs, make sure Twilio is selected.
- Go to Settings > Mobile Data or Settings > Cellular Data . Which of these you'll see will depend on your region.
- Tap on Mobile Data Options or Cellular Data Options . Again, which of these you see will depend on your region.
- Enable roaming by turning on the Data Roaming toggle.
- Go back to the Mobile Data or Cellular Data screen and tap on APN Settings .
-
Enter
superin the first APN field. Don't enter a username or password.
And you're done. Your device's eSIM will now connect to the Internet via the Twilio Distributed IoT Mobile Core and any of the cellular networks across the globe that you have assigned to the Network Access Profile associated with your eSIM's Fleet. Make sure the device's WiFi connectivity is turned off and try visiting some websites.
If you're not interested in the Default SM-DP+ profile installation method, you can jump to the last section.
Go to your mobile device.
Warning
Due to the many difference between Android versions and the OS' implementation by phone and tablet manufacturers, the following references to sections, pages, and controls in the Android UI may not fully match those on your own device. However, you'll find items that are similar — use those.
- Open the device's Settings app.
- Tap Phone > SIM status , and scroll down to EID .
- At the home screen, tap on Settings .
- Go to General > About and scroll down to EID .
Write down your device's EID — you'll need it in the next step — or keep the unit turned on beside you.
On your computer, enter the following command in a terminal, making sure you replace <YOUR_DEVICE_EID> with the value you noted down in Step 1. Enter it carefully — it's a 32-digit number, so it's easy to mis-key.
_10twilio api:supersim:v1:esim-profiles:create \_10 --eid=<YOUR_DEVICE_EID>
This will create a new eSimProfile resource — the API's representation of the eSIM profile you are creating. The command will display information about the new eSimProfile. Make a note of its SID, which will be 32 characters long, starting with HP. We'll use this value in the next step.
Run the following command:
_10twilio api:supersim:v1:esim-profiles:fetch \_10 -o=json --sid=<YOUR_ESIM_PROFILE_SID> \
In the JSON displayed, check the value of the status key. When it is available, you're ready for the next step, but you may see reserving instead. This means Twilio is still in the process of setting up the new eSIM profile for the specified EID. Wait a couple of minutes and try again. In a real-world application, you'd add a callback URL to the API call. Twilio will post notifications to this URL whenever the eSimProfile resource's status changes and when it is eventually downloaded to its target eSIM.
When the eSIM profile has been reserved, Twilio creates a Sim resource to represent the eSIM in your device. From this point, you'll use this Sim resource just like any other Super SIM. The new Sim's SID is the value of the sim_sid key in the output from Step 3, above. Make a note of it; you'll use it in a moment to activate it and add it to a Fleet.
In addition to the sim_sid key, grab the value of the smdp_plus_address key. This is the address of the server your device will contact to download its new eSIM Profile.
If you don't already have a Fleet resource, you'll need to create one now and set up its Network Access Profile — the list of global cellular networks its member SIMs are able to connect to. If you need a hand, jump to our Network Access Profiles guide and we'll show you how to do this. Whether you use an existing Fleet or create a new one, you'll need its SID, which you can grab from Console.
Run the following command to add the eSIM to a Fleet and to activate it. Just replace <YOUR_SIM_SID> with the Sim SID you retrieved in the previous step, and <YOUR_FLEET_SID> with the target Fleet's SID:
_10twilio api:supersim:v1:sims:update \_10 --sid=<YOUR_SIM_SID> \_10 --fleet=<YOUR_FLEET_SID> \_10 --status=active
Go back to your mobile device.
- Open the device's Settings app.
- Go to Network and Internet > SIMs , and tap the + icon on the right-hand side of the screen.
- Tap Download a SIM instead? at the bottom of the screen.
- On the Use 2 SIMs? panel that will appear, tap Yes .
- On the Download your SIM page, tap Next .
- On the Scan QR code from network page, tap Need Help? at the bottom.
- On the Help adding a network page , find and tap the Enter it manually link.
- On the next screen, enter the URL you received in Step 2, above, then tap Continue .
- You'll be asked if you want to use the eSIM — tap Download .
- There'll be a short period while the eSIM profile is downloaded.
- On the Download Finished screen, tap Settings .
- Back at the SIMs page, tap the downloaded SIM.
- Switch the Use SIM toggle to on, and then confirm when asked by tapping Yes .
- When asked, select the eSIM for data.
- Make sure the eSIM's Mobile data and Roaming toggles are on.
- Go to Settings > Mobile Data or Settings > Cellular Data . Which of these you'll see will depend on your region.
- Scroll down and tap Add Data Plan or Add Cellular Plan . If you're working with a new device, you'll see a list of network providers, but just tap Other... .
- The iOS UI is designed to scan a QR code from an operator, but you should instead tap Enter Details Manually at the bottom of the screen.
-
On the
Enter Activation Code
panel, enter the value of the
smdp_plus_addresskey you got earlier into the SM-DP+ Address field. Leave the other two fields blank. - Tap Next .
- On the Add Data Plan panel, tap the Add Data Plan or Add Cellular Plan button.
- There'll be a short period while the the plan — the eSIM profile, in other words — is downloaded and activated. The Mobile Data settings will be disabled while activation is taking place.
- Go to Settings > Mobile Networks > Advanced .
- Scroll down and tap Access Point Names .
- Tap the three dots menu icon and select New APN .
-
Tap
Name
, enter
Twilioin the pop up, then tap OK . -
Tap
APN
, enter
superin the pop up, then tap OK . - Tap the three dots menu icon and select Save .
- In the list of APNs, make sure Twilio is selected.
- Go to Settings > Mobile Data or Settings > Cellular Data . Which of these you'll see will depend on your region.
- Tap on Mobile Data Options or Cellular Data Options . Again, which of these you see will depend on your region.
- Enable roaming by turning on the Data Roaming toggle.
- Go back to the Mobile Data or Cellular Data screen and tap on APN Settings .
-
Enter
superin the first APN field. Don't enter a username or password.
And you're done. Your device's eSIM will now connect to the Internet via the Twilio Distributed IoT Mobile Core and any of the cellular networks across the globe that you have assigned to the Network Access Profile associated with your eSIM's Fleet. Make sure the device's WiFi connectivity is turned off and try visiting some websites.
You've learned how eSIMs work and how they are configured with eSIM profiles. You've seen how the Twilio Super SIM API makes it easy to set up new eSIM profiles and use each one's associated Sim resource to bring connectivity to a device.
In the tutorial, that device was a mobile phone or tablet, but it could just as easily have been any IoT device that you, or your end-users, will deploy. It works just the same way. You can take any off-the-shelf eUICC hardware compatible with the consumer eSIM profile specification, create and install a Super SIM eSIM profile onto it, and by doing so allow it to connect through mobile networks across the globe.
We can't wait to see what products you build and connect.