Get Started with Super SIM Connection Events
Twilio Event Streams is a new, unified mechanism to help you track your application's interactions with Twilio products. Event Streams spans Twilio's product line to provide a common event logging system that supports product-specific event types in a consistent way. You use a single API to subscribe to the events that matter to you.
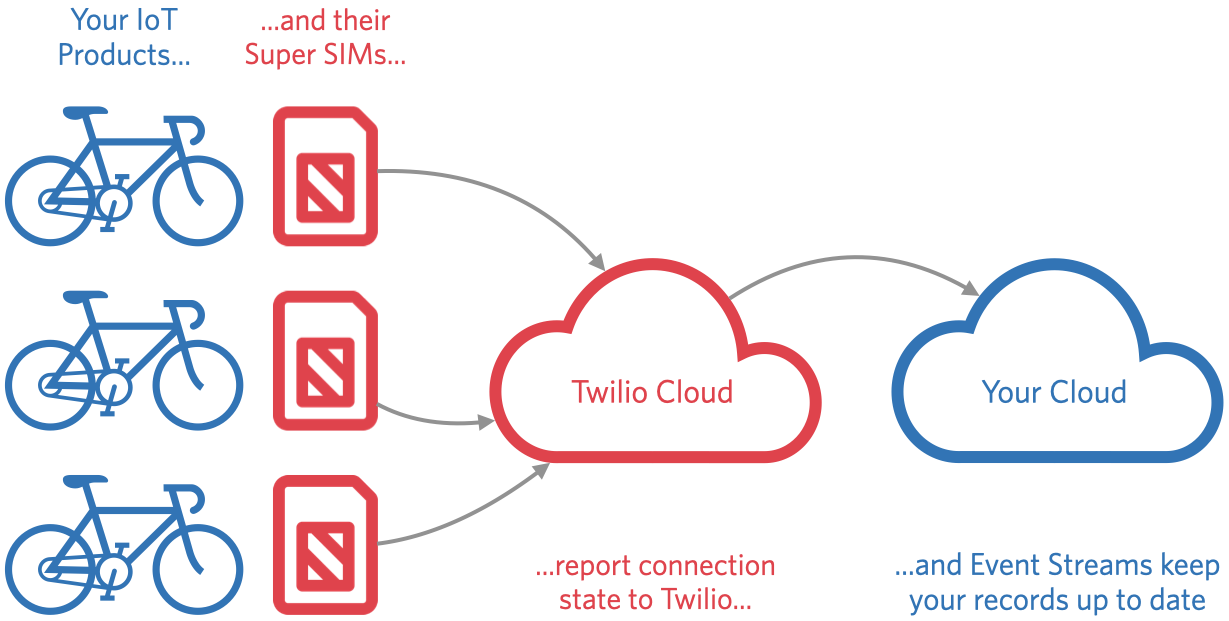
Super SIM provides a set of event types focused on devices' attempts to attach to cellular networks and, once they are connected, the data sessions they establish to send and receive information.
This tutorial will show you how the Event Streams API works and how you can use it to monitor your Super SIMs. If you've already set up Event Streams for another Twilio product, then you may prefer to jump straight to the documentation that describes the event types unique to Super SIM. No problem. But if you're keen to try Event Streams for the first time to see how this API might help you monitor your IoT fleet, read on.
Info
Event Streams currently supports two destinations for your events: AWS Kinesis and webhooks. For real-world large-scale applications you'll most likely prefer the scalability and flexibility of AWS Kinesis, but webhooks provide an easy starting point for smaller apps, API testing and during development, so that's the approach we're taking here.
However, for those of you looking to make the jump to a more sophisticated setup, we have a tutorial that takes you through setting up AWS Kinesis to relay events to ElasticSearch and to use Kibana as an events monitor dashboard.
This tutorial assumes you're on a Linux box or a Mac, but it should work under Windows. We'll note Windows-specific points as we come to them. Whatever platform you're using, we'll take it as a given that you have Python 3 installed and that you're familiar with the basics of the language. Likewise using the command line on your preferred platform.
OK. Let's get started.
The first thing to do is gather the software you will need to complete the tutorial. You'll be using a specific setup to trial Event Streams with Super SIM and while this may not mirror the tools you'd use in a real-world application, it will give you a clear picture of how the system works.
- Install and set up Twilio's CLI tool: this Quickstart guide will show you how.
-
Install the Python tools Falcon and Gunicorn:
pip3 install falcon gunicorn -
If you're using Windows but not running the
Windows Subsystem for Linux
, omit
gunicornand installwaitressinstead. -
Download
Ngrok then install it by unzipping the download file and moving the
ngrokbinary to your current working directory. Ngrok is free to use but it requires you to set up an account in order to get a token to authorize its usage. Go and sign up now. - Go to the Ngrok dashboard and copy your AuthToken .
-
Hop back to your terminal and configure Ngrok with
ngrok config add-authtoken <YOUR_AUTH_TOKEN>, replacing the placeholder text with the token you copied in the previous step.
With the tools in place, you need to establish a server on your machine that will receive Super SIM events streamed from Twilio. This is what Falcon and Gunicorn are for. Falcon is an app server and it operates via a basic web server — Gunicorn in this case. First, though you need an app to serve, so copy the code below into a text editor then save it in your working directory as server.py.
_34# 'wsgiref' is provided by Gunicorn/Waitress_34from wsgiref.simple_server import make_server_34import falcon, json_34_34class Event(object):_34 def on_post(self, req, resp):_34 # Configure the response to Twilio_34 resp.status = falcon.HTTP_201_34 resp.body = json.dumps({"success": True})_34_34 # Parse the received data and extract some_34 # of the information it contains_34 if req.content_length:_34 data = json.load(req.stream)[0]_34 sim_data = data["data"]_34 event_type = sim_data["event_type"]_34 time_stamp = sim_data["timestamp"]_34 sim_name = sim_data["sim_unique_name"]_34 if not len(sim_name):_34 sim_name = sim_data["sim_sid"]_34 if not time_stamp in events:_34 events[time_stamp] = "TWILIO EVENT " + event_type + " received from SIM " + sim_name_34 print(events[time_stamp],"at",time_stamp)_34_34# Main entry point_34if __name__ == '__main__':_34 events = {}_34 app = falcon.App()_34 eventHandler = Event()_34 app.add_route('/events', eventHandler)_34_34 with make_server('', 8000, app) as httpd:_34 print('Serving on port 8000...')_34 httpd.serve_forever()
This code uses Falcon to set up an endpoint for POST requests at the path /events. It then serves the endpoint on port 8000. When a POST request is received, it's passed into the function on_post(), which configures a status code 201 ('object created') response, and then prints some of the data included in the event so you can view events as they arrive.
Open a terminal on your system, navigate to the file you just saved and run this command:
_10python server.py
You'll see the server start and begin listening on port 8000. Remember the port number — you'll need it in the next step.
Your event receiver is only accessible on your own machine. You need to expose it to the Internet so that Twilio can reach it too. The most secure and anonymous way to do this is to use Ngrok, which routes over a virtual private network (VPN) to your computer any HTTP requests that are sent to a temporary public URL.
Not only is it secure, but it's also free and you don't even need to set up an account if you're happy running it for a limited period at any one time.
Open up another terminal tab or window, navigate to where you placed the ngrok binary you downloaded in Step 2, and run this command:
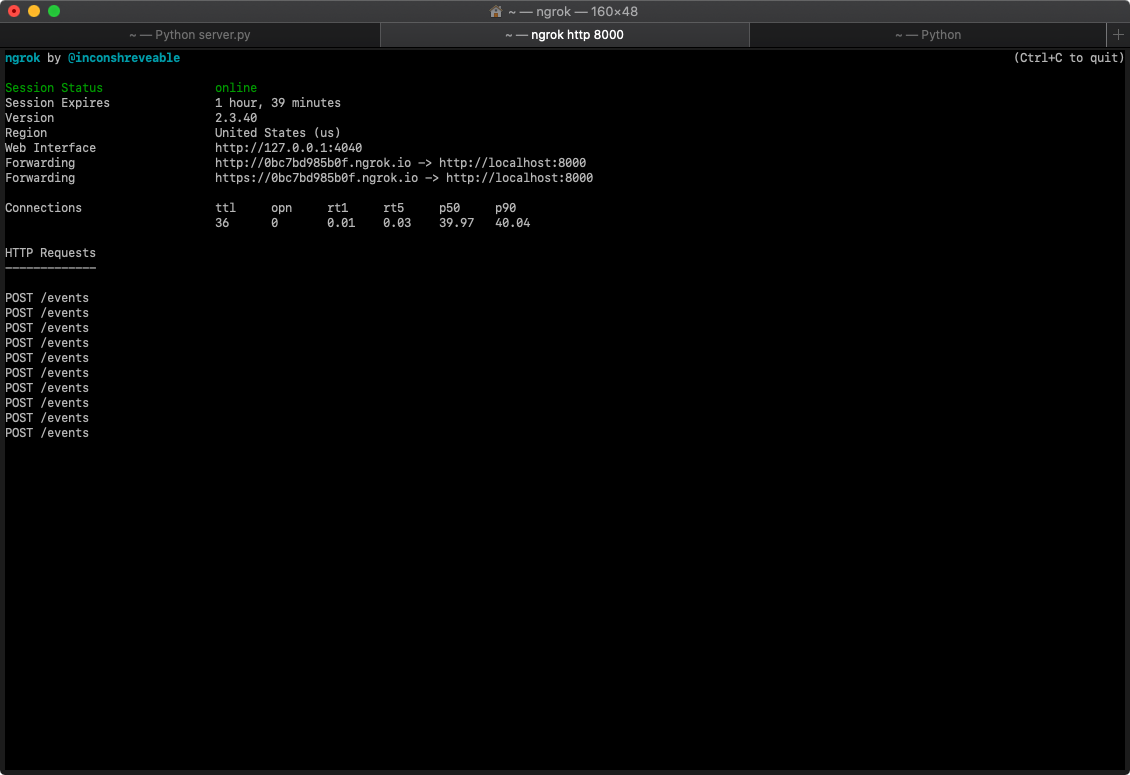
_10ngrok http 8000
You'll recognize the port number from Step 3.
Ngrok will output a bunch of information — make a note of the https forwarding address. It'll be something like https://4a4cb93787ca.ngrok.io and it will be forwarding to http://localhost:8000 which is your event handler. It will look something like this:
A Sink is an Event Stream destination. To set up a Sink, you create a Sink resource using the Event Streams API. Event Streams currently support two Sink types: AWS Kinesis and webhooks. The former requires an AWS account, so we're going to demo Event Streams with a webhook. To be precise, you're going to configure Event Streams to send events to your event handler via Ngrok.
Open a third terminal tab or window, and run the following command:
_10twilio api:events:v1:sinks:create --description SuperSimSink \_10 --sink-configuration '{"destination":"<YOUR_NGROK_URL>/events","method":"POST","batch_events":false}' \_10 --sink-type webhook
You'll need to enter the Ngrok forwarding URL from Step 4. Make sure you don't overwrite the /events in the destination field — this is the endpoint defined in your server code in Step 3.
The command creates a Sink and outputs the new Sink's SID, which you'll need to paste into the code in the next step. If you get an error, check that you entered the command correctly.
Event Streams uses a publish-subscribe (aka 'pub-sub') model: you subscribe to the events that interest you, and Twilio will publish those events to your Sink.
There are six Super SIM event types, each identified by a reverse domain format string:
| Event Type | ID String |
|---|---|
| Attachment Accepted | com.twilio.iot.supersim.connection.attachment.accepted |
| Attachment Rejected | com.twilio.iot.supersim.connection.attachment.rejected |
| Attachment Failed | com.twilio.iot.supersim.connection.attachment.failed |
| Data Session Started | com.twilio.iot.supersim.connection.data-session.started |
| Data Session Updated | com.twilio.iot.supersim.connection.data-session.updated |
| Data Session Ended | com.twilio.iot.supersim.connection.data-session.ended |
The types are largely self explanatory. The exception is Attachment Failed, which is a generic 'could not connect' error that you may encounter when your device tries to join a cellular network.
In a typical connection sequence, you would expect to receive: one Attachment Accepted, one Data Session Started, and then multiple Data Session Updated events. When your device disconnects, you'll receive a Data Session Ended event at that point.
Now let's set up some subscriptions.
To get events posted to your new Sink, you need to create a Subscription resource. This essentially tells Twilio what events you're interested in. Once again, copy and paste the following command, adding in your Sink SID from the previous step:
_10twilio api:events:v1:subscriptions:create \_10--description "Super SIM events subscription" \_10--sink-sid <YOUR_SINK_SID> \_10--types '{"type":"com.twilio.iot.supersim.connection.attachment.accepted","schema_version":1}' \_10--types '{"type":"com.twilio.iot.supersim.connection.attachment.rejected","schema_version":1}' \_10--types '{"type":"com.twilio.iot.supersim.connection.attachment.failed","schema_version":1}' \_10--types '{"type":"com.twilio.iot.supersim.connection.data-session.started","schema_version":1}' \_10--types '{"type":"com.twilio.iot.supersim.connection.data-session.ended","schema_version":1}'
You specify your chosen event types as --types arguments: each one is a JSON structure that combines the type as an event ID string and the events schema you want to use. We've included all but the Data Session Updated event so you don't impact your free event quota.
Again, the code will output the new Subscription resource's SID. You'll need this to cancel the subscription when you tidy up at the end of the tutorial.
Are you ready? Switch back to the terminal tab running the event handler — it's the first one you opened — and…
You'll see a series of events printed to the terminal as your device boots up, tries to connect to the network, does so, and then begins sending and receiving data. For example:
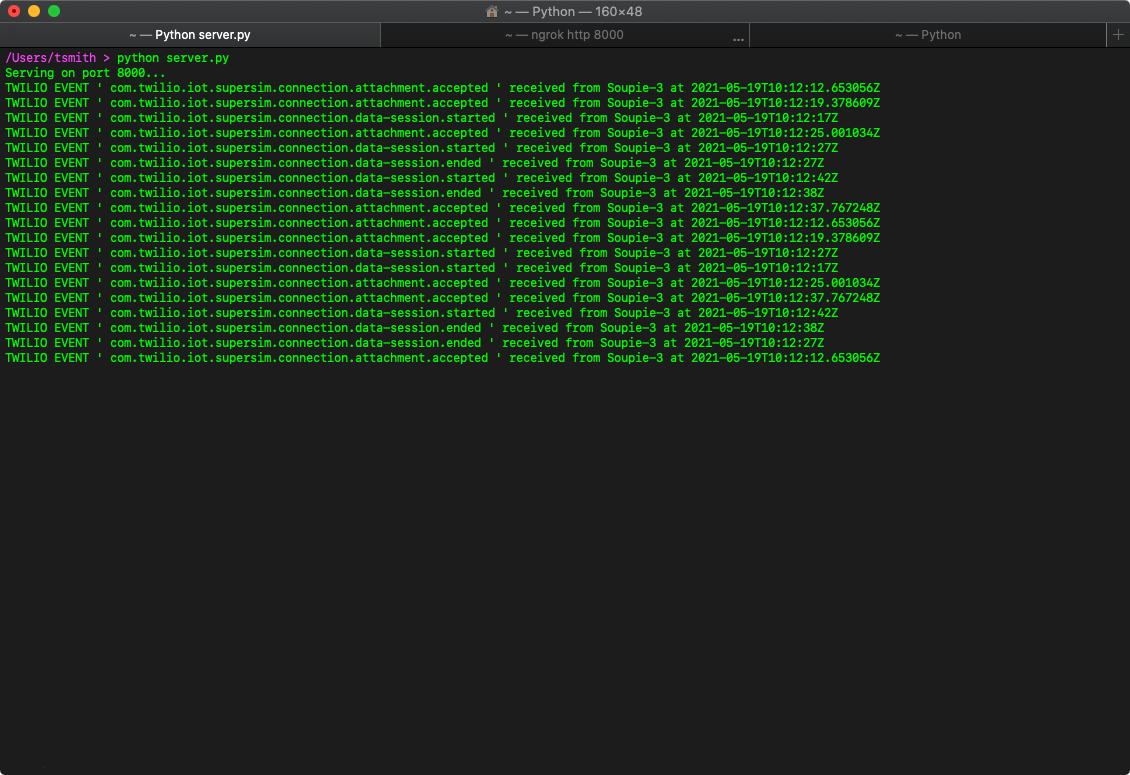
Info
If you're running this guide on a Mac, you may see some errors in the output too, in particular OSError: [Errno 41] Protocol wrong type for socket. This is nothing to worry about, and you'll soon see the subscribed notifications appear. The errors relate to longstanding bugs in Python's internals, not to the code you've entered.
When you've seen enough, you should cancel your subscription by deleting the Subscription resource you created in Step 6. This ensures that Twilio doesn't continue to send messages to your events handler, which you're about to shut down. To cancel the sub, copy and paste the following commands one at a time at the command line:
_10twilio api:events:v1:subscriptions:remove \_10 --sid <YOUR_SUBSCRIPTION_SID>_10_10twilio api:events:v1:sinks:remove \_10 --sid <YOUR_SINK_SID>
That done, you can switch to your Ngrok terminal and close the tool down with ctrl-c. Use the same keys to shut down the event handler in the remaining terminal window or tab.
You delete the Sink as well as the Subscription because it's bound to the Ngrok input URL, which is temporary. If you restart Ngrok, you'll get a new URL. You can't update an existing Sink with an alternative destination, so you will need to create a new Sink with the new URL — just re-run the code you created in Step 5.
You've used Twilio's CLI tool, a pair of Python applications, and Ngrok to receive and display events streamed from Twilio in response to actions performed by your Super SIM-connected device. Your computer and the device may only be inches apart on your desk, but you've seen how Event Streams can be used to feed you event data from any of your Super SIM-connected devices anywhere in the world.
As a next step in your exploration of Super SIM and Event Streams, you might try changing the event handler code to write a log file for all your SIMs, the events they generated and when. You might also write some code to parse that log and present the results graphically.
We've only displayed a few of the data points contained in each event. When you fully harness the power of Super SIM events, you'll be able to get network and cell tower level location information, data usage reports, and so much more.
If your want a more sophisticated setup, why not work through our Connection Events , AWS ElasticSearch, and Kibana tutorial? You'll set up an AWS Kinesis Sink, use it to relay Super SIM events to ElasticSearch, and then use Kibana as an events monitor dashboard.
We can't wait to see what you build with Super SIM connection events!