Get Started with the Microvisor Nucleo Development Board
Warning
Microvisor Public Beta
Microvisor is in a pre-release phase and the information contained in this document is subject to change. Some features referenced below may not be fully available until Microvisor's General Availability (GA) release.
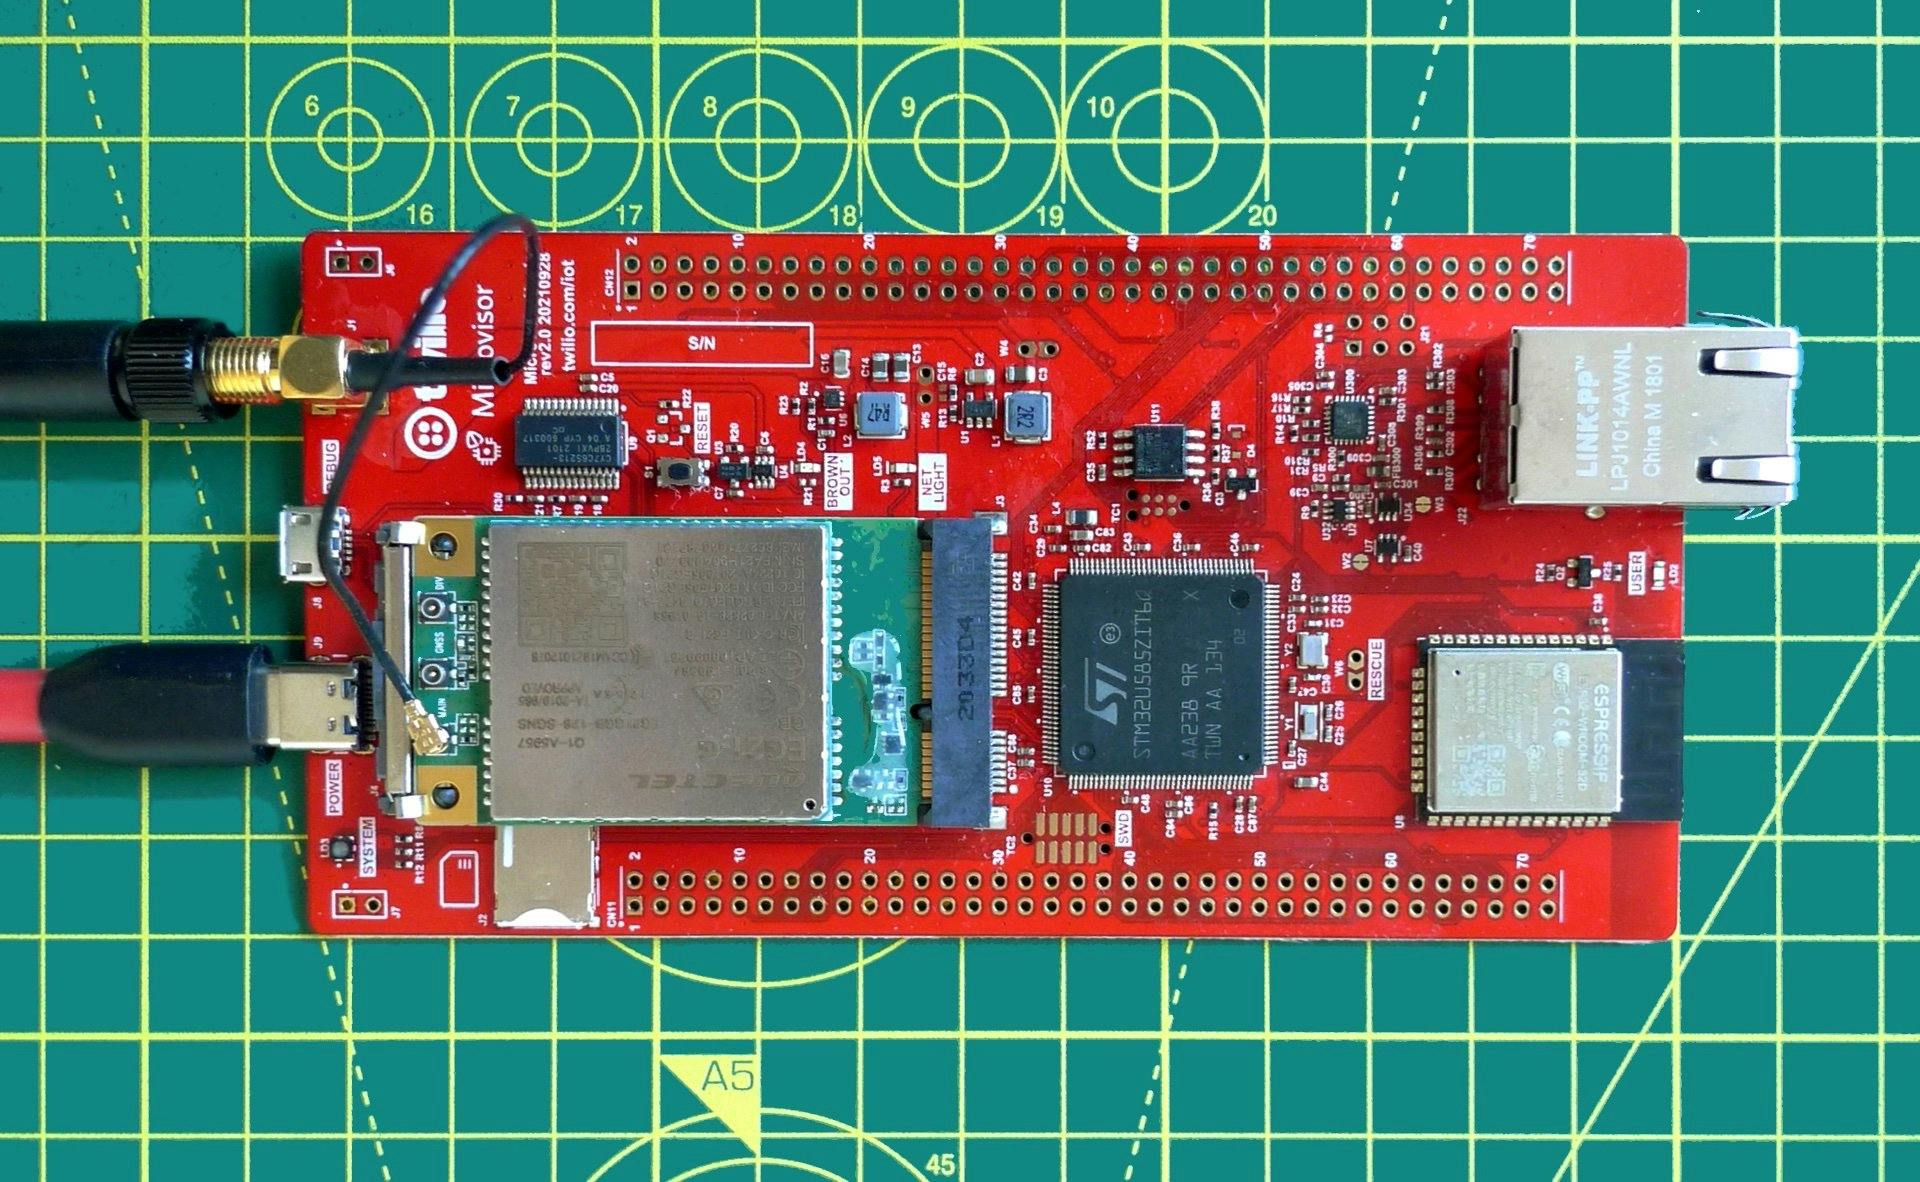
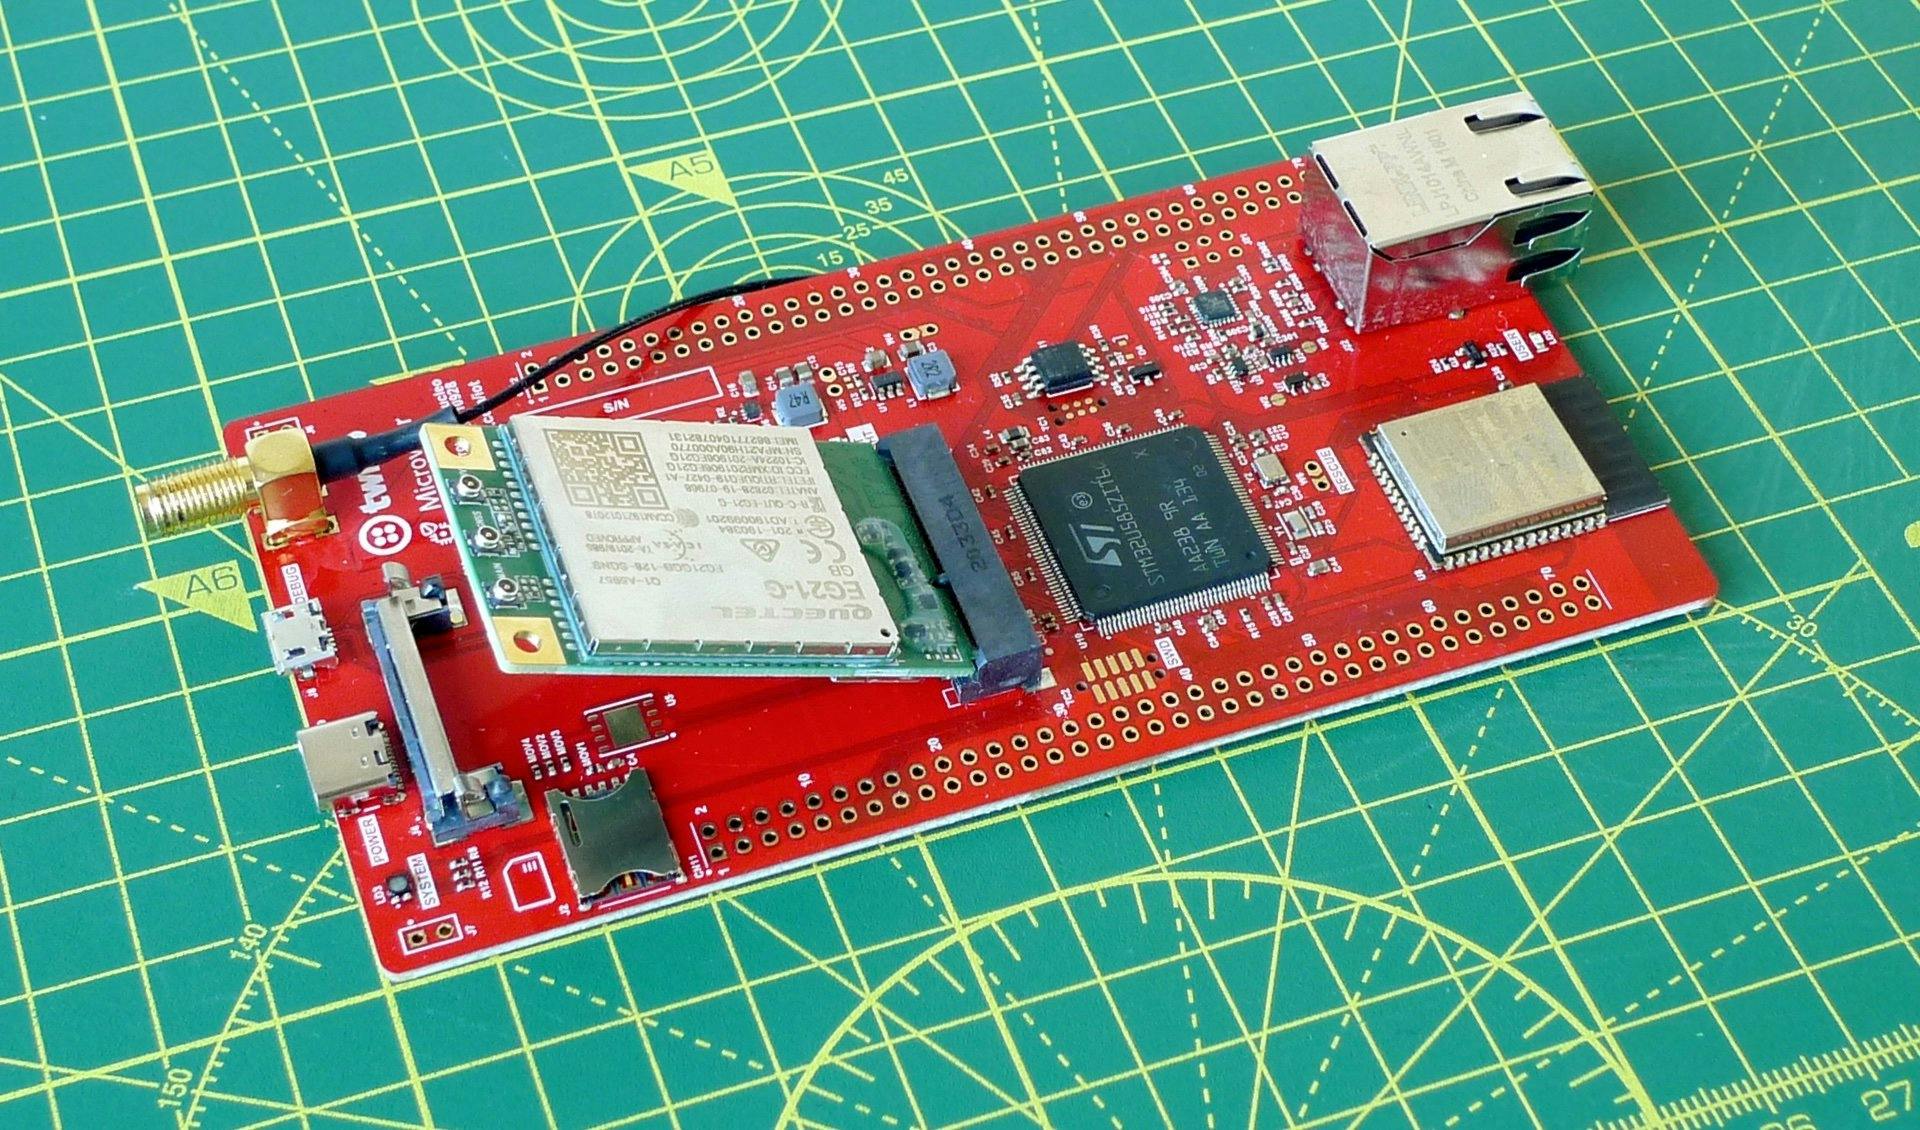
The Microvisor Nucleo Development Board (NDB) is a complete evaluation and development platform for Microvisor and the STMicroelectronics STM32U585 microcontroller. It is based on the familiar STMicroelectronics Nucleo form-factor. You will use it to explore the Microvisor platform, and to develop and prototype your IoT applications.
This Quick Start Guide will help you get your NDB powered, connected, and running a sample application that you will deploy to the board over the air via the Microvisor cloud.
Take a moment to learn what Microvisor is all about, its ARM TrustZone-based secure architecture, and the benefits it will bring to your IoT application.
Your NDB, which has been pre-registered with your Twilio account, comes with the following items:
- A USB-C cable to power the NDB.
- A USB AC power adapter.
- A Quectel EG21-G global cellular module PCIe card.
- A cellular antenna and connector cable.
- A KORE Wireless Super SIM.
- A Micro-USB cable for provisioning WiFi credentials.
Warning
The supplied AC adapter is optional, but do not run the Nucleo board from a USB port on your computer if it is not able to deliver at least 15W (3A at 5V) peak. The Nucleo board draws more power than some older computers' USB ports are usually able to deliver.
Info
You will also need a Twilio account. Sign up now if you don't have one.
Warning
Microvisor currently supports only Super SIM for cellular connectivity. We expect to enable support for other SIMs in a future release.
Your NDB comes with a KORE Wireless Super SIM that has been set up for you to provide you with global cellular connectivity. The SIM has already been fitted into your board, so you are ready to go.
-
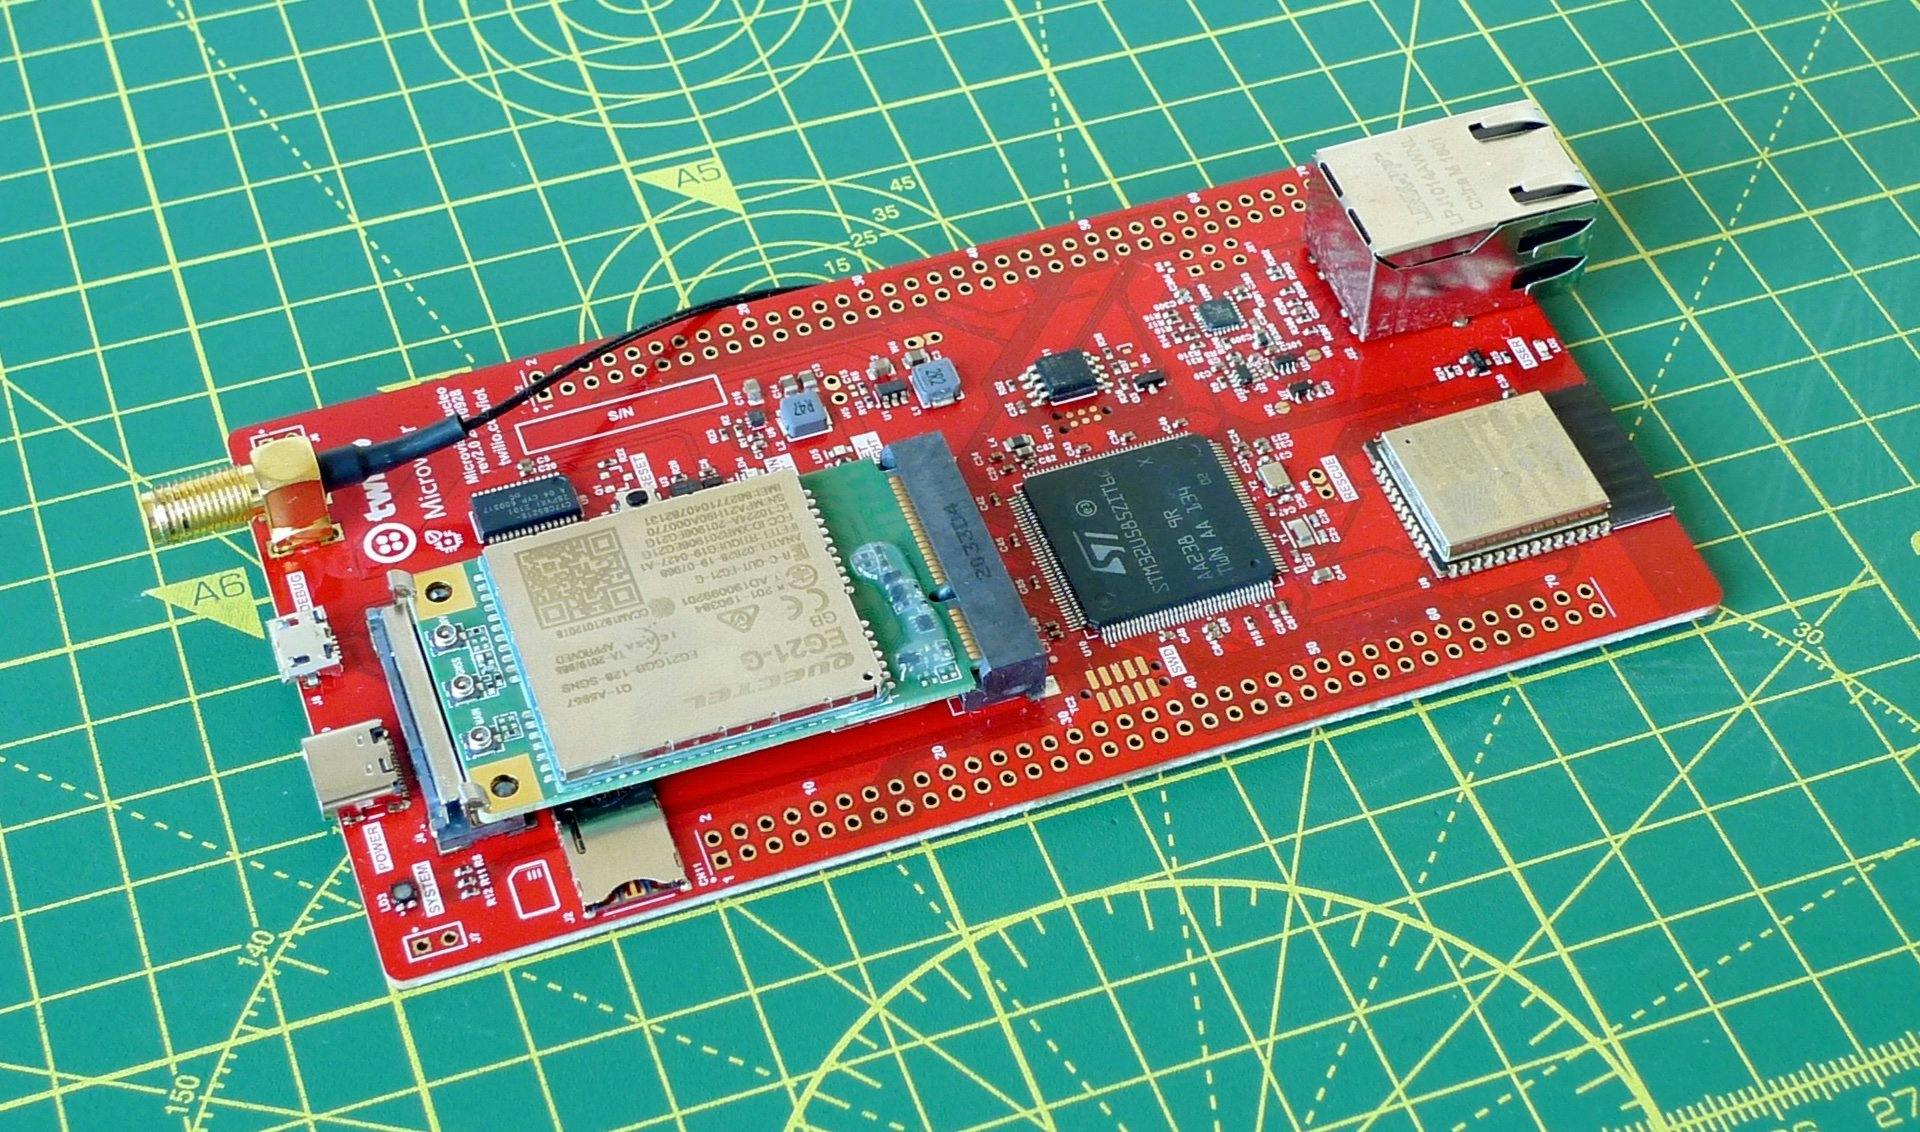
Unpack the cellular modem card and fit its connector into the slot on the NDB:
-
Push the card gently down onto the board until the two restraining clips snap to hold it firmly in place:
-
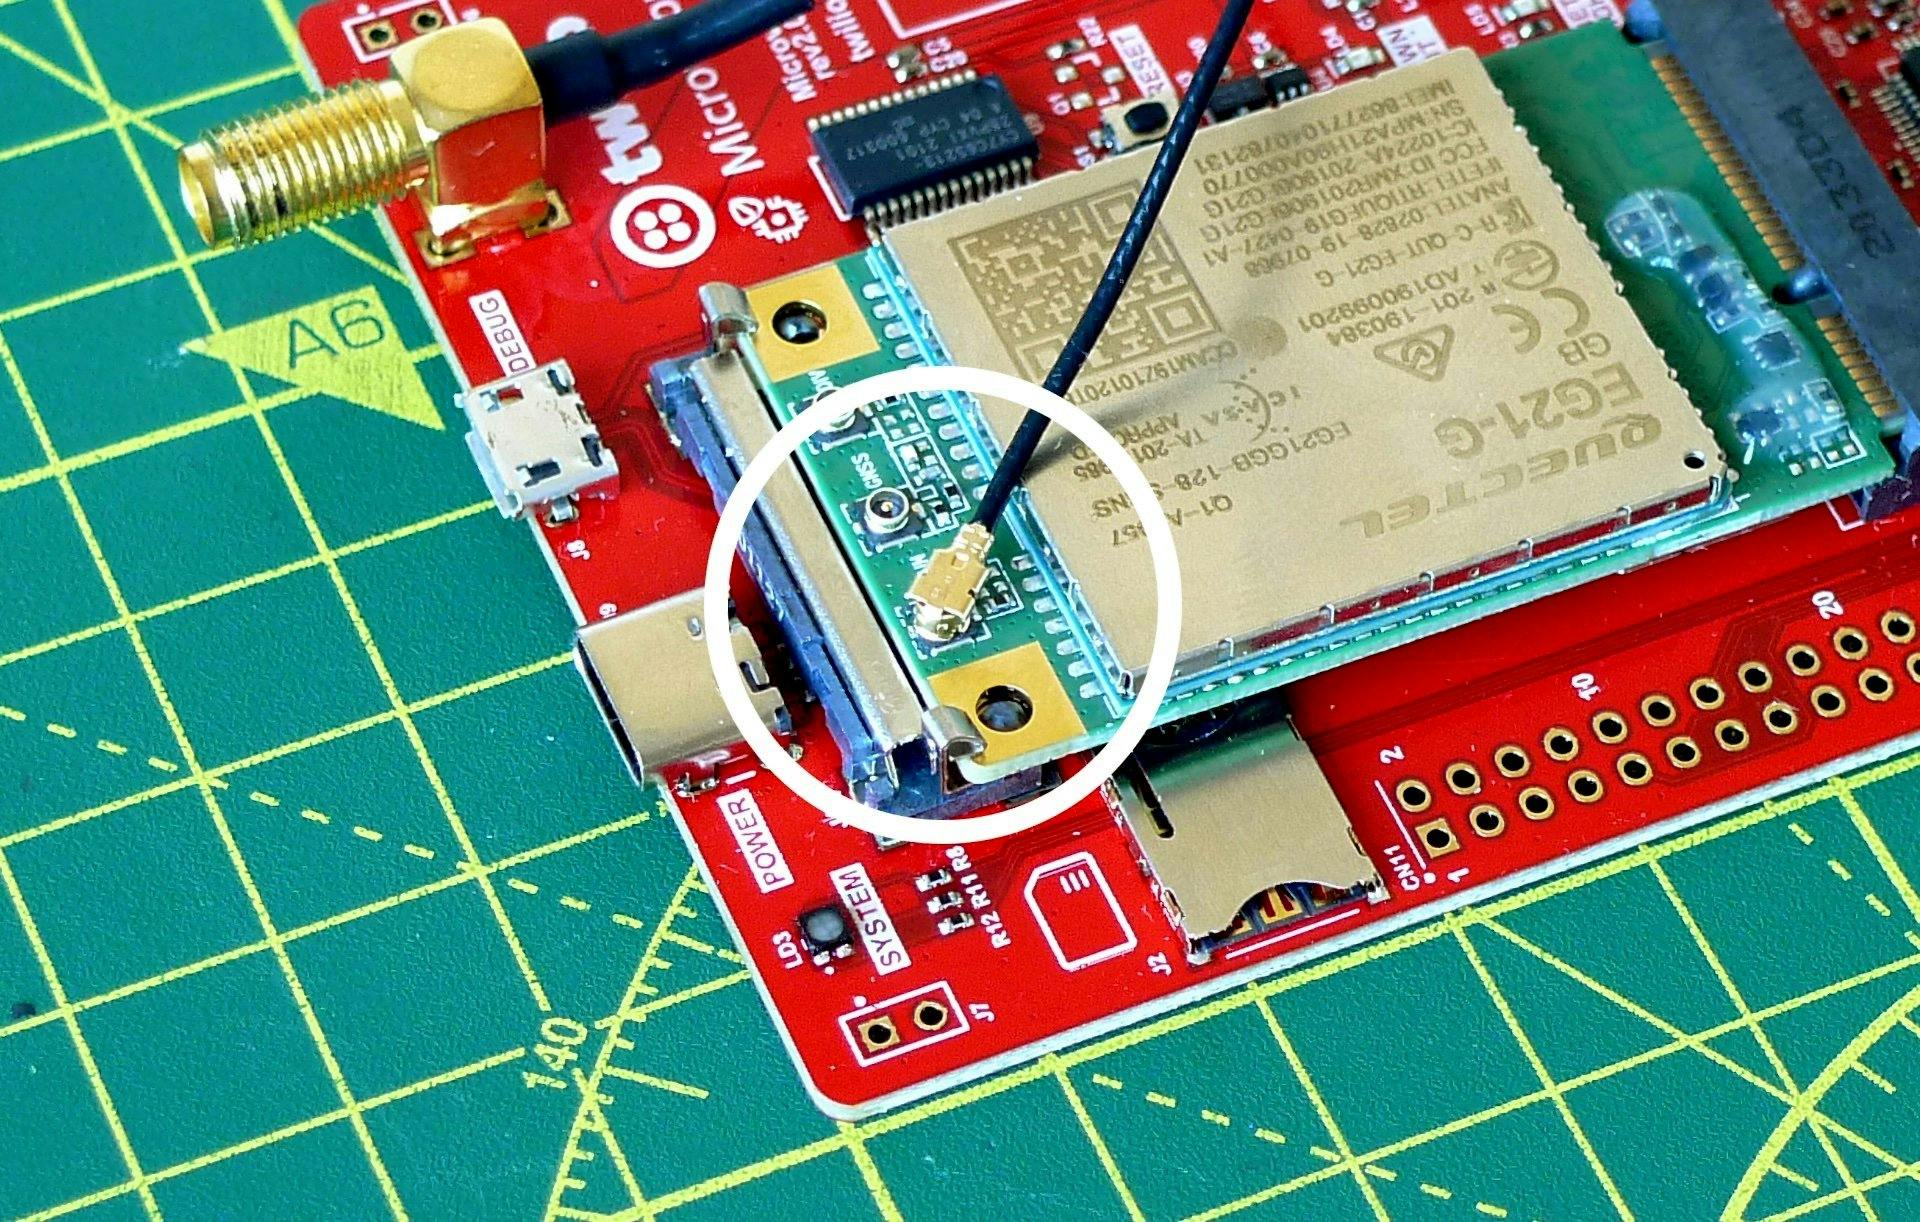
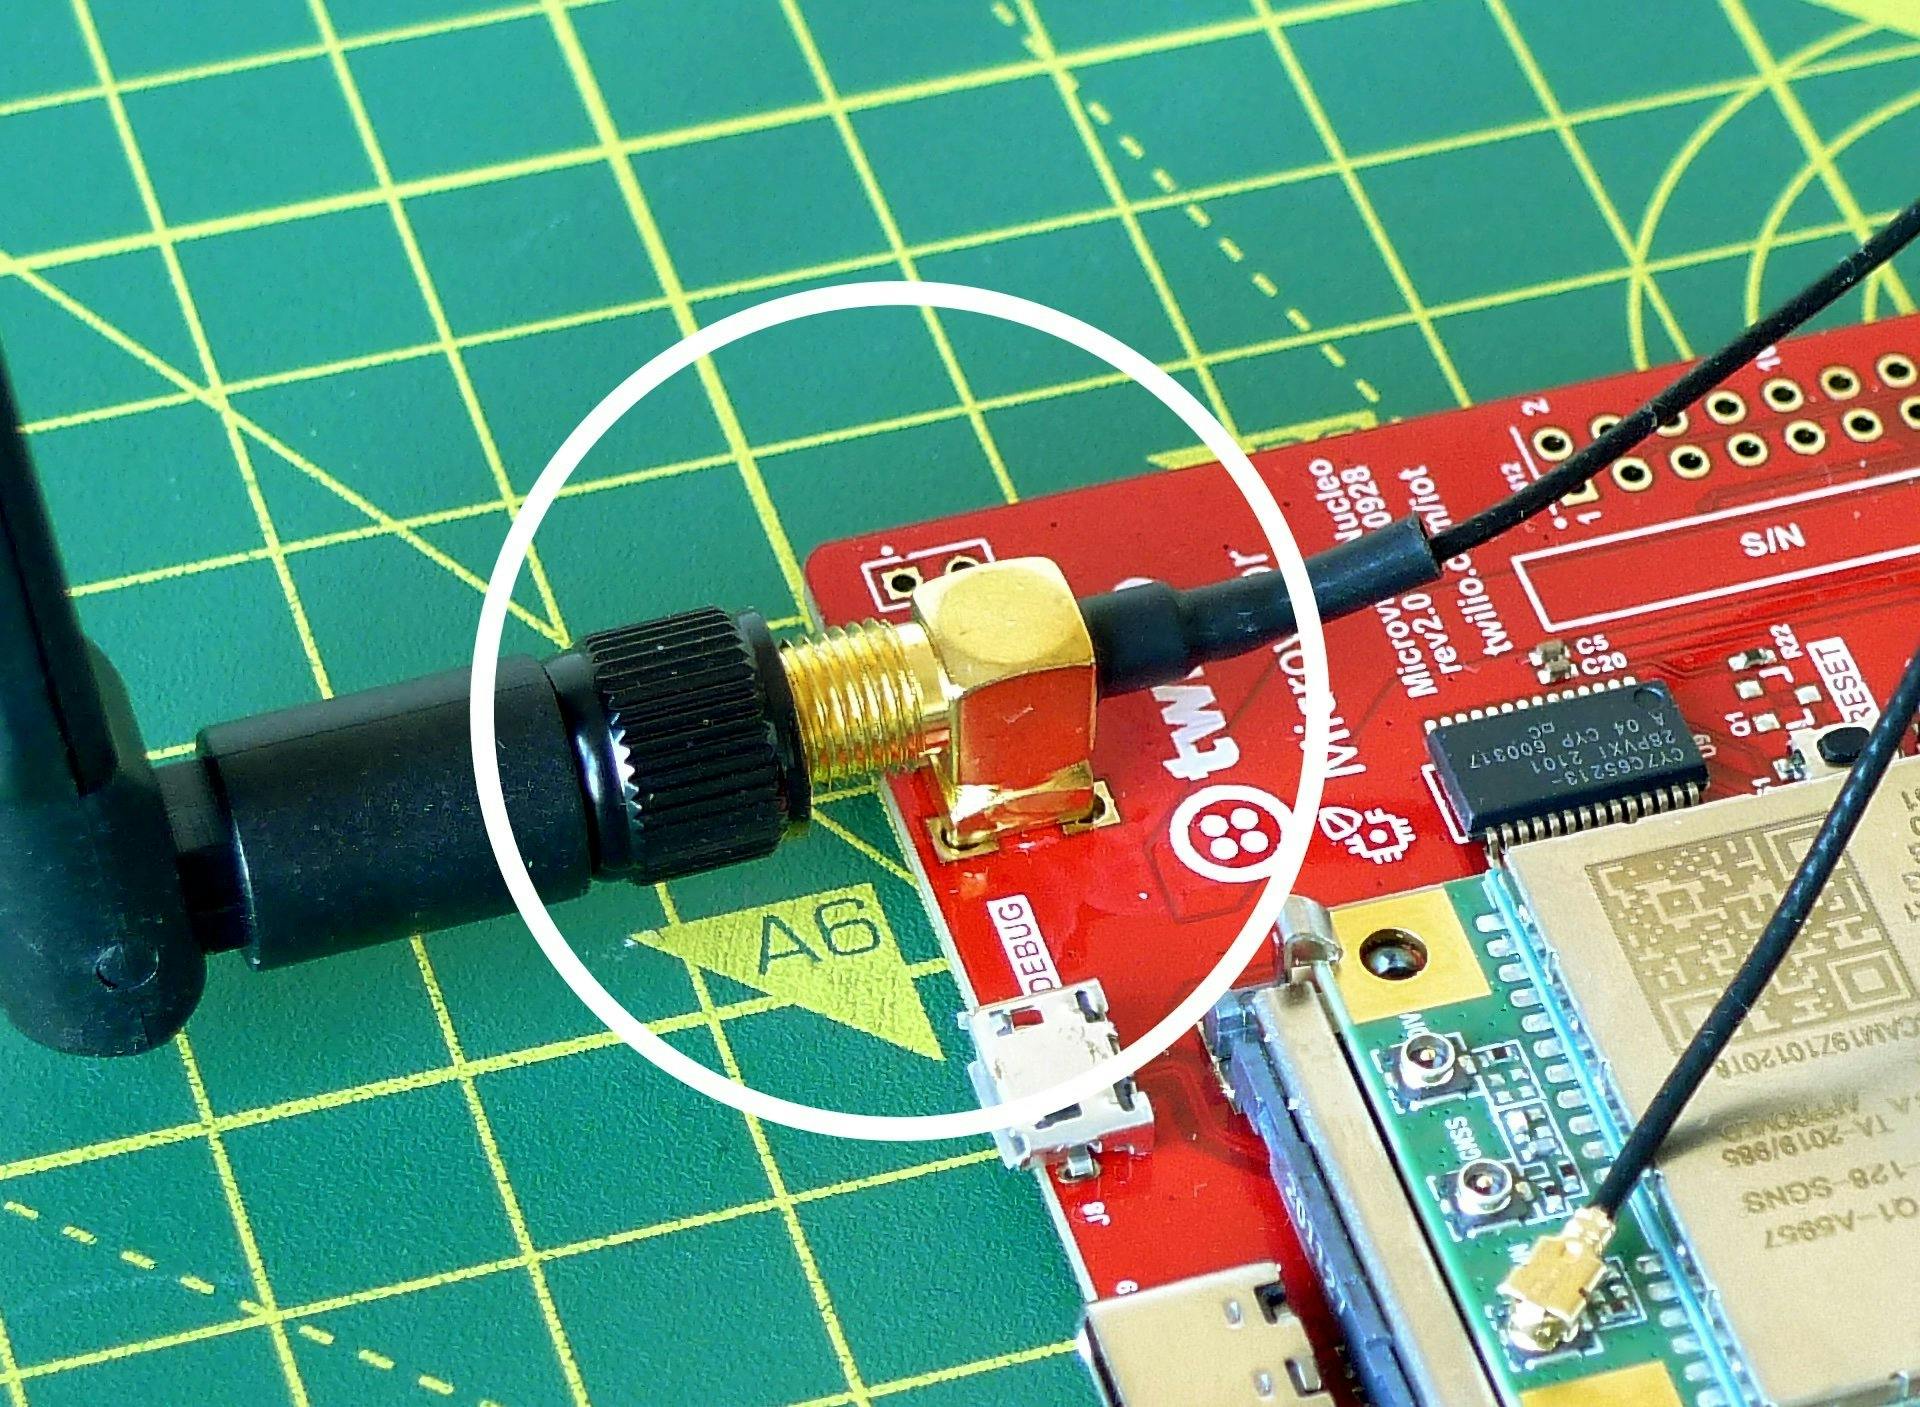
Fit the antenna cable's female u.FL connector to the male connector on the modem card marked MAIN:
-
Screw the large antenna onto the board's jack:
-
Remove the nano-size SIM card from the Super SIM packaging and slot it into the receptacle on the NDB. The contacts should be face down, and the edge with the notch inserted first. This may have been done for you:

See the note below if you are only using WiFi and/or Ethernet.
-
Plug in the AC adapter and use the USB-C cable to power the NDB:

Warning
Do not try to power the NDB through the Micro USB port marked CONTROL (or DEBUG on older boards), depending on the board revision. This connector is not able to deliver power to the board.
Info
If you are using the NDB in WiFi or Ethernet mode — you're not using its cellular functionality — you will still need to fit the supplied modem card for the time being. However, you should not install the Super SIM. If a SIM has been fitted into your board for you, please remove it.
Warning
On your first power up, if you are connecting via cellular, it can take the modem a significant amount of time — 10 minutes or more — to attach to the network. See below for the signals shown on the NETLIGHT LED.
The Microvisor application development process goes like this. You will use your computer to build new versions of your application. You run each new build through Microvisor's bundle creation tool to generate the file that will be uploaded to the Microvisor cloud from where it will be deployed to the device or devices that you specify, such as your NDB, at a time you choose.
We support Ubuntu 20.04 LTS Linux as the primary Microvisor development environment. While we hope to support other platforms in due course, for now Windows and macOS users will have to choose between interacting with the Microvisor development tools through Docker or from within a virtual machine running Ubuntu.
For Windows 10 and 11, we recommend using Windows Subsystem for Linux 2 (WSL). You will need Administrator privileges to install WSL.
- Open an Administrator-level Powershell or Command Prompt instance.
-
Run
wsl --install -d Ubuntu-20.04. - Exit from Ubuntu and quit Powershell.
- Open the Ubuntu 20.04 LTS shell from your Start menu.
- Follow the steps below .
Alternatively, you can use Docker. You can also try native tools, but this is unsupported at this time.
For Mac, we support Docker or, if you're happy not to be supported, you can try native tools.
The first thing to do is set up your computer for Microvisor application development.
Ignore this step if you are using Docker.
_10sudo bash -c 'apt update && apt install -y gcc-arm-none-eabi binutils-arm-none-eabi \_10 build-essential libsecret-1-dev cmake curl git jq wget gdb-multiarch'
Ignore this step if you are using Docker.
_10wget -qO- https://twilio-cli-prod.s3.amazonaws.com/twilio_pub.asc | sudo apt-key add -_10sudo touch /etc/apt/sources.list.d/twilio.list_10echo 'deb https://twilio-cli-prod.s3.amazonaws.com/apt/ /' | sudo tee /etc/apt/sources.list.d/twilio.list_10sudo apt update_10sudo apt install -y twilio
Ignore this step if you are using Docker.
_10twilio plugins:install @twilio/plugin-microvisor
Ignore this step if you are using Docker.
Run:
_10twilio login
You will be asked for your account SID and your account Auth Token, both of which you can call up from the Console if you don't have them handy. Do keep them nearby — you'll need them in the next section. You will also be prompted to enter a "shorthand identifier", or profile name, which is a local ID for your credentials. Enter your initials or any phrase you prefer.
Run:
_10twilio profiles:use PROFILE_ID
Before you build your first application, let's go on a quick tour of the NDB's key features. Jump ahead if you want to deploy an application straight away.
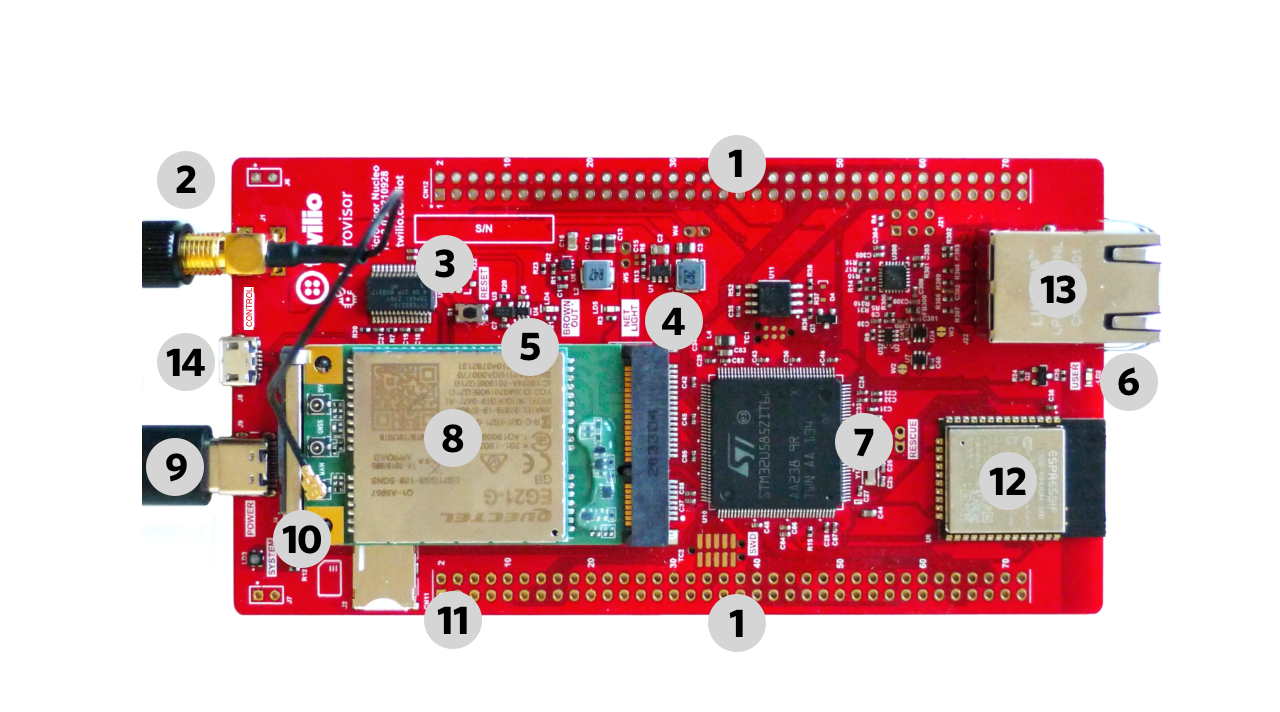
- GPIO header .
- Antenna jack.
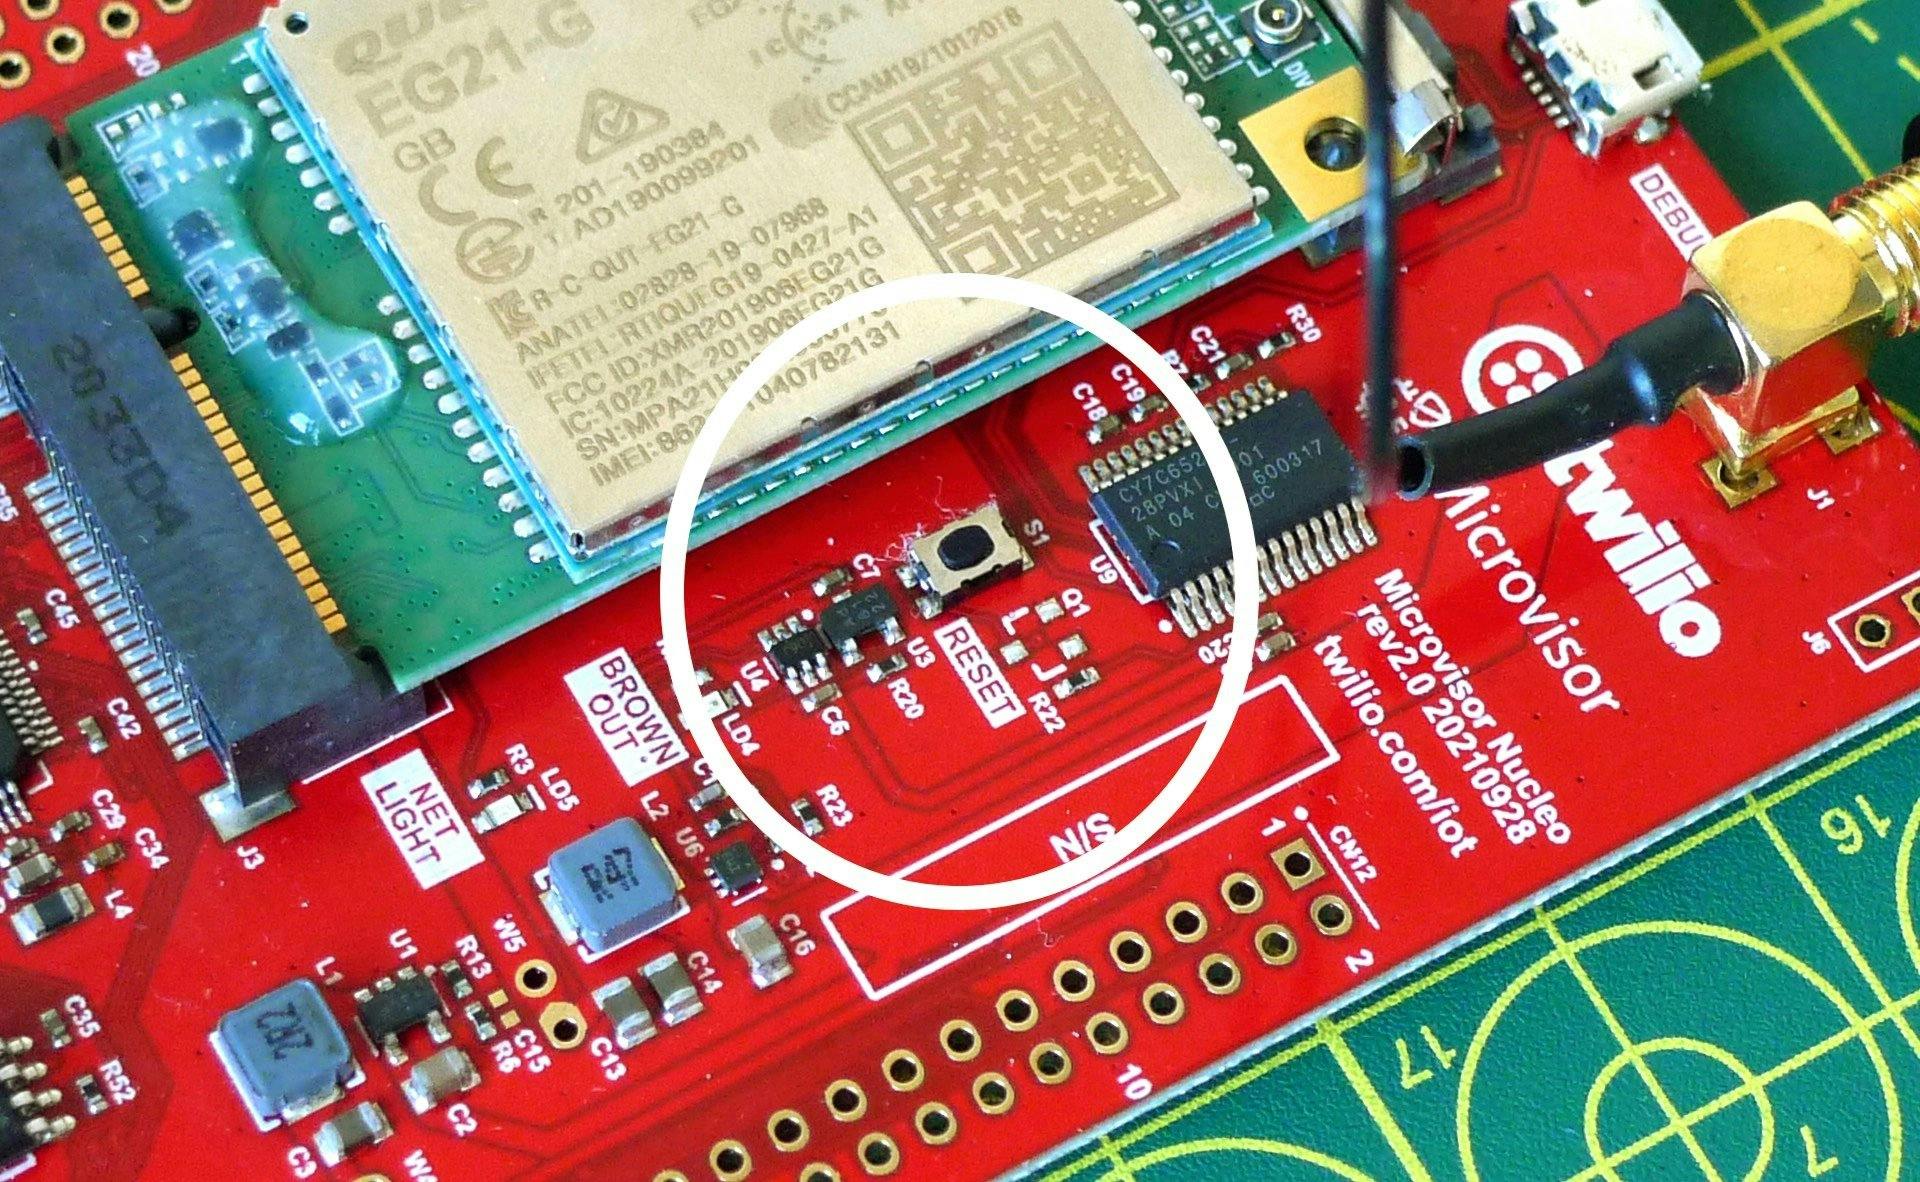
- Reset button .
- Network activity LED .
- Power brownout LED .
- Application-controllable LED .
- STM32U585 with Microvisor.
- Quectel EG21-G global cellular modem.
- USB-C power input.
- System LED
- Super SIM.
- ESP32 WiFi/BLE module.
- RJ-45 Ethernet jack.
- UART control port.
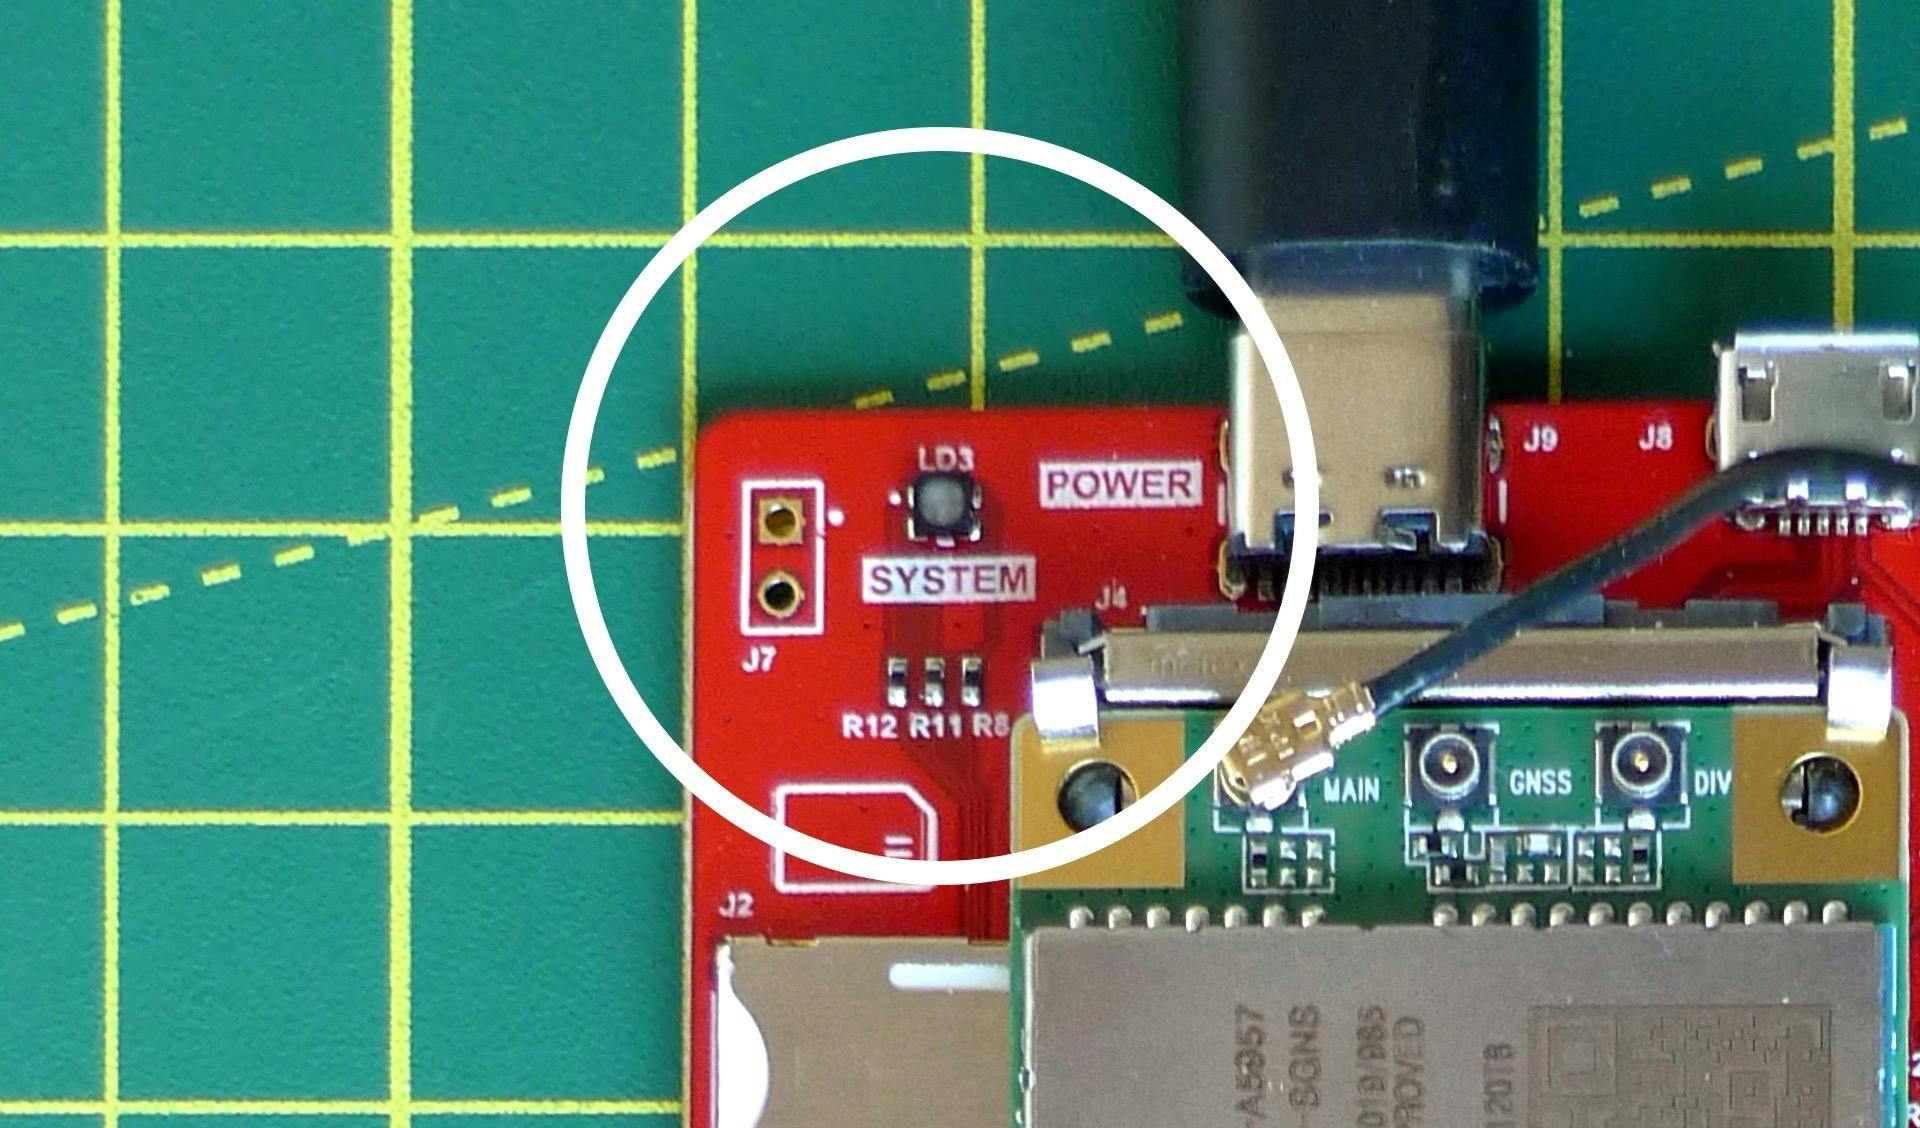
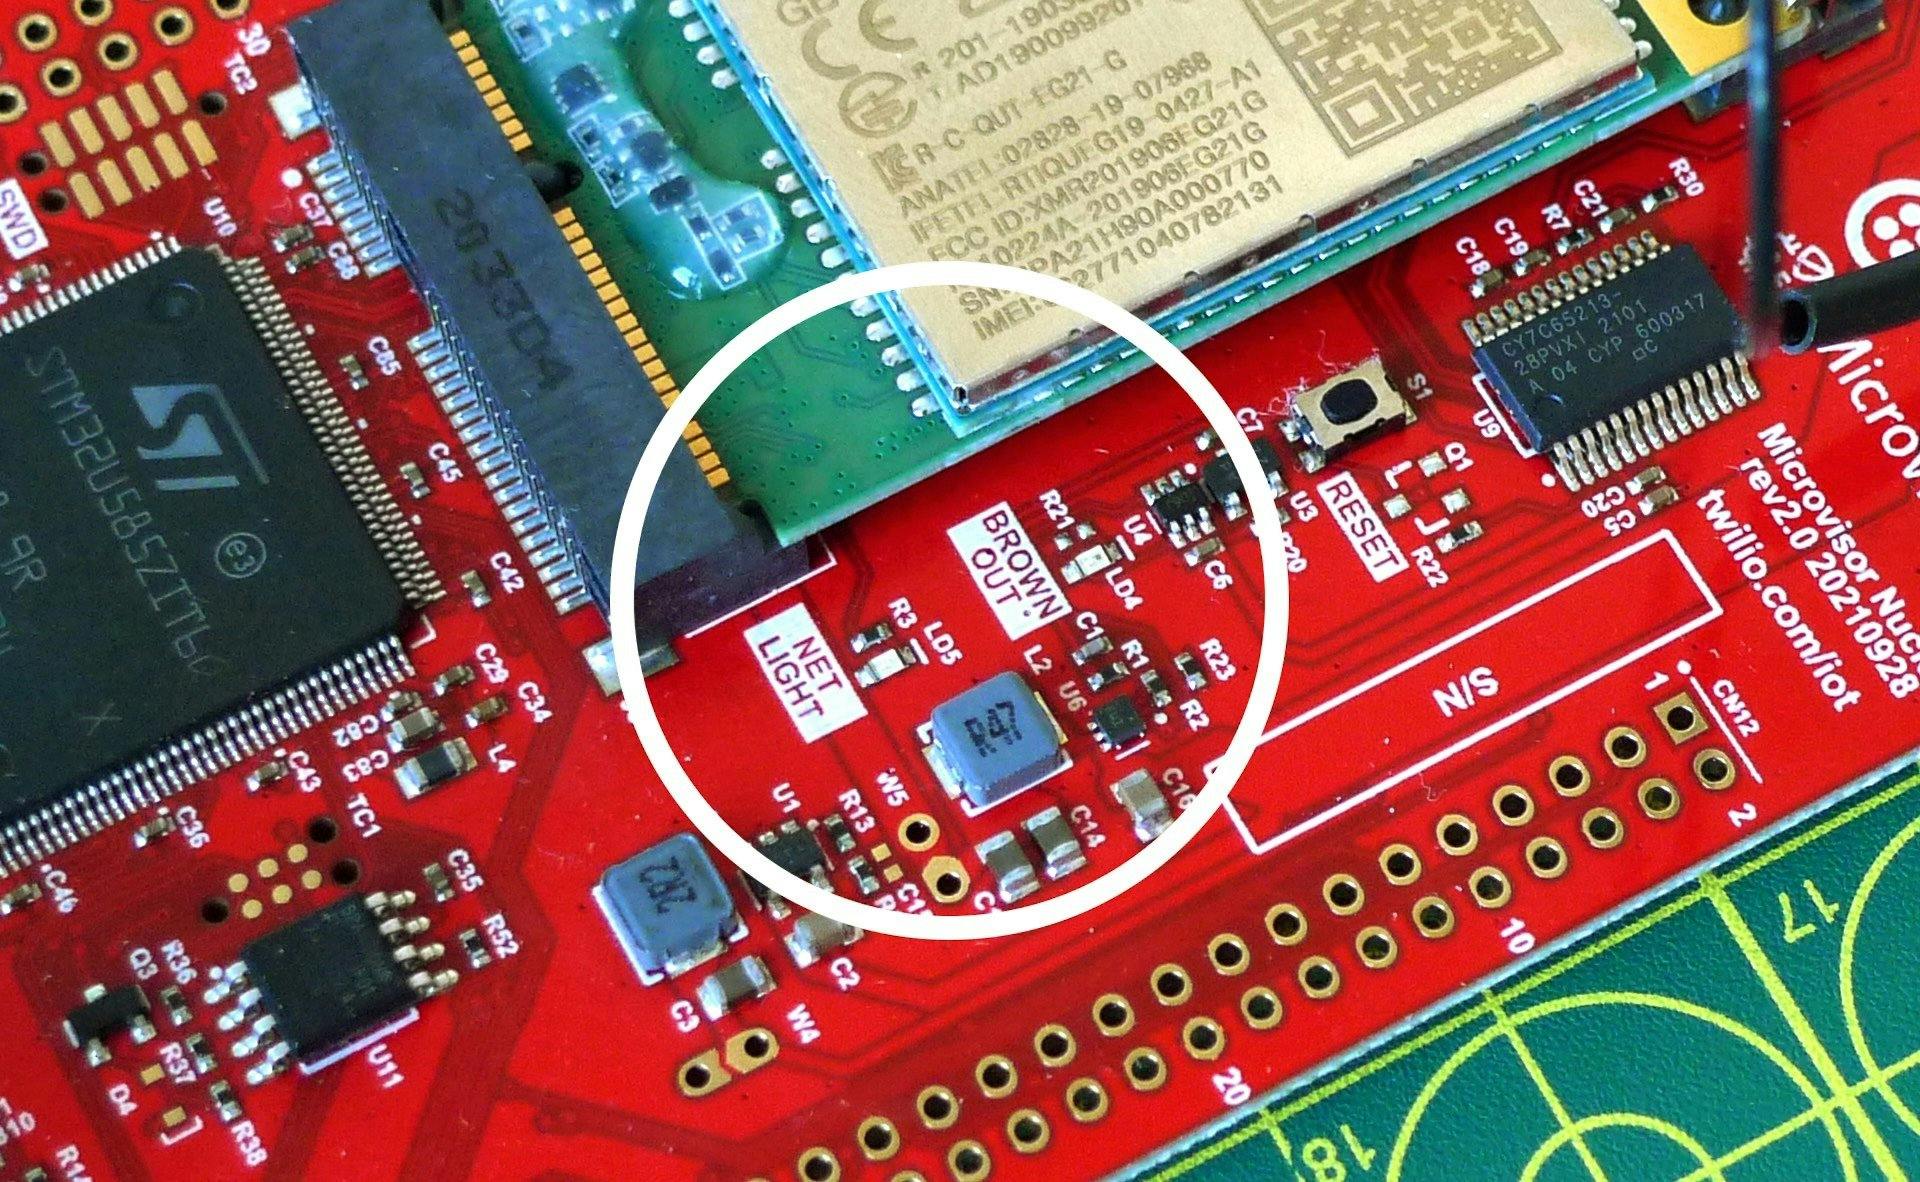
The NDB has three LEDs, marked with the labels listed below, to provide you with status feedback.
-
SYSTEM — This indicator signals system status using patterns of colors and flashes. For example, it slowly flashes green when the board is connected. The more commonly encountered patterns are shown below.A pattern may take longer to complete than the time Microvisor spends in the indicated state. As soon as it changes state, Microvisor will signal the new state even if it has not yet finished the previous state's pattern. So watch this LED for error or success conditions — a pattern being displayed repeatedly without change — not to observe transient states.
-
USER — This is a GPIO connected single-color LED that's just for you and your application. It is connected to the STM32U585's PA5 pin. Set this pin high to turn on the LED:
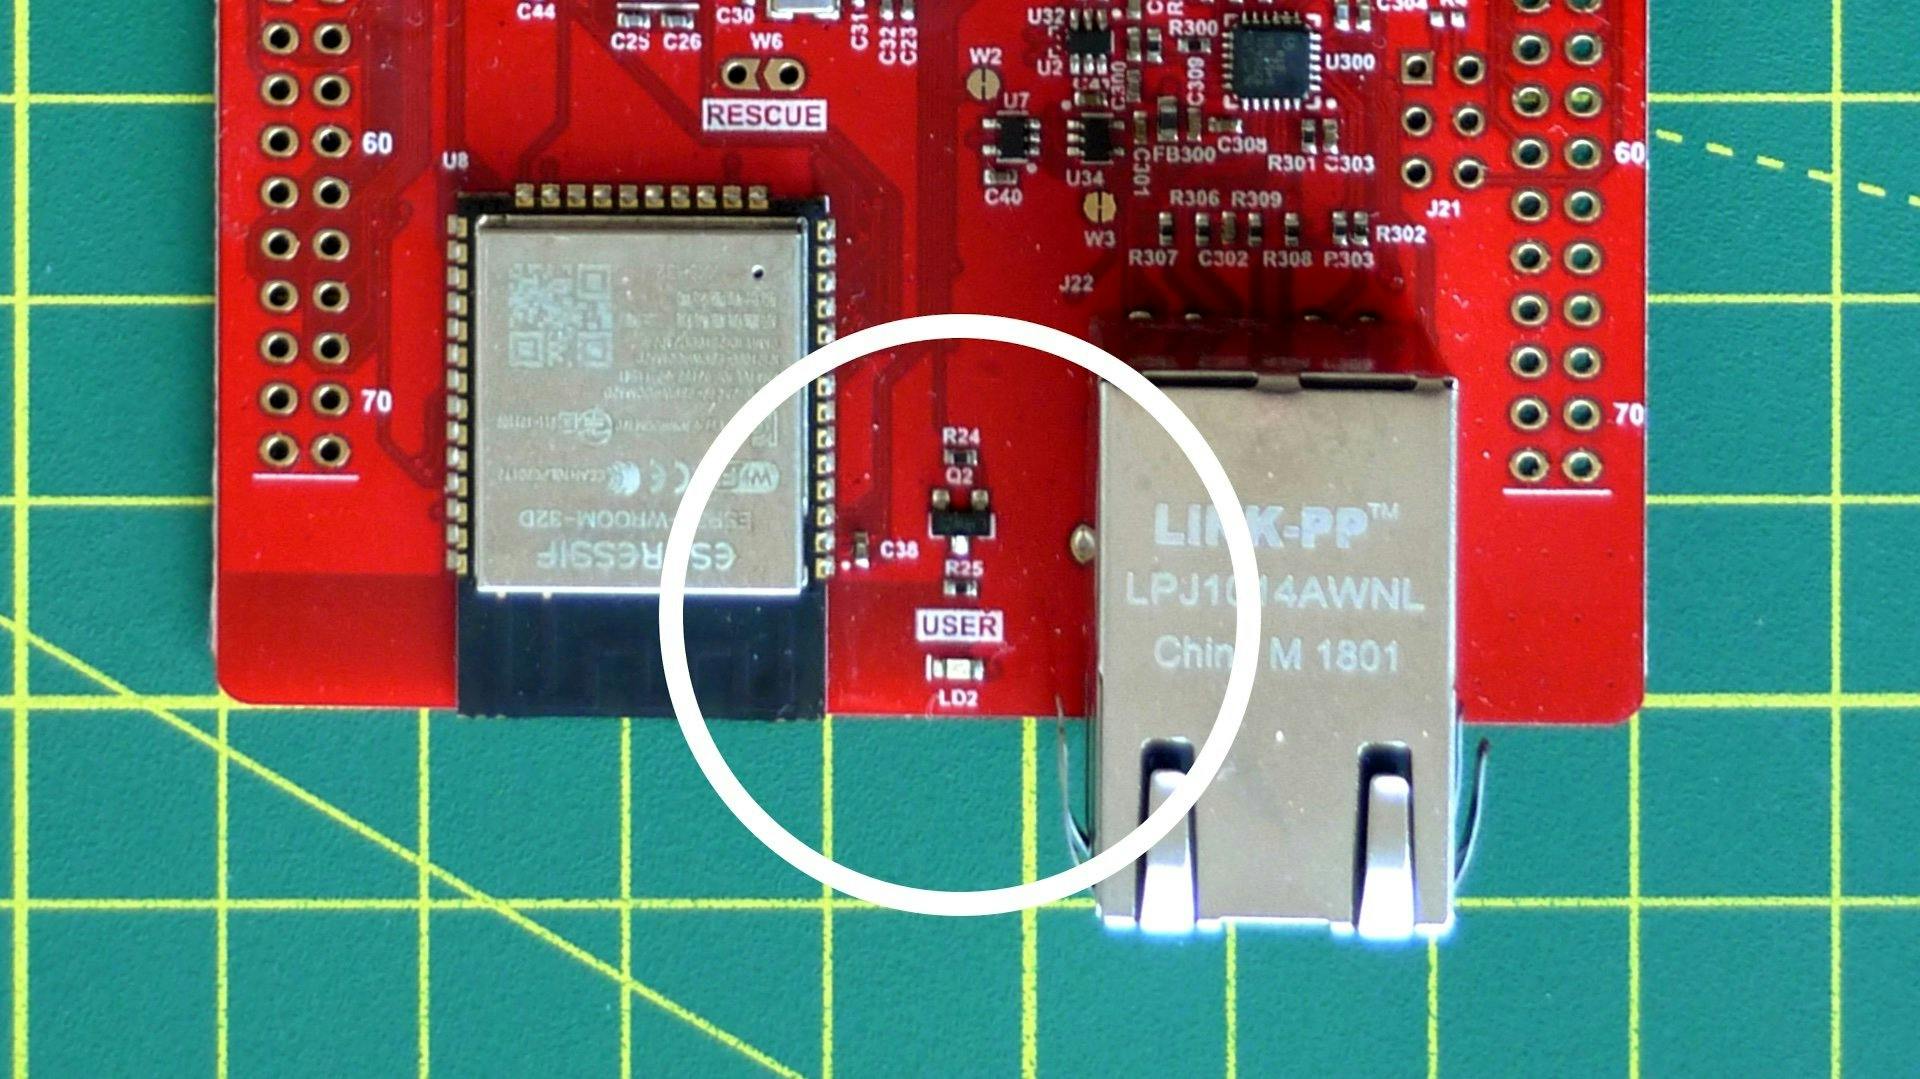
- NETLIGHT — This is the modem's network activity indicator. You can see it in the picture below. This LED will blink slowly while the device is idling (long flash) or searching for the network (short flash), and blink rapidly during data transfer.
-
BROWNOUT — This will light when the modem's power draw has exceeded the power supplied to the board. This typically happens when your AC adapter is not delivering sufficient power. Make sure your adapter delivers at least 15W (3A at 5V). The adapter and cable supplied with the NDB is rated to meet this peak power draw.
All of the STM32U585's GPIO pins that are available to the user are broken out through the NDB's two headers, marked CN11 and CN12. Any pins not present are reserved for Microvisor's use. Please see the STM32U585 data sheet for the functionality enabled at each available pin. The headers are connected as follows (click on the image for a large view):
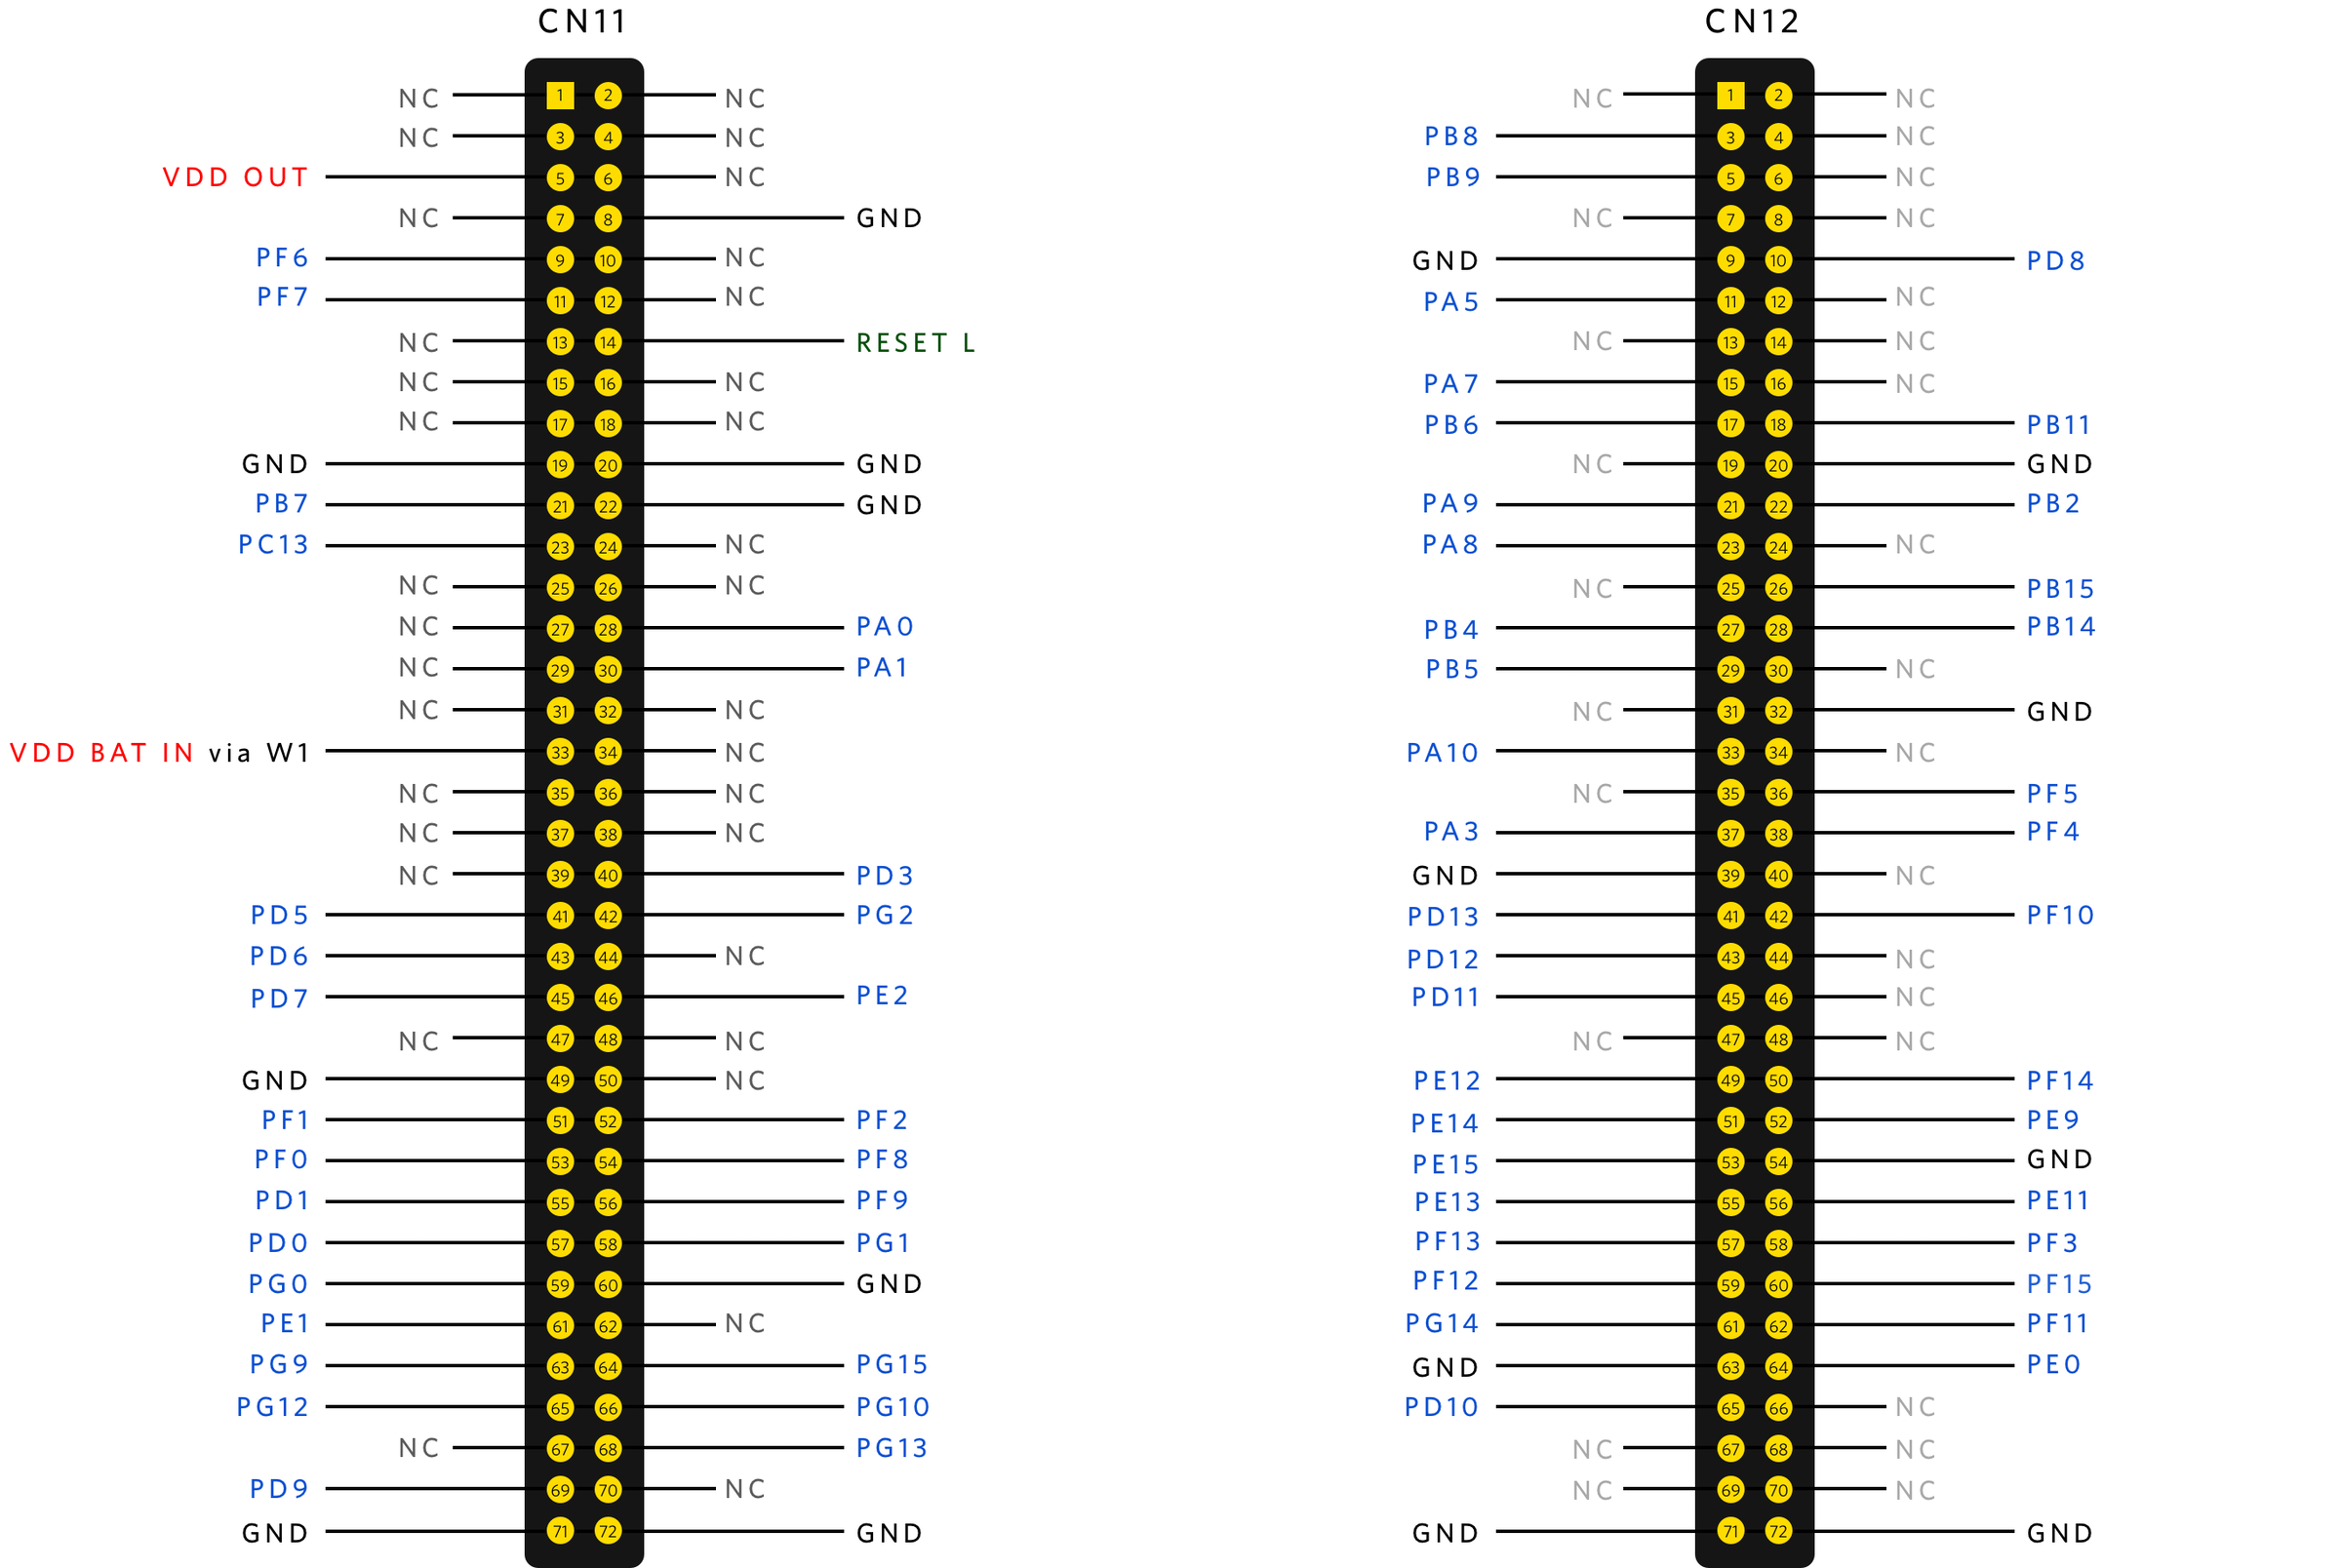
**NC = Not ConnectedCN11 pin 33 is not connected, but bridging W1 will connect it to VDD BAT IN.
We recommend soldering male header pins to the Nucleo. Make sure you choose header pins of 2.54mm pitch in dual-row configuration. These will be available from any good electronics component stockist such as Digikey or Mouser.
Make sure you order tall, stackable headers if you wish to fit a custom board to the pins. This will be required to stand above the Nucleo's RJ-45 connector.
You can manually trigger a device reboot at any time by pushing the RESET button:
The table below shows you some color and blink patterns that you may see on the SYSTEM LED. The first six of these signal the NDB's progress as it comes online. This usually happens quite quickly so you may not see all of them before you see the steady green blink that indicates the NDB is online. The NETLIGHT LED will blink rapidly.
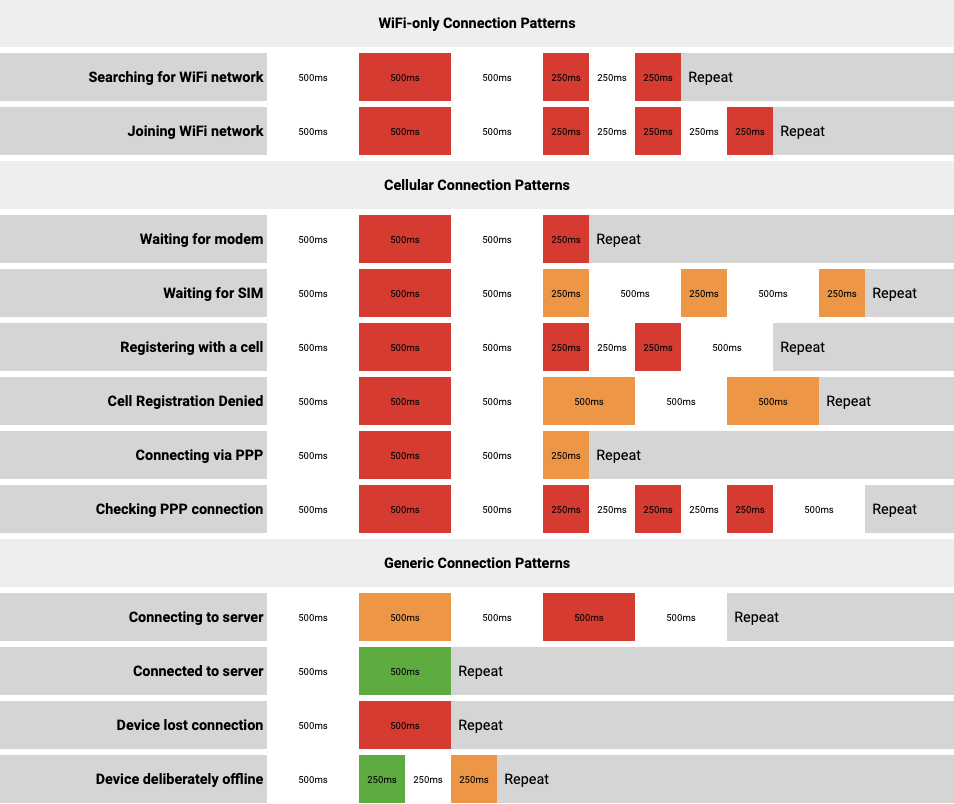
If you do not see the even green blink, match the pattern you do see to those listed above. It will tell you how far the NDB progressed and the likely cause of its failure to connect. For example, if you see the Waiting for SIM pattern, you know to check that the board's Super SIM has been inserted correctly. A pattern further down the list might indicate a broken antenna connection.
The NDB incorporates an ESP32 WiFi/BLE module and Ethernet jack. These features can be used by the NDB to connect to the Internet in place of the cellular modem. For more details, please see the NDB connectivity guide.
Let's build and deploy a classic 'Hello, World' application so you can see how you interact with the tools and your newly connected NDB. You'll use our FreeRTOS demo code. It flashes the NDB's USER LED to signal its presence.
Ignore this step if you are using Docker.
_10git clone --recurse-submodules https://github.com/korewireless/Microvisor-Demo-CMSIS-Freertos.git_10cd Microvisor-Demo-CMSIS-Freertos
_10cmake -S . -B build_10cmake --build build
Applications are delivered to the Microvisor cloud in the form of a 'bundle'. This is a zip archive which contains a combination of executable code and data. It also includes a manifest, a signed metadata file which tells Microvisor where to install the code and the data. Build a basic bundle now:
_10twilio microvisor:apps:bundle build/Demo/mv-freertos-cmsis-demo.bin \_10 build/Demo/mv-freertos-cmsis-demo.zip
If you're using Docker, you will need to set up your environment with these variables:
_10export MV_DEVICE_SID=UVxxxxxxxxxxxxxxxxxxxxxxxxxxxxxxxx_10export TWILIO_ACCOUNT_SID=ACxxxxxxxxxxxxxxxxxxxxxxxxxxxxxxxx_10export TWILIO_AUTH_TOKEN=xxxxxxxxxxxxxxxxxxxxxxxxxxxxxxxx
_10$env:TWILIO_ACCOUNT_SID="ACxxxxxxxxxxxxxxxxxxxxxxxxxxxxxxxx"_10$env:TWILIO_AUTH_TOKEN="xxxxxxxxxxxxxxxxxxxxxxxxxxxxxxxx"_10$env:MV_DEVICE_SID="UVxxxxxxxxxxxxxxxxxxxxxxxxxxxxxxxx"
Replace each xxxxxxxxxxxxxxxxxxxxxxxxxxxxxxxx with your own values. The first two can be obtained from the Twilio Console account dashboard. The QR code on the back of your board and on the anti-static bag in which it shipped shows your NDB's SID. Scan the code with your mobile phone and a suitable app, and the board's SID is the third /-separated field.
Now create a container with:
_10docker build --build-arg UID=$(id -u) --build-arg GID=$(id -g) \_10 -t microvisor-freertos-image .
Now run the container to build, bundle and upload the Microvisor demo app:
_10docker run -it --rm -v $(pwd)/:/home/mvisor/project/ \_10 --env-file env.list \_10 --name microvisor-freertos microvisor-freertos-image
Ignore this step if you are using Docker.
Upload the generated bundle with this command:
_10twilio microvisor:apps:create build/Demo/mv-freertos-cmsis-demo.zip
Uploaded bundles are accessed through the Microvisor Apps API, which represents each bundle upload as an App resource. Apps are uniquely identifiable by their SID. This allows you to quickly re-deploy an older version of your code if you need to.
You'll need the new App's SID. It's a 34-character string beginning with KA and it's shown in the output of the above command in the SID column.
Info
To make it easier to identify a specific upload, give it a unique friendly name:
_10twilio microvisor:apps:create /path/to/bundle <UNIQUE_NAME>
You can then use the App's name instead of its SID.
Ignore this step if you are using Docker.
Get your NDB's SID. You'll need this to instruct the Microvisor cloud which device to deploy the uploaded bundle to. First, get a list all of your devices:
_10twilio api:microvisor:v1\:devices:list
This will list your devices — possibly just your NDB at this stage — with their SIDs and, if set, unique names.
Info
The QR code on the back of your board and on the anti-static bag in which it shipped also contains your NDB's SID. Scan the code with your mobile phone and a suitable app, and the board's SID is the third /-separated field.
Ensure your NDB is powered up and connected to the Internet: the SYSTEM LED will be slowly blinking green.
Deploy the code to it. To so, make a Microvisor API request like this:
_10twilio api:microvisor:v1\:devices:update \_10 --sid <YOUR_NDB_SID_FROM_ABOVE> \_10 --target-app <YOUR_APP_SID_OR_UNIQUE_NAME>
Again, you'll need to replace the bracketed values with your own values.
Info
You can avoid using the bulky SID by giving your device a friendly unique name:
_10twilio api:microvisor:v1\:devices:update \_10 --sid <YOUR_NDB_SID> \_10 --unique-name my_ndb
Use the unique name wherever you're asked to enter a device SID.
There is nothing to do — this is included in the last command you ran.
In the background, the Microvisor cloud will signal the device that that an application update is pending, and Microvisor will reboot, reconnect to the Internet, and download your code. After a moment or two, while the NDB connects to the Internet, you'll see the USER LED flash once a second.
Hello, World!
Microvisor supports the relay of logging statements issued by your application code. To view logs from your device, you'll use the Twilio CLI.
_10twilio microvisor:logs:stream <YOUR_NDB_SID>
Our Docker setup starts logging automatically.
Sit back and watch some messages appear in your terminal. Logging leverages standard Microvisor system calls for application logging.
You have set up your development environment and your Microvisor Development Board. You've run a FreeRTOS-based sample application on the device by creating a bundle, transferring it to the Microvisor cloud, and then deploying it to your board over the air. You have viewed logging information transmitted by your application.
What next? Microvisor now supports remote debugging: controlling running application on your Microvisor device wherever in the world it is located. To try out this powerful development functionality, work through our Microvisor Remote Debugging guide.
Here are some suggestions for further stages of your Microvisor journey.
- Build some of our demo applications to learn how to integrate specific technologies into your own Microvisor code.
- Get some further guidance on developing applications for Microvisor .
- Check out the functionality Microvisor can provide to your application through its system calls .
- Review STMicro's STM32U585 Reference Manual and HAL documentation .
- Is designing hardware your focus? If so, find out how to design Microvisor-empowered IoT devices .
- Read about the Microvisor API you use to interact with the Microvisor cloud.
Info
Microvisor Help and Support
We welcome all inquiries you may have about Microvisor and its implementation, and any support questions that arise once you've begun developing with Microvisor. Please submit your queries via a KORE Wireless ticket: log in to the Kore console and click the Contact Support button in the left-hand navbar.