Microvisor Sample Code
Warning
Microvisor Public Beta
Microvisor is in a pre-release phase and the information contained in this document is subject to change. Some features referenced below may not be fully available until Microvisor's General Availability (GA) release.
This page is a jumping off point to take you to our growing number of Microvisor sample applications and demos.
Warning
We are migrating these demos to the KORE Wireless GitHub organization. All but the MQTT demo have now been transferred. We recommend you replace existing clones of these repos with new ones targeting the new organization.
This application demonstrates of Microvisor's HTTP communications System Calls.
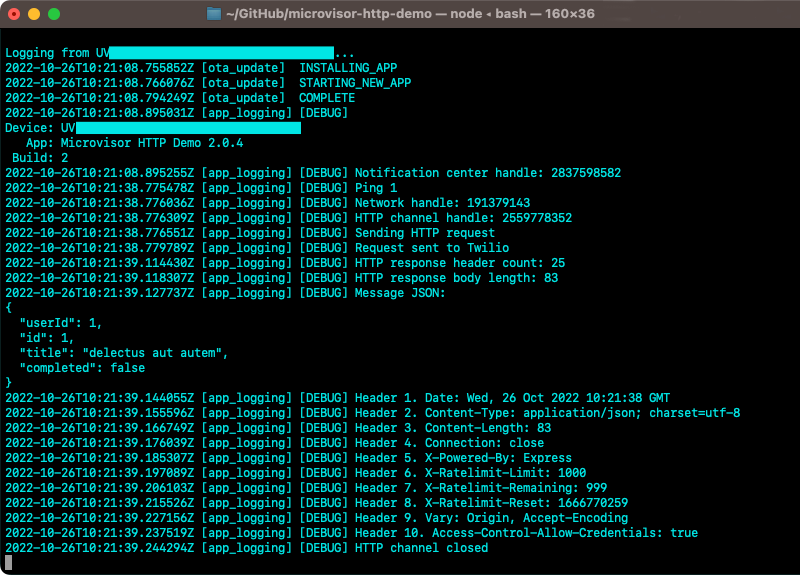
Built from our FreeRTOS demo code, the multi-task code shows you how to configure and open a network channel for HTTP communication, and to issues requests to a cloud service. It uses Microvisor's interrupt-driven notification mechanism to determine when data has been returned, and to set a 'data ready' flag for the main application to process and log the received JSON data.
This sample does not require any additional hardware beyond the Nucleo Development Board.
This sample also demonstrates the use of a UART serial bus for local application logging. This feature is optional but if you intend to try it, you will need an FTDI USB-to-serial cable.
There are full setup instructions alongside the source code.
This application is built from our FreeRTOS demo code and is designed to run on the Microvisor Nucleo Development Board.
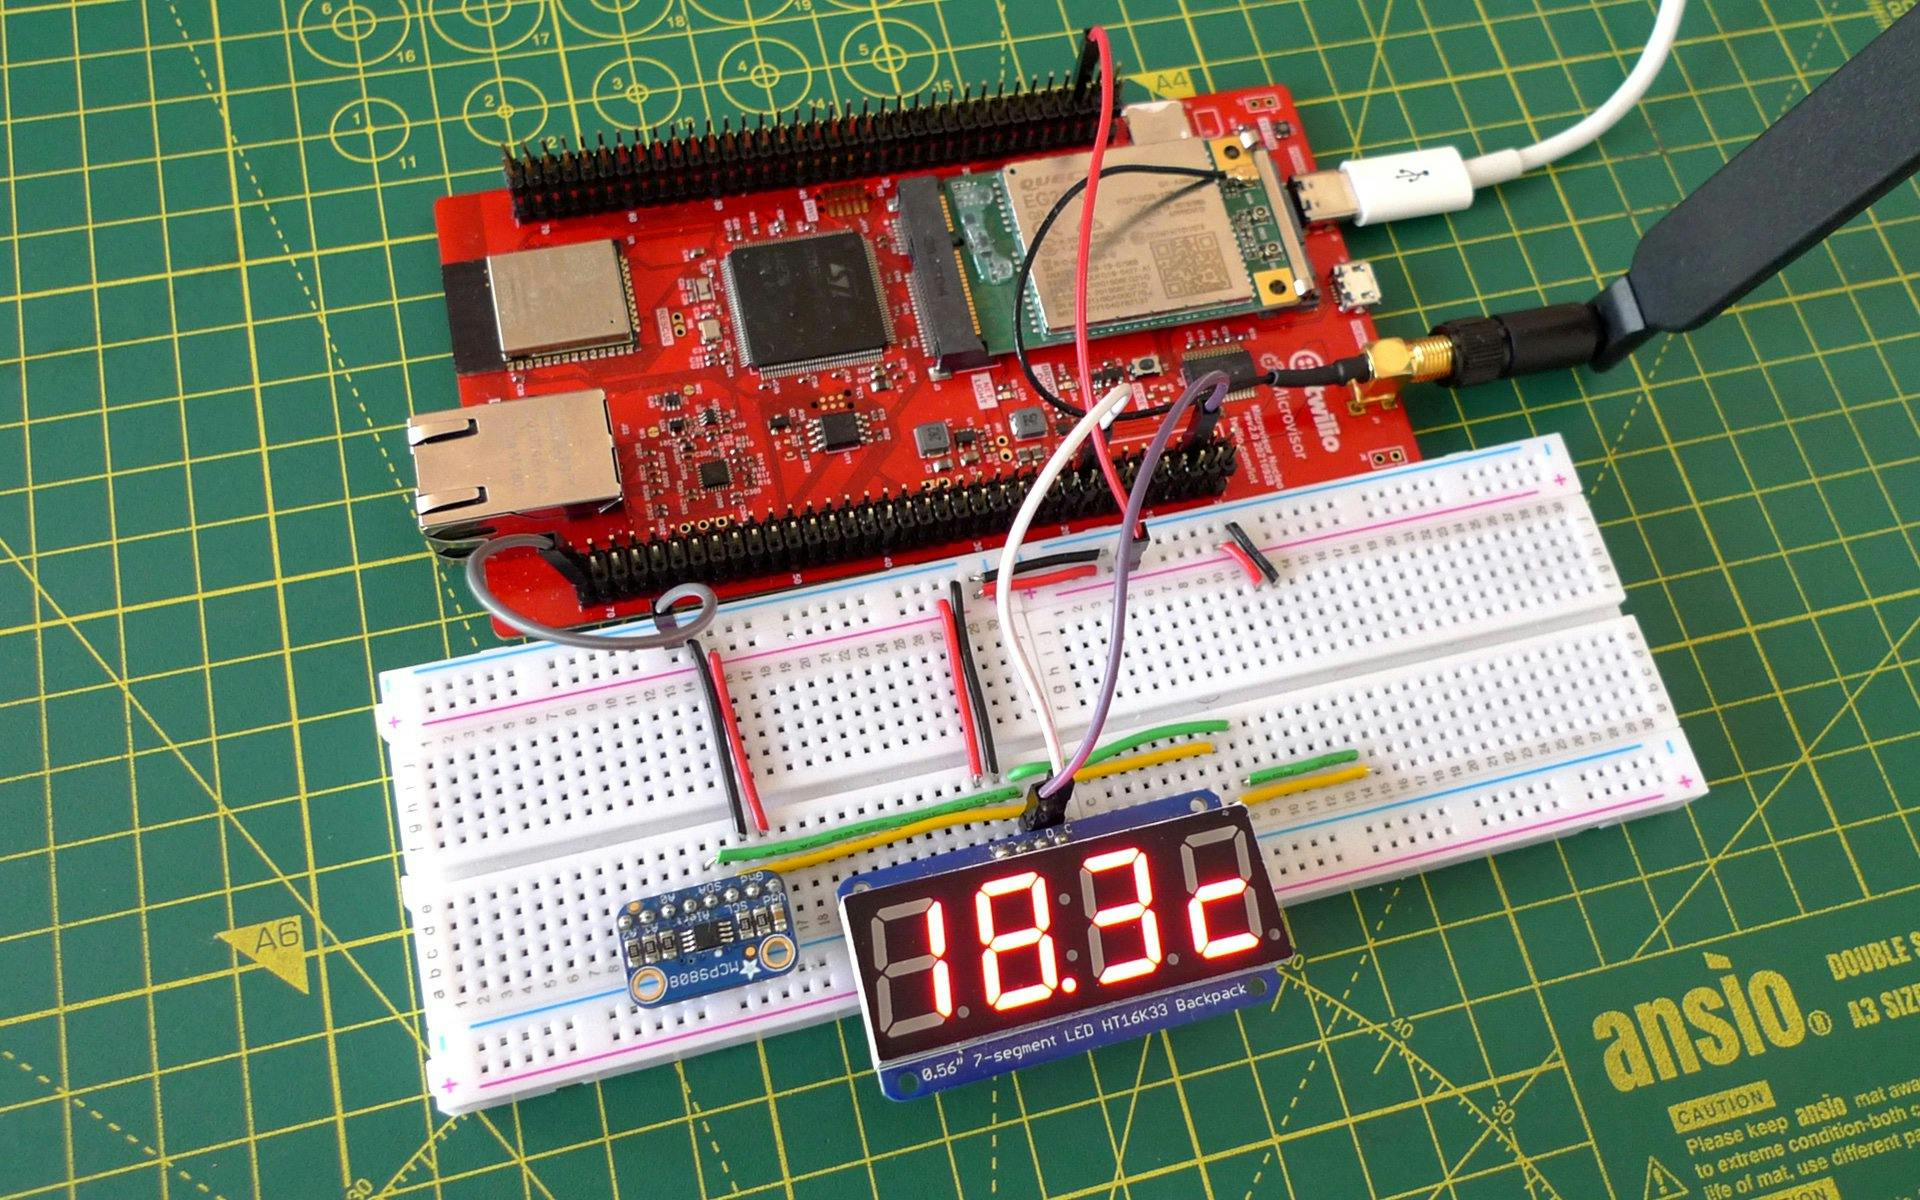
It makes use of an MCP9808 temperature sensor and a Holtek HT16K33-driven seven-segment, four-digit LED display. Both connect to the same I²C bus. The code demonstrates how this bus is configured and operated through the STMicro ST32U585 HAL.
The demo also uses a LIS3DH accelerometer (not shown in the photo above).
Check out the source code Read Me for full hardware setup details.
The code makes use of Microvisor's HTTP communications System Calls to POST data generated by the temperature sensor to the cloud. The sample uses the online service Beeceptor as a mock target API to consume this sensor data. You do not need a Beeceptor account.
This sample weather readout application is based on the Microvisor Nucleo Development Board with the addition of an HT16K33-driven 8x8 LED matrix. You will also require an OpenWeather account for access to the OpenWeather API.
The display connects via I²C, and the code demonstrates how this bus is configured and operated through the STMicro ST32U585 HAL.
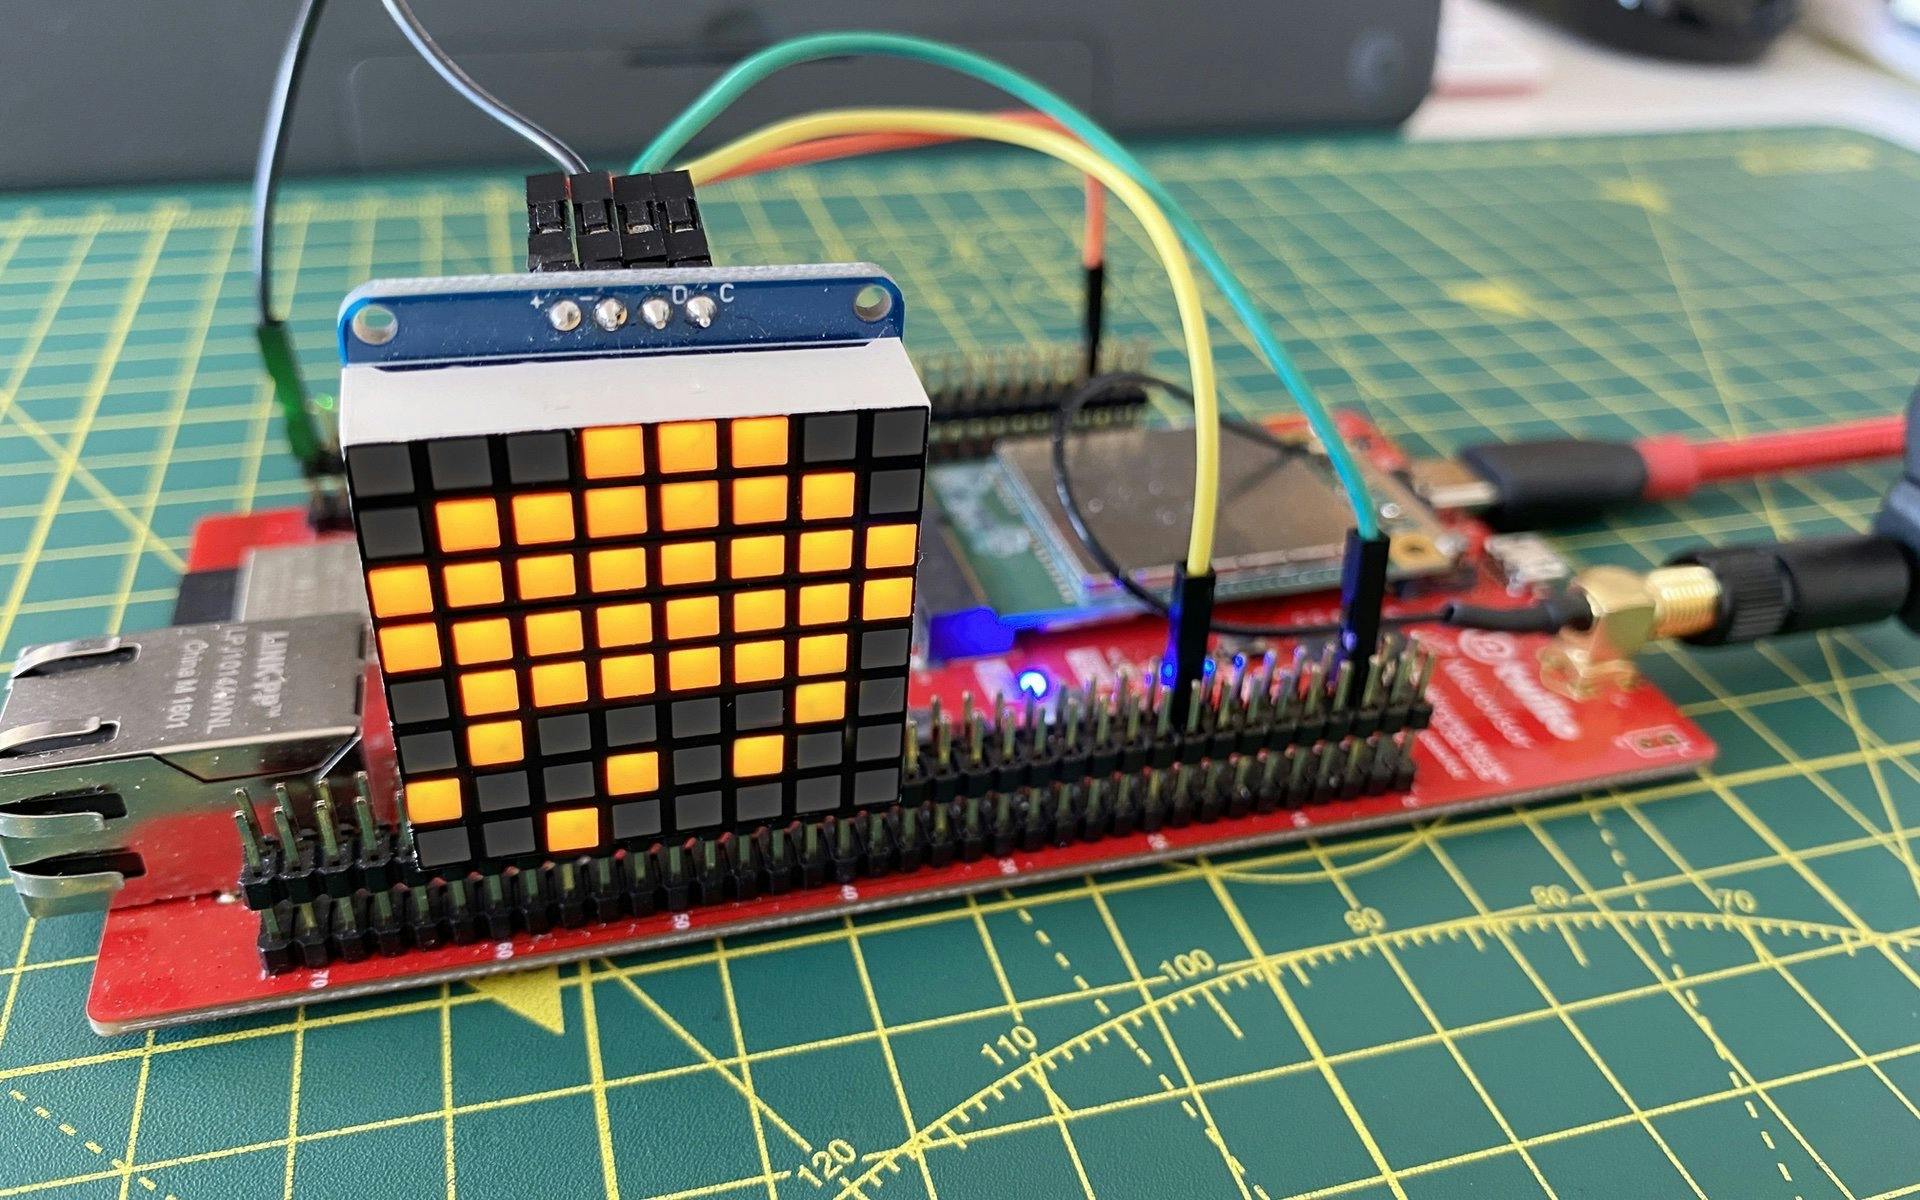
Access to the OpenWeather API is mediated by Microvisor's HTTP communications System Calls. Responses are processed using cJSON and the data accessed to generate messages that will scroll across the display and to select a weather condition icon to show.
The source code Read Me contains complete hardware and software setup instructions.
This sample provides a basic user application that you can use to try out Microvisor's remote debugging feature. It uses the Microvisor Nucleo Development Board but no other hardware components.
For more information on remote debugging under Microvisor, please see this guide.
The source code Read Me contains complete hardware and software setup instructions.
This sample provides a basic foundation for Microvisor applications that make use of the FreeRTOS real-time operating system FreeRTOS. It uses the ARM CMSIS-RTOS API as an intermediary between the application and FreeRTOS to make it easier to swap out the RTOS layer for another should you wish to do so at a future time.
This sample does not require any additional hardware beyond the Nucleo Development Board.
This sample also provides a basic foundation for Microvisor applications that make use of the FreeRTOS real-time operating system FreeRTOS. However, it does not use ARM's CMSIS-RTOS API but instead makes use of native FreeRTOS system calls.
In addition to the Nucleo Development Board, this demo also uses an I²C-connected Microchip MCP9808 temperature sensor breakout as a source of data and as an interrupt trigger (when the measured temperature rises above 30 degrees Celsius) to demonstrate GPIO external interrupt handling on the STM32U585 and FreeRTOS.
These samples demonstrate how to communicate with an MQTT broker to sign in and exchange data. They use the Microvisor Nucleo Development Board but no other hardware components.
There are two repos:
- MQTT Demo — This contains samples that support MQTT communications between the board and either Amazon Web Services (AWS) IoT or a generic MQTT broker.
- MQTT Demo — This contains a sample that supports MQTT communications between the board and Microsoft Azure IoT.
The Read Me files for each repo contain complete instructions.
Info
Microvisor Help and Support
We welcome all inquiries you may have about Microvisor and its implementation, and any support questions that arise once you've begun developing with Microvisor. Please submit your queries via a KORE Wireless ticket: log in to the Kore console and click the Contact Support button in the left-hand navbar.