How to Use Super SIM eSIM Profiles
Many Internet of Things manufacturers wish to incorporate eSIMs (eUICC SIMs) into their products rather than traditional SIMs in order to take advantage of eSIMs' remote SIM provisioning capabilities. The good news is that they can do so with Super SIM and continue to take full advantage of Super SIM's global connectivity via multiple tier-1 networks.
In fact, working with a virtual Super SIM installed in an eSIM is no different from working with a physical one in card or chip form: you use the same API calls to assign it to a Fleet and manage its state. However, you need to follow a slightly different process to obtain the virtual SIM — called an eSIM profile — and to prepare for its installation on a device.
The Super SIM API provides tools for you to create, or 'reserve', Super SIM eSIM profiles, which are accessible as eSimProfile resources. To make use of the eSIM profiles you have created, you need eUICC (Embedded Universal Integrated Circuit Card) hardware to store them on your IoT device, and Local Profile Assistant (LPA) software, also on the device, to download profiles and manage those installed in the eUICC.
This guide will introduce you to the Super SIM API used to reserve and manage Super SIM eSIM profiles, and show you the methods you can apply to install profiles onto devices. If you're new to eSIMs, you may prefer to start with the guide Get Started with Super SIM eSIM Profiles for eUICCs and then return to this longer, more detailed document.
To use eSIMs, an IoT device needs LPA software. The LPA downloads eSIM profiles from an SM-DP+ (Subscription Manager Data Preparation) server, installs them in the device's eUICC, and manages switching between profiles — the digital equivalent of swapping SIM cards. The LPA may also provide an interface through which users swap the current profile for another to switch between cellular connectivity providers, if that's a choice you as a device manufacturer have chosen to grant them.
There are many ways to implement an LPA. It may be part of a mobile device operating system. For example, many Android devices are already eSIM compatible, and the OS supports the installation of third-party LPAs in addition to its own. If you are building your own IoT hardware, you will need to discuss with your cellular module supplier how to develop and install a suitable LPA. If your choice of eUICC already incorporates an LPA, you will still need to code your application to communicate with it.
The process of installing an eSIM profile goes like this:
- You create an eSIM profile on a SM-DP+ server. This is done using the Super SIM API, and is typically referred to as "reserving" a profile.
- You provide the device's LPA with the address of the SM-DP+ server. There are several methods, discussed shortly, that you can choose from.
- The LPA contacts the SM-DP+ server and receives the reserved eSIM profile, which it installs in the device's eUICC.
The SM-DP+ server is an online resource that makes eSIM profiles available for download. Think of it as a virtual warehouse full of ready-to-use digital SIMs.
There are various ways of providing the LPA with the address of the SM-DP+ it should contact. Super SIM supports the following methods:
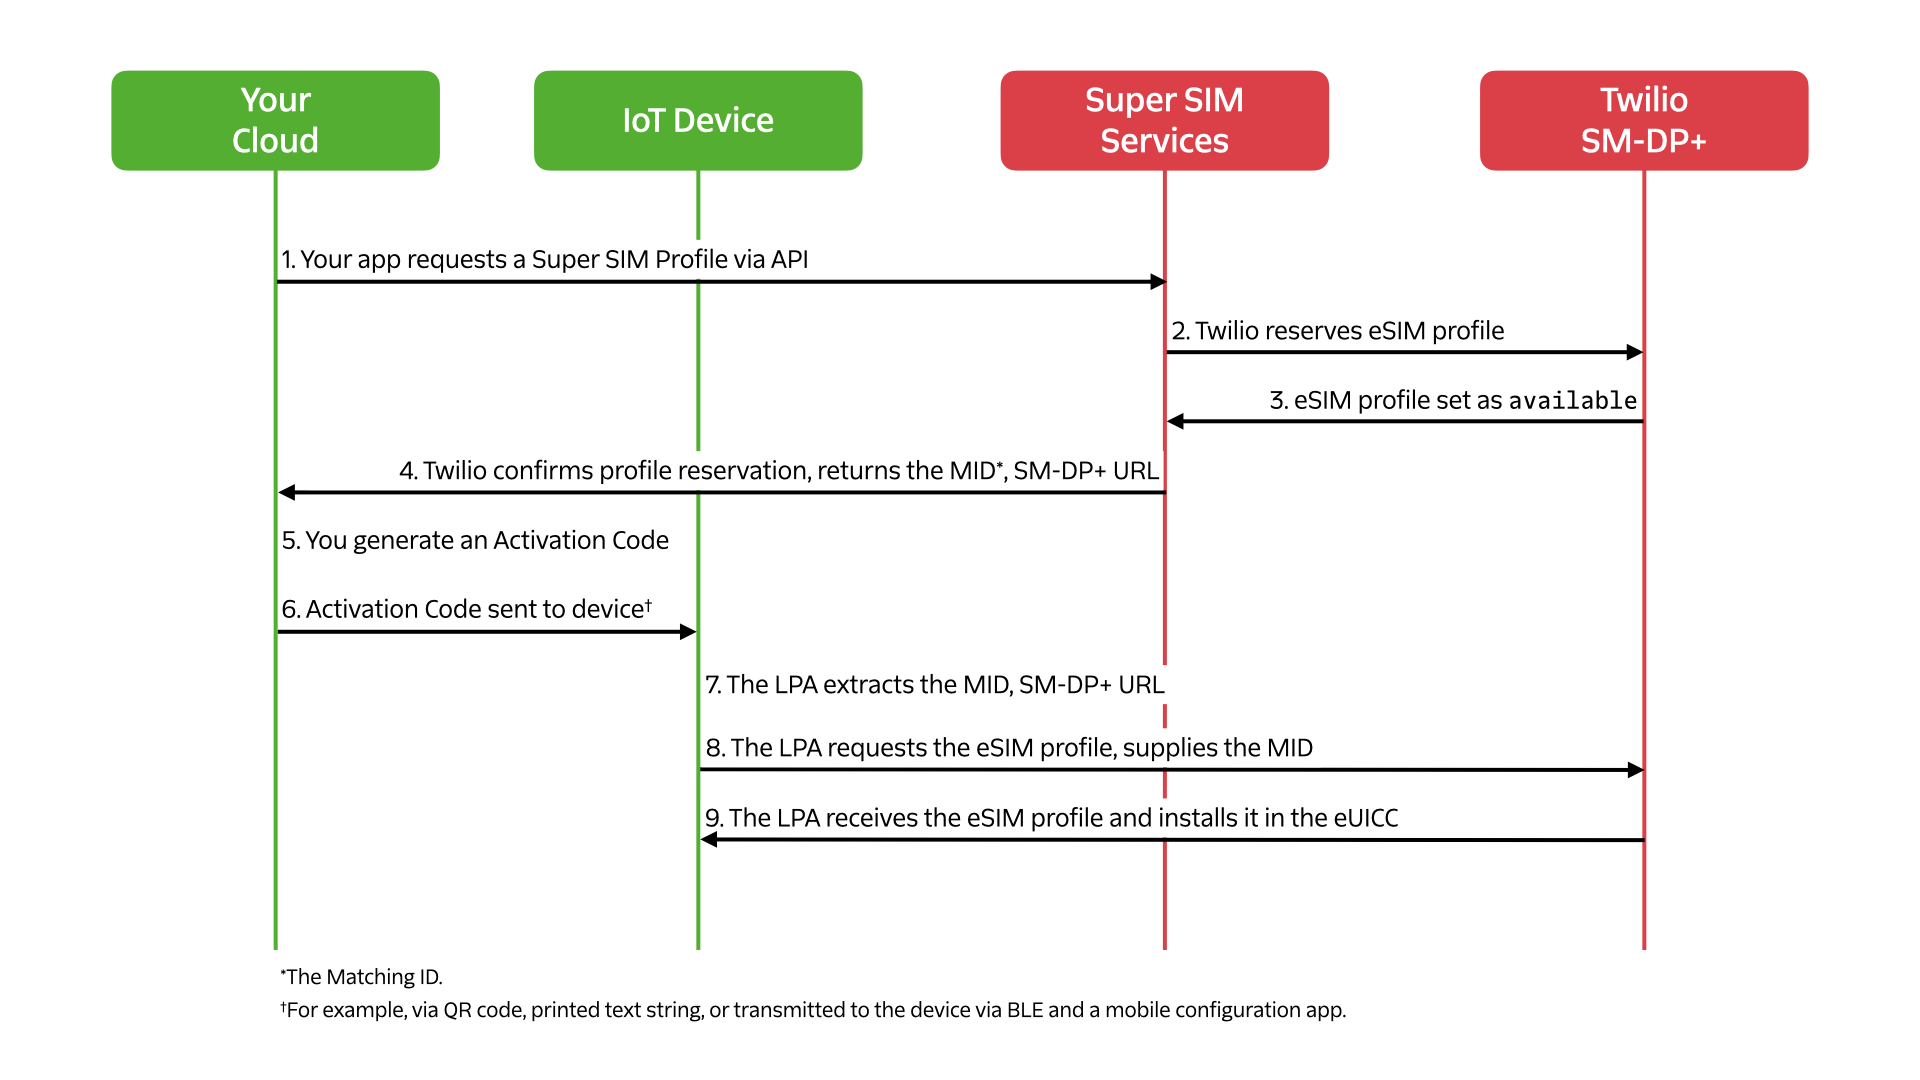
Activation Code also reserves an eSIM Profile on a SM-DP+ server but rather than bind the profile to a specific device, a unique identifier called a Matching ID is generated to identify a specific profile that you can claim later. Any device with that ID can claim the eSIM profile, irrespective of its EID. So when you reserve an eSIM profile, you don't need to know the identity of a target device. Additionally, the SM-DP+ address and matching ID can be combined into a single string to build the Activation Code itself, so the LPA doesn't need to be separately provisioned with this information.
As the Activation Code's value is known before installation, it can be presented in a form that simplifies providing it to the device. A common approach is to supply it as a QR code which can be scanned by devices that include a camera, and the ID and SM-DP+ server address extracted. This makes it ideal as a means to offer eSIM profiles that will be installed by end-users on mobile devices like phones and tablets.
Here is a typical call flow for downloading Super SIM profiles using the Activation Code method:
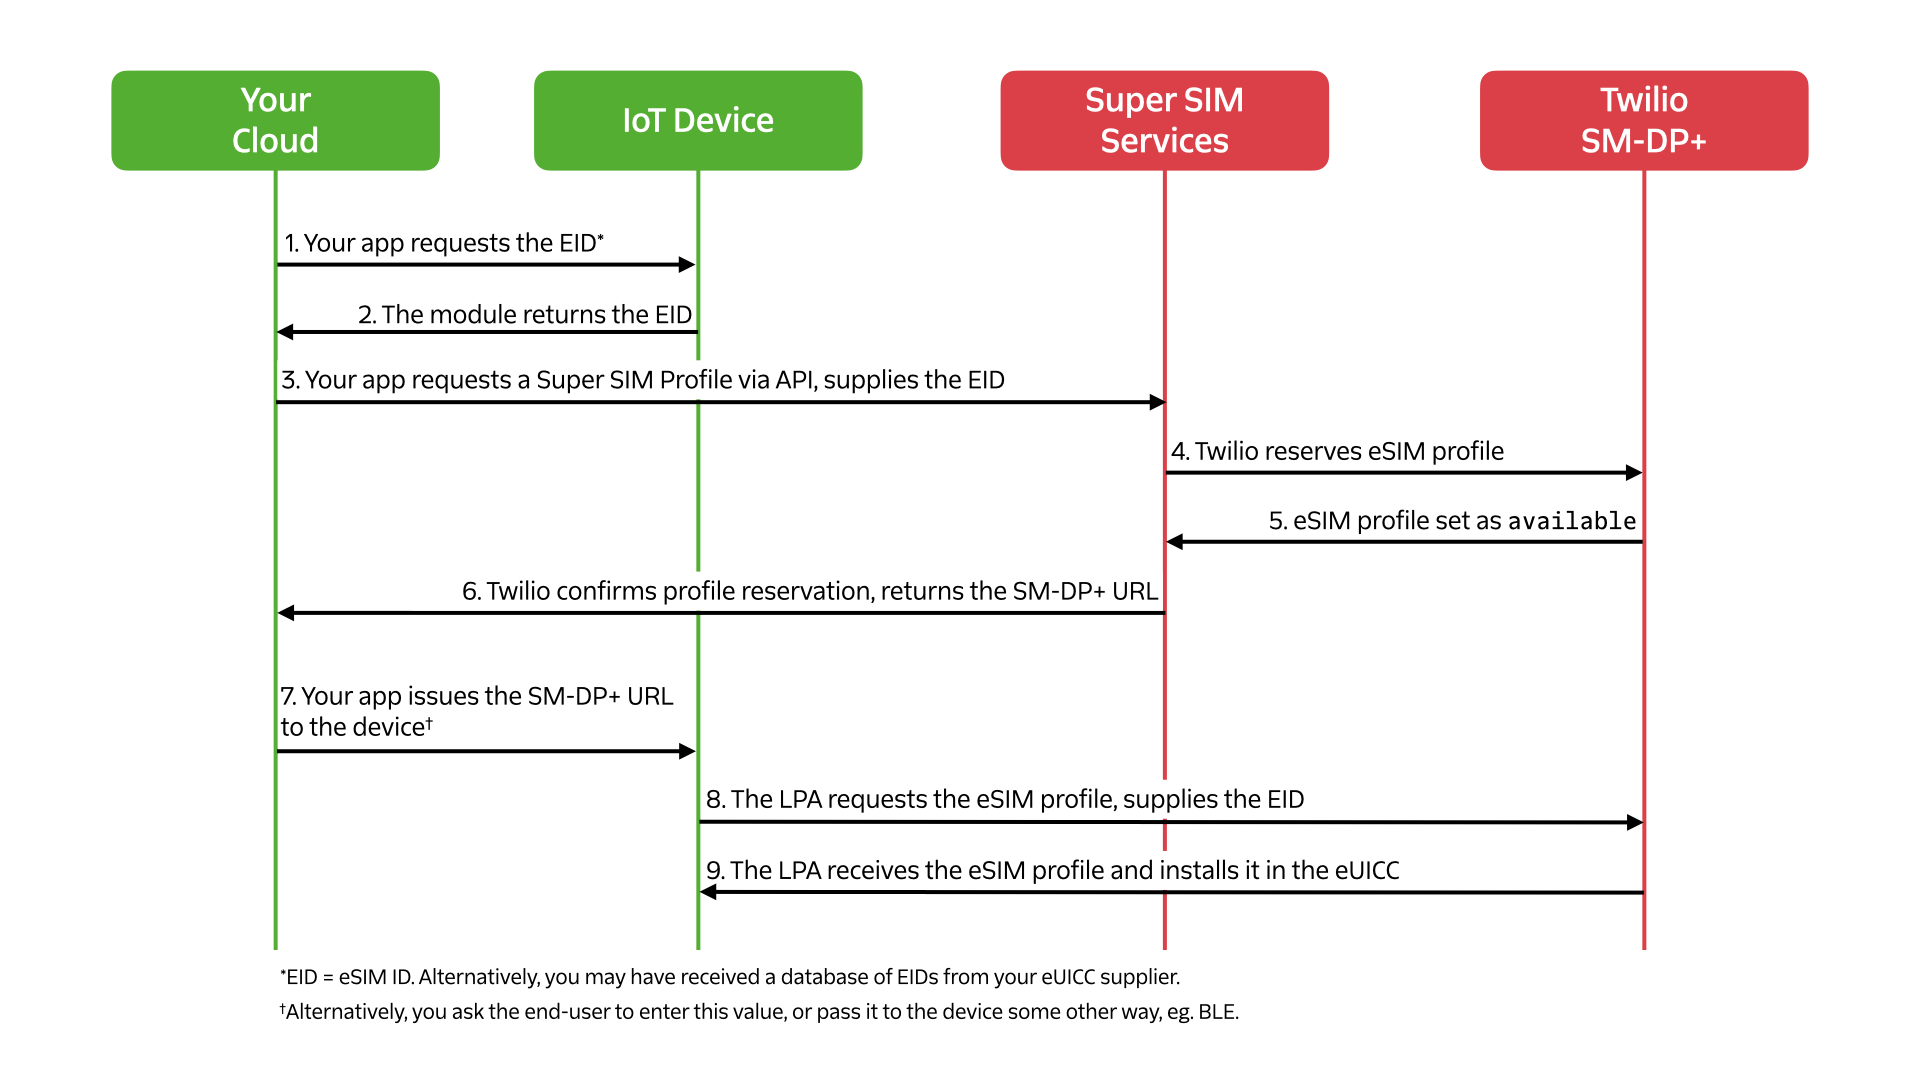
SM-DP+ Default binds the reserved profile to a specific eSIM which is identified by its eSIM ID (EID). Only that eSIM can then make use of the reserved profile. The LPA sends the host's EID to the server, which responds with the eSIM profile reserved for that EID. When you reserve eSIM profiles with this method in mind, you need to know the identity of the target device.
Here is a typical call flow for downloading Super SIM profiles using the SM-DP+ Default method:
However the LPA gets the address of an SM-DP+ server, when it contacts the server it will receive a profile and install it in the eUICC. Once the eSIM profile has been installed and activated, the host device is able to connect to the Internet.
Let's go through each of these phases in detail.
To reserve a profile, you need to send an HTTP POST request containing data appropriate to your chosen installation method to:
_10https://supersim.twilio.com/v1/ESimProfiles
This will create a new eSimProfile resource and initiate the process of reserving its linked eSIM profile on the SM-DP+ server.
If you wish to use the Default SM-DP+ method of profile installation, provide the target device's EID as a URL-encoded request parameter. For example, to make the request using curl:
_10curl -X POST https://supersim.twilio.com/v1/ESimProfiles \_10 -d Eid=<DEVICE_EID> \_10 -u $TWILIO_ACCOUNT_SID:$TWILIO_AUTH_TOKEN
Or to do using the Twilio CLI:
_10twilio api:supersim:v1:esim-profiles:create \_10 --eid=<DEVICE_EID>
Alternatively, to generate an Activation Code, do not supply an EID but instead include a 'generate matching ID' flag:
_10curl -X POST https://supersim.twilio.com/v1/ESimProfiles \_10 -d GenerateMatchingId=true \_10 -u $TWILIO_ACCOUNT_SID:$TWILIO_AUTH_TOKEN
Info
This approach is not yet supported in the Twilio CLI tool.
In every case, the response will include the URL of the eSimProfile resource you will work with.
Reserving an eSIM profile is an asynchronous operation, so the new profile will not be ready to use immediately, though the eSimProfile resource is available straight away. If you're testing the process at the desktop, you can poll the URL provided in the response to your initial request and view the status field of the poll response. When the status is available, the profile is ready for use.
A better approach for server-side code is to provide a callback URL with your initial request.
_10twilio api:supersim:v1:esim-profiles:create \_10 --eid=<DEVICE_EID> \_10 --callback-url=<YOUR_CALLBACK_ENDPOINT>
Twilio will issue a GET request to this URL when the eSIM profile is available for download, but you can change this ti POST:
_10twilio api:supersim:v1:esim-profiles:create \_10 --eid=<DEVICE_EID> \_10 --callback-url=<YOUR_CALLBACK_ENDPOINT> \_10 --callback-method=post
Part of the creation of an eSIM profile is the generation of an associated Sim resource which you use to manage the profile's SIM data. The resource's SID will be included in the poll response as the value of the sim_sid field once the eSimProfile resource's status has become available. At this point, you can also read the SM-DP+ address from the resource's smdp_plus_address field.
If you have asked for an Activation Code Matching ID to be generated, you can read it now from the same response by extracting the value of the matching_id field.
Use the extracted Sim resource SID assign it to a Fleet resource and to activate it:
_10curl -X POST https://supersim.twilio.com/v1/Sims/<YOUR_SIM_SID> \_10 -d "Fleet=<YOUR_FLEET_SID>" \_10 -d "Status=active" \_10 -u "<YOUR_ACCOUNT_SID>:<YOUR_AUTH_TOKEN>"
_10twilio api:supersim:v1:sims:update \_10 --sid=<YOUR_SIM_SID> \_10 --fleet=<YOUR_FLEET_SID> \_10 —-status=active
Assignment and activation are shown here as a single call, but you may choose to perform these tasks separately and at different points in time, depending on your workflow and use case.
This stage will depend on your chosen installation method.
You will have received the Matching ID alongside the SM-DP+ address. Take these two values and format them as follows:
_101$<SM-DP_ADDRESS>$<MATCHING_ID>
Warning
The $ symbol is a field separator, not a shell variable marker.
This is the Activation Code.
Extra formatting may be required depending on how you plan to make the code available. For instance, to use the Activation Code as the basis for a QR code, you need to add a protocol identifier so that QR decoder software knows how to route the extracted data. In this case, the protocol identifier is LPA:, producing:
_10LPA:1$<SM-DP_ADDRESS>$<MATCHING_ID>
This string can be passed to any QR code generation software. There are many online services available — here is an example using the Google charts API:
_10curl -X POST https://chart.googleapis.com/chart \_10 -d cht=qr \_10 -d chs=256x256 \_10 -d chl='LPA:1$<SM-DP_ADDRESS>$<MATCHING_ID>' \_10 -o qr-code.png
The cht parameter indicates the chart type; the chs parameter its size. The chl parameter is the data to be encoded. By default this is a UTF-8 string. The API returns the code as a PNG format graphic.
Warning
If you use a command line tool like curl, make sure you include the encoded data in single quotes to prevent the shell from attempting to substitute values for what it will otherwise assume to variable names.
You will need to provision the target device with the SM-DP+ address you received earlier. If you are working with an eSIM-compatible Android or iOS device, each OS' Settings app provides a path to enter this information manually — for more information, please see Get Started with Super SIM eSIM Profiles for eUICCs. For an embedded device, however, you will need to consult your LPA provider to learn how to code your application to provision the LPA with the address after retrieving it from your cloud.
Again, this stage will depend on your chosen download method.
Devices which allow the user to input an Activation Code, either by keying in the code manually or by scanning a QR code derived from it, will extract the SM-DP+ address and Matching ID, and pass them to the LPA, which will contact the server at that time and retrieve the eSIM profile.
In the case of the Default SM-DP+ method, installation typically takes place when the LPA first starts up and there is no profile in the eUICC: it will contact the provisioned server and pass the host EID. The server will respond with the eSIM profile for installation. If the SM-DP+ server address has just been entered manually — for example, into an Android or iOS device — then the LPA will contact the server at that time.
Take a look at the guide Get Started with Super SIM eSIM Profiles for eUICCs to see how to apply the installation methods to Android and iOS devices.
Warning
A Super SIM profile can be downloaded only once to an eSIM. Once it is downloaded, it can be used only with that eSIM. It cannot be downloaded again or used with another eSIM.