Get Started with Super SIM IP Commands and the Raspberry Pi
IP Commands is a new Super SIM feature that allows your cloud to communicate with your IoT devices by exchanging IP/UDP messages. You can use IP Commands to send server-initiated IP messages from your cloud to your Super SIM-connected devices. The best part is that you don't actually need to know a device's IP address — Twilio will handle that for you. Nor do you need to maintain a persistent connection between a device and your server.
You can think of IP Commands as a lightweight alternative to using a Virtual Private Network (VPN) to reach a device from your cloud and exchange information.
This information is transferred in the form of User Datagram Protocol (UDP) messages. UDP provides basic, 'fire and forget' data exchange: there's no connection established between sender and receiver — and no guarantee that the message will be delivered. This simplicity makes UDP ideal for lightweight IoT applications: it's a great way to send commands ("change the air con setting to 40C") to a connected device. Such commands might come from your cloud, or from your app running on an end-user's mobile device. They would be more structured than the colloquial example shown above, and completely flexible: your application not the transport defines the command-response interaction.
This short guide will take you through setting up IP Commands so you can try it out. If you just want to cut to the chase and start developing the feature into your application, check out the API documentation and sample code.
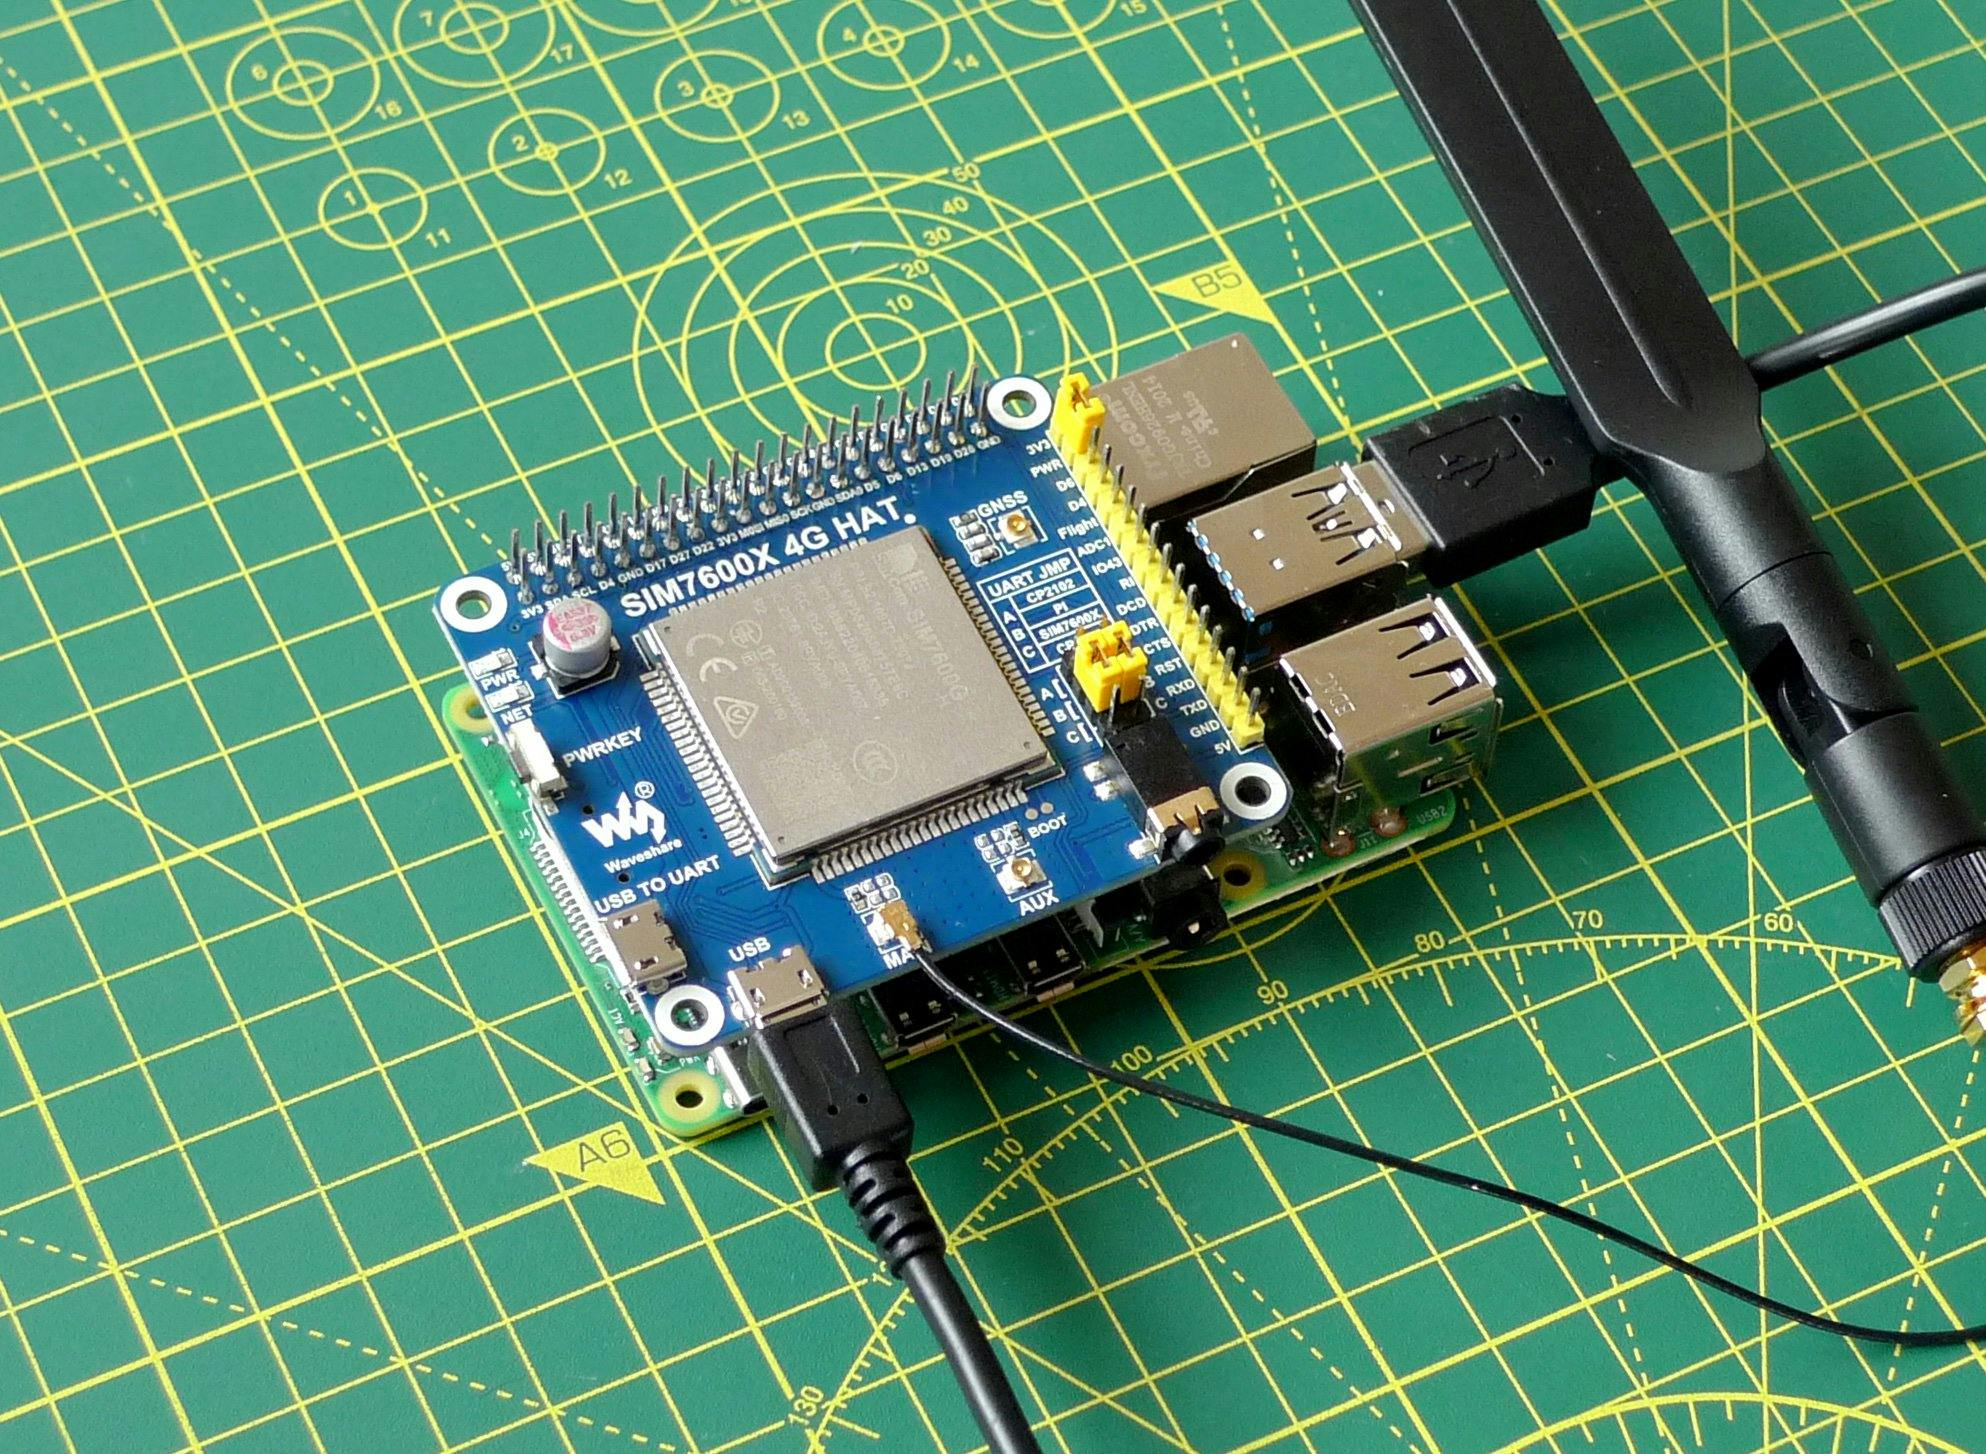
To demonstrate IP Commands, we'll use a Raspberry Pi 4 Linux computer and a Waveshare's SIM7600G-H add-on board, which incorporates a Simcom 7600G global LTE modem. Please head over to the Super SIM Quickstart now for a list of the hardware you need and guidance on putting it together. When you've reached Step 4, jump back here and finish the Quickstart later.
Info
If you'd like to try IP Commands with different hardware, we have a tutorial that focuses on the Raspberry Pi Pico microcontroller board.
Info
This tutorial was originally written to make use of the original Sixfab Cellular IoT Hat, which has since been EOL'd. If you have a Cellular IoT Hat, you can find the AT commands used by its BG96 cellular module at the end of the tutorial.
Info
This guide also requires a configured Super SIM. If you haven't set up your Super SIM in the Console, please do so now. The Super SIM First Steps guide has help if you need it.
You can perform all of the following steps using the Raspberry Pi as both the target device — i.e., the one with the modem — and as a stand-in for your cloud or app. You can also use your main computer for the latter, but using the Pi for both saves moving between machines.
You will first need to install and configure Twilio's CLI tool on whichever machine you are using to send commands to the device.
To send or receive messages, you need to set up the device's 7600G module for UDP communication.
- First, check the Waveshare Hat's NET LED — if it's not lit, press its PWRKEY button. NET should light up.
-
By default, the Raspberry Pi will boot to the desktop. If it's one you've used before and set to boot to the command line, just run
startxto launch the desktop. - Select Accessories > Terminal from the Raspberry menu.
-
You'll use a command-line serial console tool called Minicom to communicate with the Hat's cellular module. If you would prefer to use an alternative tool, such as Screen, that's fine, but it may have a slightly different device-selection procedure than the one outlined here. Install Minicom with these two commands:
_10sudo apt update_10sudo apt install minicom -y -
Enter
minicom -D /dev/ttyUSB2to open a connection to the 7600G module. If Minicom posts an error indicating that/dev/ttyUSB2is inaccessible, please check your Hat setup . -
Enter
AT+CSCS="IRA"to change the module's display character set. It tells the module to display characters in the International Reference Alphabet (IRA). We need this to view the braces in the JSON as they are not part of the standard GSM character set, which is the module's default.
Info
The 7600G probably isn't set to echo back what you type in, so you won't be able to see your side of the conversation. Type in ATE1 and hit Enter . You'll get an OK back, and when you follow the remaining steps you'll see what you type!
To establish a UDP socket on the device, you need to configure and activate a cellular data connection (a 'PDP context') and then open the socket. These three steps are achieved with the following commands — key them in one by one, hitting Enter after each:
_10AT+CGDCONT=1,"IP","super"_10AT+CIPCCFG=10,0,,1,1,,500_10AT+NETOPEN_10AT+CIPOPEN=1,"UDP",,,3030
What do these AT commands do? The first configures a connection to Super SIM's APN, super. The first 1 is the PDP context ID we want to use. The second parameter indicates that we're using an IP link.
The second AT command configures a number of socket parameters.
The third AT commands opens the socket.
The fourth AT command opens a connection over the socket. The first 1 is the link number. The string "UDP" tells the 7600G the type the socket to create. The 3030 at the end is the local port for incoming traffic — we'll make use of this in the next step.
If the socket setup process succeeds, you'll eventually see +CIPOPEN: 1,0 displayed in the terminal.
- Open a second LX Terminal instance on the Pi, or a terminal on your main machine.
-
Let's say this is the message we want to send to the device:
_10{ "command": "wake up",_10"timestamp": "2021-03-08-14-02-49" }It's a command encoded in JSON, though you can use any other textual format and with whatever combination of keys and values that's appropriate for your application. You can send this message to your device using the
twiliotool as follows:_10twilio api:supersim:v1:ip-commands:create \_10--sim <YOUR_SIM_NAME_OR_SID> \_10--payload '{"command":"wake up","time":"2021-03-08-14-02-49"}' \_10--device-port 3030Copy and paste the
twiliocommand to the command line then edit it to fill in the identifier of the Super SIM you're using (you can get this from the Console if you don't have it handy), and your account credentials (also available from the Console). The message is the value of the payload parameter. Make sure you set the--device-portvalue to the one you chose when you configured the UDP socket in the previous section.
The response, posted to the terminal by twilio, will be something like this:
_10SID Status Date Created_10HGxxxxxxxxxxxxxxxxxxxxxxxxxxxxxxxx queued Jan 26 2022 15:37:10 GMT+0000
As you can see, the message's status is queued: it's in Twilio's message queue waiting to be sent. When the IP Command leaves the Twilio Mobile Core for the network the device is attached to, its status will become sent. Later on, you'll use a webhook, which you'll set up in the next section, to receive notifications about message status changes as they happen. For details of the possible status values you may see, take a look at the API documentation.
The message will probably already have arrived. You'll know it has because you should see it displayed in Minicom:
_10RECV FROM:100.64.0.1:3030_10+RECEIVE,1,50_10{"command":"wake up","time":"2021-03-08-14-02-49"}
Decoding this input, the top line's 100.64.0.1 is the Twilio IP address it has been relayed from, and 3030 is the port you chose when you configured the socket. On the next line, the 50 is the number of bytes in the message. The third line is the message you sent.
You don't have to send text — IP Commands supports binary data too. To send information in this form, just add the --payload-type parameter to your twilio call and add the value "binary":
_10twilio api:supersim:v1:ip-commands:create \_10 --sim <YOUR_SIM_NAME_OR_SID> \_10 --payload '{"command":"wake up","time":"2021-03-08-14-02-49"}' \_10 --payload-type binary_10 --device-port 3030
Of course, in a real-world application the message would come from your server, not be sent manually, and your device-side application would be actively checking for incoming messages and parsing any that arrive, but the demo gives you a picture of the flow.
However, IP Commands isn't a one-way route — let's see how messages can travel in the opposite direction, from the device.
The IP Commands API provides a specific IP address, 100.60.0.1, to which all IP Commands, from every device are sent. Twilio uses a little bit of magic to streamline the relay of your messages to your cloud. How does it know where to send them? You specify a webhook address.
Super SIMs are organized into Fleets: groups of SIMs that have common settings, such as which networks they are able to connect to and whether they can make use of cellular data services. Fleets are represented in the Super SIM API by Fleet resources, and IP Commands adds a property to each Fleet resource in which you can store your IP Commands webhook address.
So before we can send a message, we need to set up a webhook target URL and add that to your Super SIM's Fleet.
Beeceptor is a handy service for testing webhooks. It's designed for developing and testing APIs of your own, and offers free mock servers — virtual endpoints that can receive webhook calls. Let's set one up to receive messages from the device.
- In a web browser tab, go to Beeceptor .
-
Enter an endpoint name and click Create Endpoint:

-
On the screen that appears next, click on the upper of the two clipboard icons to copy the endpoint URL:

- Keep the tab open.
Now you update your Super SIM's Fleet to add an IP Commands webhook. You can do this with the API, but we'll use the Console for this demo.
- Open a second web browser tab and log into the Twilio Console .
- Go to IoT > Super SIM > Fleets and select the Fleet containing the Super SIM you are using.
-
Scroll down to
IP Commands Callback URL
and paste in your webhook URL from the previous section. By default, webhooks are triggered with a
POSTrequest. Leave it unchanged for now, but if you need to use another method for your own application, you can change it later. - Click Save .
- Close the tab if you like.
-
In the LX Terminal instance running Minicom — the one you're using to talk to the 7600G — enter the following command:
_10AT+CIPSEND=1,15,"100.64.0.1",6969This tells the module to take the next 15 bytes of data it will receive and send them to the specified IP address — the standard Twilio entry point for IP Commands originated by the device — as a UDP message. The
1at the start is the ID of the link number you set up earlier. The6969is the remote port; Twilio doesn't care about thus so we're using a random value. -
Minicom will display a
>symbol to show the 7600G is awaiting some text. Key in a message —Pi says hello!!, for example — and the module will grab the first 15 characters and attempt to send them. You'll seeOKif it succeeded.
Info
If you don't include a length value in the AT+CIPSEND command, i.e., enter AT+CIPSEND=1,,"100.64.0.1",6969, the module will wait for you to enter any number of characters. Just hold down CTRL and hit Z to send the message when you're ready.
-
Jump back to the Beeceptor tab in the browser. You should see — or will shortly see — the endpoint has received a
POSTrequest. Click on it to see the request body, then on the JSON icon, {:} , to view the data more clearly. -
Unlike messages sent to the device, which can be text or binary, messages that are sent from the device are always binary. The string you entered has been base64 encoded, so it'll need decoding before you can read it. Look for the line beginning
Payload=and copy the characters that appear after it, up until the end of the line. It'll look something like this:_10UGkgc2F5cyBoZWxsbyEhCg== -
Switch to a spare terminal and enter:
_10echo <BASE64_ENCODED_STRING> | base64 -dmaking sure you paste the text you copied between the
echoand the|symbol as indicated. You'll be presented with the message you sent from the device in the previous section:Pi says hello!!
The webhook URL you just put in place was set up to receive IP Commands from the device. You can also use it in a tutorial context for monitoring messages being sent to the device. Use the same technique you applied in the Send IP Commands to the device section, above, but this time add the following extra parameter to the twilio call, adding --callback-url <YOUR_WEBHOOK_URL> with your Beeceptor endpoint:
_10twilio api:supersim:v1:ip-commands:create \_10 --sim <YOUR_SIM_NAME_OR_SID> \_10 --payload '{"command":"wake up","time":"2021-03-08-14-02-49"}' \_10 --device-port 3030 \_10 --callback-url <YOUR_WEBHOOK_URL>
Now you'll receive a series of notification messages as the IP Command's status moves from queued to sent. For details of the possible status values you may see, take a look at the API documentation.
You've set up a Simcom SIM7600G cellular modem to send and receive UDP messages over a data connection, then you've sent messages to the device and back again, all through Twilio Super SIM's IP Commands API.
You can try sending some alternative messages, including some binary data.
IP Command Resources are persisted for 30 days, so you can check your send and receive histories at any time. For example, a GET request made to https://supersim.twilio.com/v1/IpCommands will fetch all existing resources for inspection. If you have the SID of a specific Command's resource, you can add it as a path value to the endpoint above. Try it now.
The next stage, of course, is to build a device-side app that listens for commands, parses them and triggers actions accordingly. You may also want to create a server app that's able to request information from devices: it sends a request command which causes the device to send a second, data-bearing message back. Or you might code up a mobile app that uses IP Commands to control the device remotely.
We can't wait to see what you build with Super SIM IP Commands!
This tutorial was originally written to make use of the original Sixfab Cellular IoT Hat, which has since been EOL'd. If you have a Cellular IoT Hat and would like to try this tutorial, the key changes you need to take note of are in the sections on preparing the device for use, setting up a UDP socket, reading messages on the device, and sending a message from the device.
To communicate with the Hat's Quectel BG96 module, use minicom -D /dev/ttyUSB3.
To establish a UDP socket, enter:
_10AT+QICSGP=1,1,"super"_10AT+QIACT=1_10AT+QIOPEN=1,1,"UDP SERVICE","127.0.0.1",0,3030,0
Read a message received by the device with this command:
_10AT+QIRD=1
To transmit a message, enter:
_10AT+QISEND=1,15,"100.64.0.1",6969