Route Inbound Sales Leads with Twilio Studio
Route inbound sales leads to the right person with Twilio Studio and Twilio Functions. In this example, you'll build a system that routes callers to representatives based on how large their company is. The application will do the following:
- Respond to an incoming phone call from a potential customer
- Collect input from the caller about the number of employees at their company
- Send that number to a Twilio Function, which will then fetch the contact information for the correct representative based on the user's input
- Connect the caller to correct representative over the phone
Before you get started, you'll need:
- A Twilio Account. If you are new to Twilio create a free account . You can review the features and limitations of a free Twilio account here .
- A Twilio Phone Number. View instructions for purchasing a Twilio Phone Number here .
You'll start with a new Twilio Studio Flow. A Flow is an individual workflow you create to handle your use case. For example, in this case we're going to be creating an autoresponder workflow, which responds to an incoming message with another message. All the logic for this will exist in the Twilio Studio Flow you create.
To create a new Flow:
- Log into your Twilio account in the Twilio Console
- Navigate to the Studio Dashboard in the Console
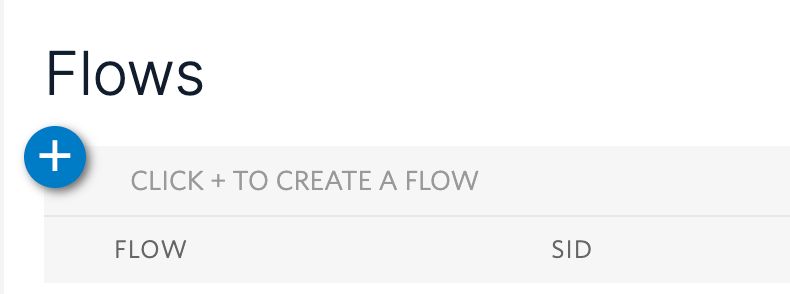
-
Click the + icon underneath the Flows heading to create a new Flow
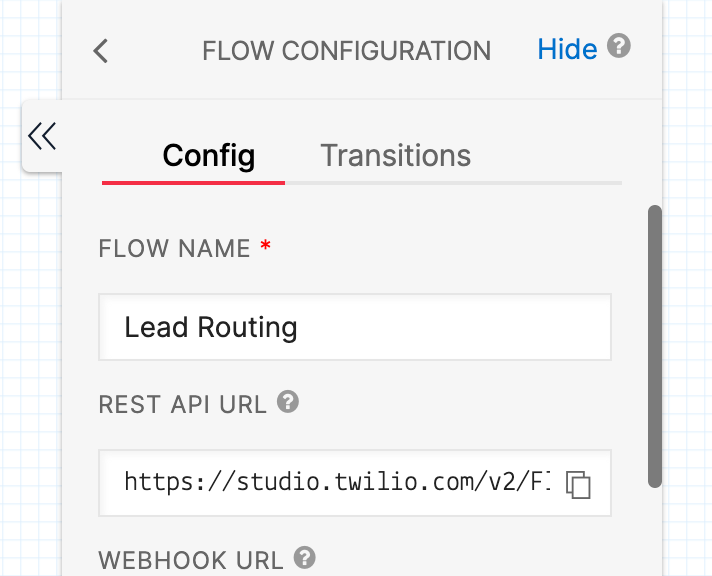
- Next, you'll name your Flow. You can name it anything you like. In this example, we're calling it "Lead Routing". Then, click Next .
- After you've named your Flow, you'll see a list of possible templates you can use. In this case, you'll start with an empty Flow and build all the logic for it yourself, so you should select the Start from scratch option. Then, click Next .
After you've created the Flow, you'll see the Flow's Canvas. The Canvas is where you will build out the rest of the logic for the autoresponder.
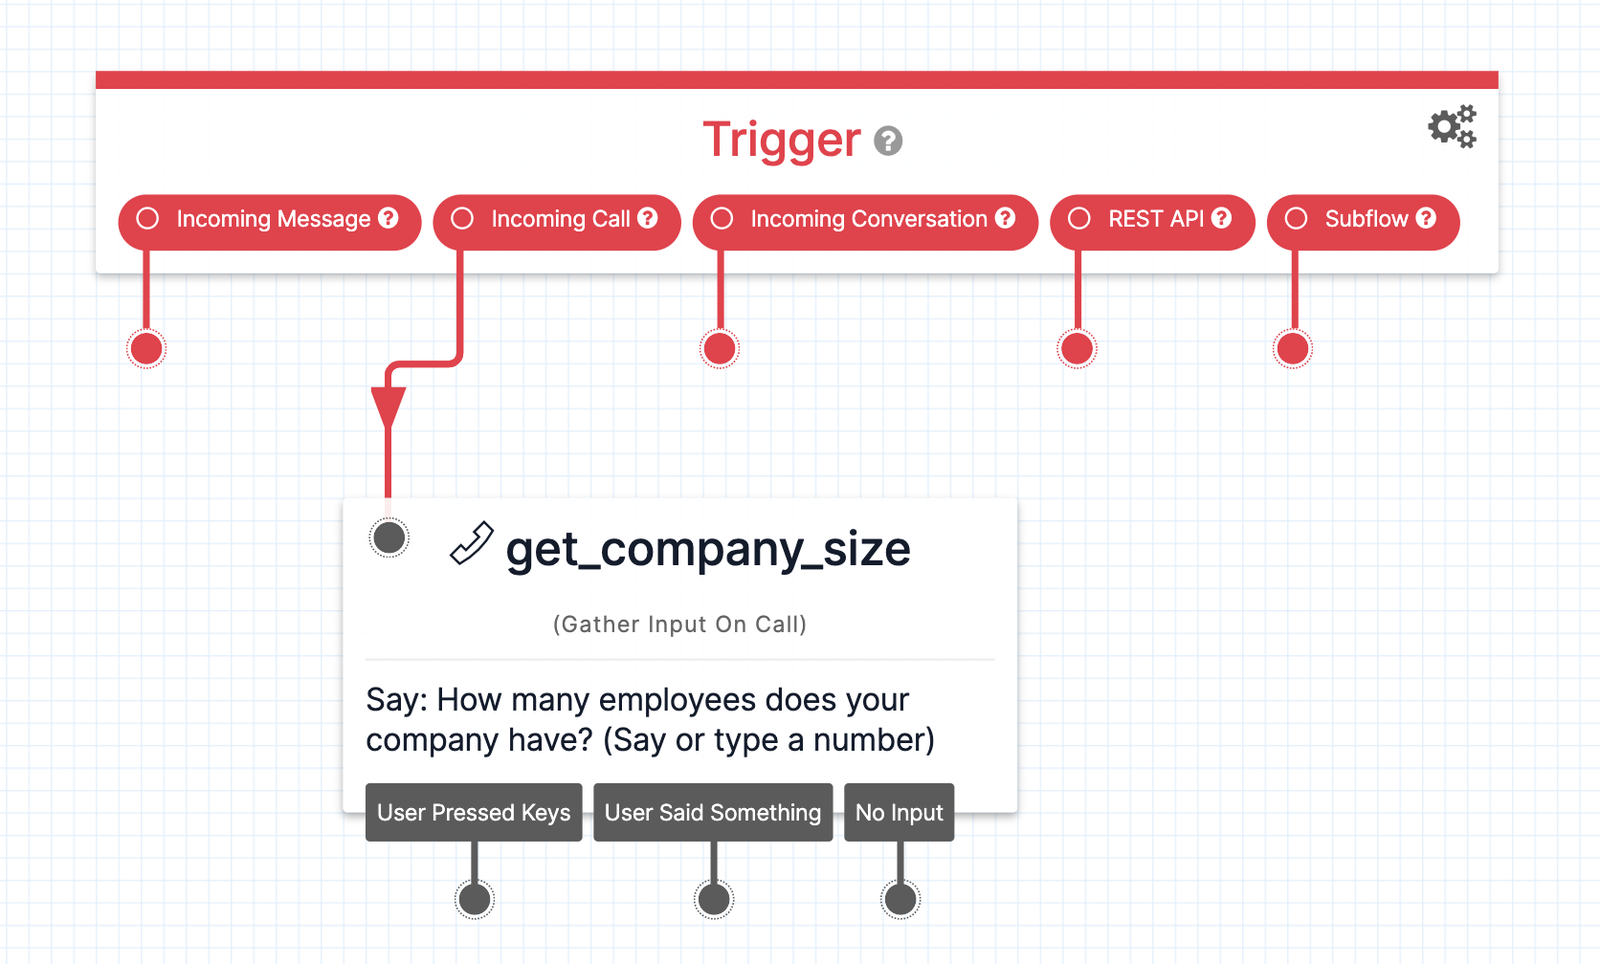
The Canvas starts with a Trigger Widget already in place. This Widget kicks off the Flow when the trigger you specify happens. In this case, the trigger is going to be an Incoming Call.
In a later step, you'll configure a specific Twilio phone number to connect to this Studio Flow. Then, whenever a call comes into that Twilio number, this Flow will run because you specified that the trigger should be an Incoming Call.
On the right-hand side of the Canvas, you'll see the Widget Library. This menu contains all the possible Widgets you can add to your Canvas to build your Studio Flow.
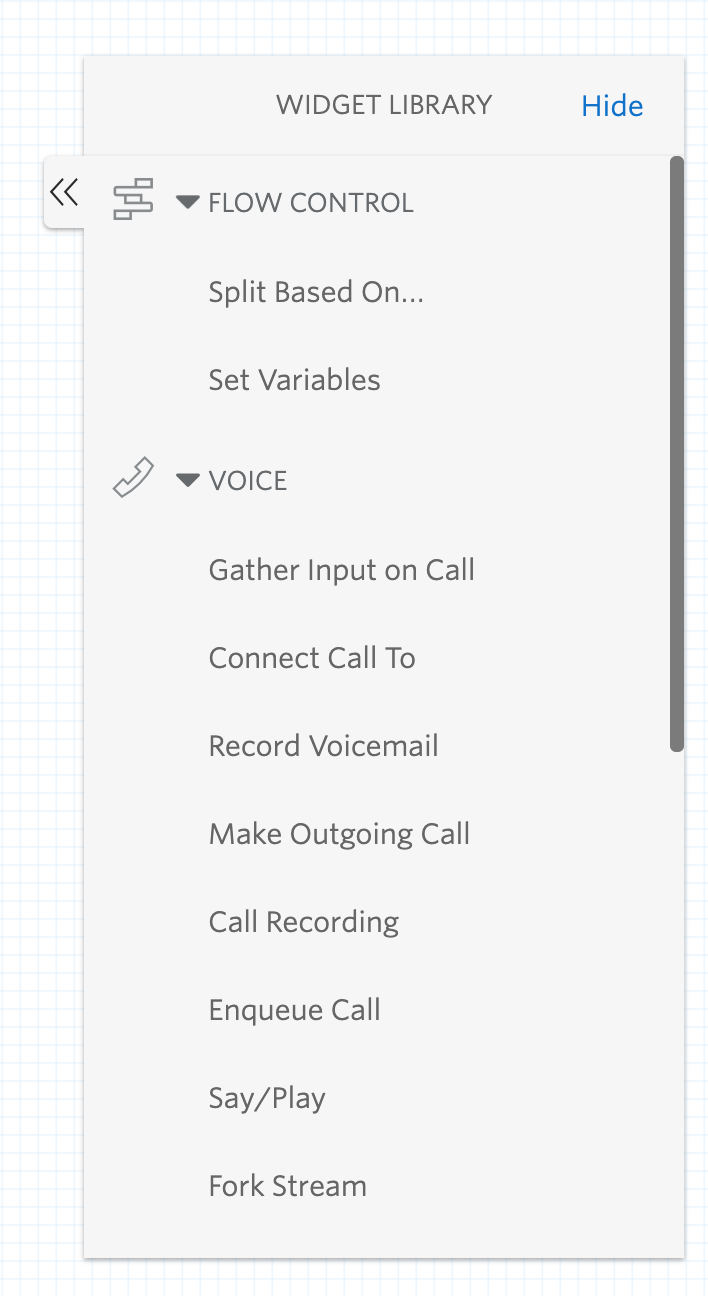
When you click onto a specific Widget (for example, if you click onto the Trigger Widget that's already on the Canvas), this menu on the right will switch to the specific Widget's configuration menu. This is where you can edit the Widget.
To get back to the Widget Library, you can click on any empty space on the Canvas, and the menu will switch back to the list of available Widgets. You can then click back onto a Widget to get into its configuration menu.
The first Widget you'll add to the page is the Gather Input on Call Widget. This Widget can collect input from a caller either via speech recognition or DTMF keypresses (when the user presses number keys on their phone).
From the Widget Library on the right side of the page, click and hold the Gather Input on Call widget, drag it onto the Canvas, and drop it anywhere. Once it's on the Canvas, you can move it wherever you'd like by clicking and dragging it.
First, you'll connect the Gather Input on Call Widget to the Incoming Call trigger, so that when a call comes in, the Studio Flow knows to run this first Widget.
Click and hold the red dot under Incoming Call in the Trigger Widget. While clicking and holding, drag that red dot onto the Gather Input on Call Widget you just placed. This will create a line connecting the two Widgets, with an arrow showing the direction that the workflow logic goes. In this case, the Canvas shows that when an incoming call comes in, it triggers the Flow and runs the Send Message Widget.
With this Widget, you'll prompt the user to enter the number of employees in their company, so that you can route the call to the correct representative.
Click on the Widget on the Canvas to open its configuration menu. You can change the default Widget name to something meaningful, for example, get_company_size. Then, under the Say or Play a Message dropdown, select "Say a Message". Type your question into the Text To Say field. This example will use the following question:
_10How many employees does your company have? (Say or type a number)
You can optionally select the language that this message is in (the default is English) and the voice to speak this voice message with. The Widget uses Text-to-Speech to speak the message to the caller. Learn more Text-to-Speech and the different available voices and languages here.
At this point, your Canvas should look like this.
Callers can respond to the Gather Input on Call Widget in two ways:
- Saying a number
- Pressing a number key
You'll handle both cases in the next steps.
First, you'll handle the case where the user says something in response to the Widget's prompt.
It's possible that someone might say something that isn't a number, so you'll have to handle the case where the user says something that does not match what you asked. To do this, you can use the Split Based On… Widget. This Widget can check a value (in this case, what the user said) and perform different actions based on specific conditions you define.
- Open the Widget Library by clicking on an empty space on the Canvas, and then drag the Split Based On... Widget onto the Canvas.
-
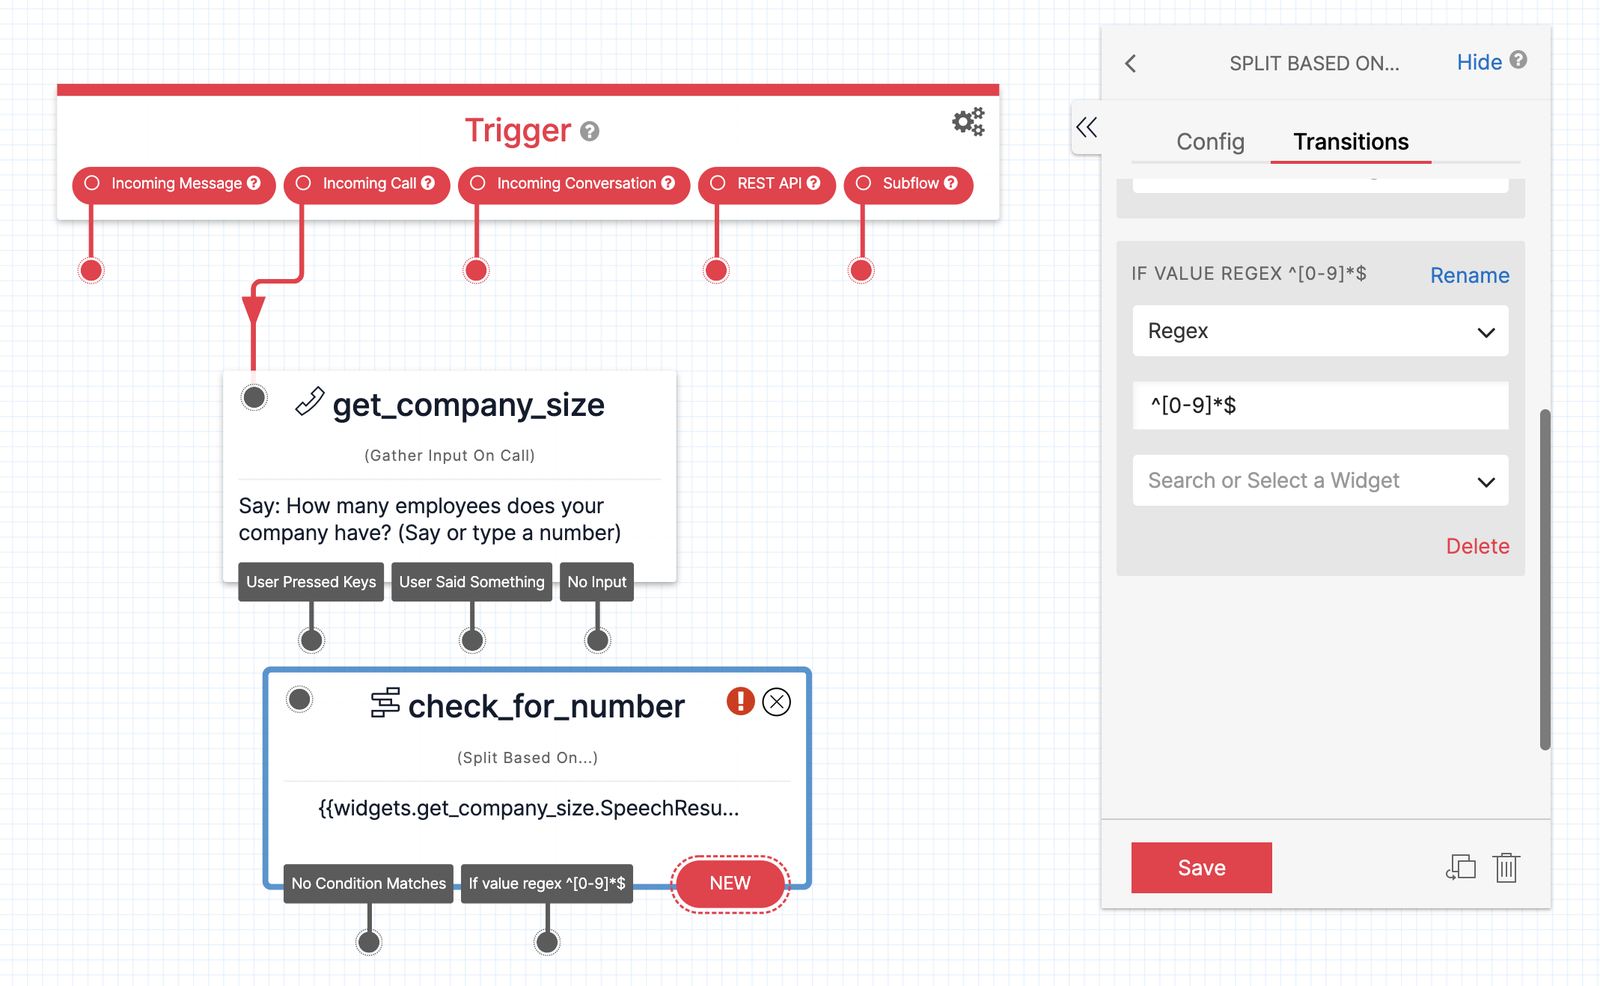
Click on the new Split Based On... Widget you added to open its configuration menu. You can change the default name to something that makes more sense for the Widget; for example,
check_for_number. -
Then, set the
Variable To Test
to the
SpeechResultfrom your Gather Input on Call Widget — in this case, that would be{{widgets.get_company_size.SpeechResult}}
Info
Twilio Studio uses the Liquid templating language to allow you to add dynamic content to your Widgets. The curly braces {{...}} indicate that you are referencing a variable from the Studio Flow. See more in the Liquid Template Language documentation.
The condition match we'll be checking for answers the question "is this a number?" so we'll use a regex to check this. A regex checks that the provided input conforms to a pattern that is specified. Create a new Transition, select Regex from the dropdown, and enter ^[0-9]*$ in the next field. This regex pattern checks if the provided input is a numeric digit.
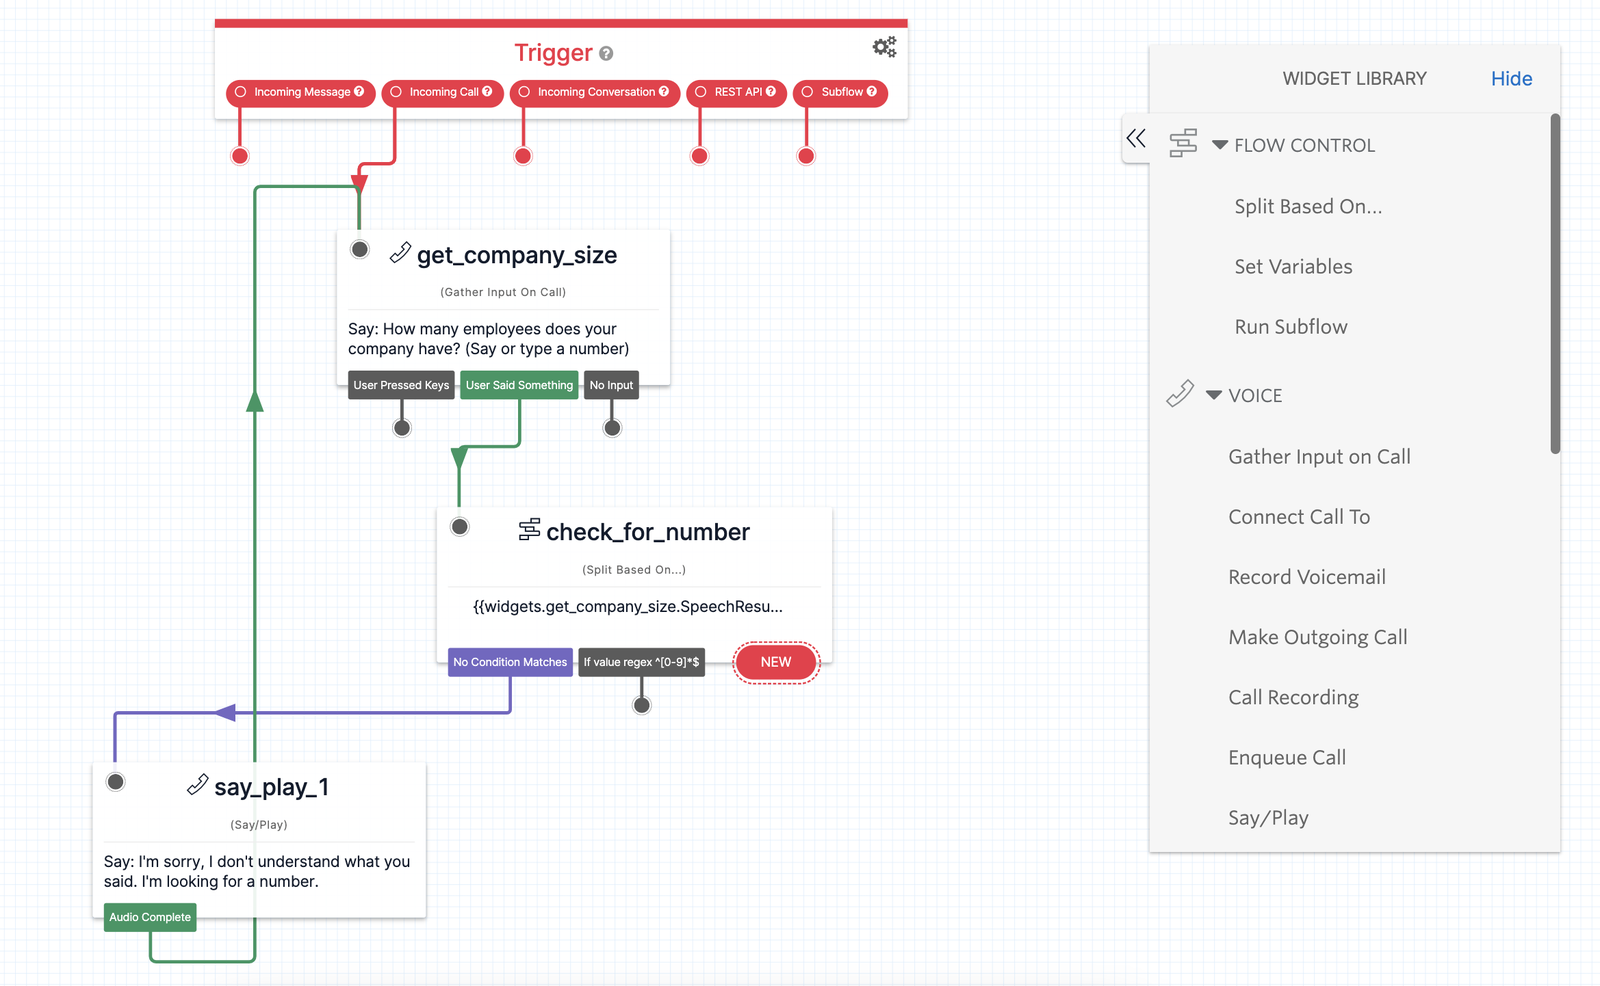
First, handle the "not a number" case. Drag a new Say/Play Widget onto the Canvas and connect it to the No Condition Matches transition from the Split Based On... Widget. Enter a message of your choosing, then connect the Audio Complete dot back to the Gather widget from earlier so the user is re-prompted to say or type a number. This example will use the following message:
_10I'm sorry, I don't understand what you said. I'm looking for a number.
The next step is to handle things in the expected case — when the user says a valid number. In order to route the call to the representative, you'll need to use some logic to determine which representative should take the call and then pass the representative's phone number to the Flow. You can do this with a Twilio Function.
-
Navigate to the
Functions
section of the Twilio Console and create a new Service by pressing on
Create Service
. Name the service. This example will use
RouteLeads. -
Add a Function by clicking on
Add +
and selecting
Add Function
. Name the path
get-phone-number. - Paste the following code into your new Function, modifying the result numbers and size criteria to fit your organization's needs.
_24exports.handler = (context, event, callback) => {_24 const size = event.size;_24 let result = "";_24_24_24 switch (true) {_24 case (size < 50):_24 result = '555-867-5310';_24 break;_24 case (size < 100):_24 result = '555-867-5311';_24 break;_24 case (size < 1000):_24 result = '555-867-5312';_24 break;_24 case (size > 1000):_24 result = '555-867-5313';_24 break;_24 default:_24 result = '555-867-5309';_24 }_24_24 callback(null, result);_24};
Your Function should look somewhat like this:
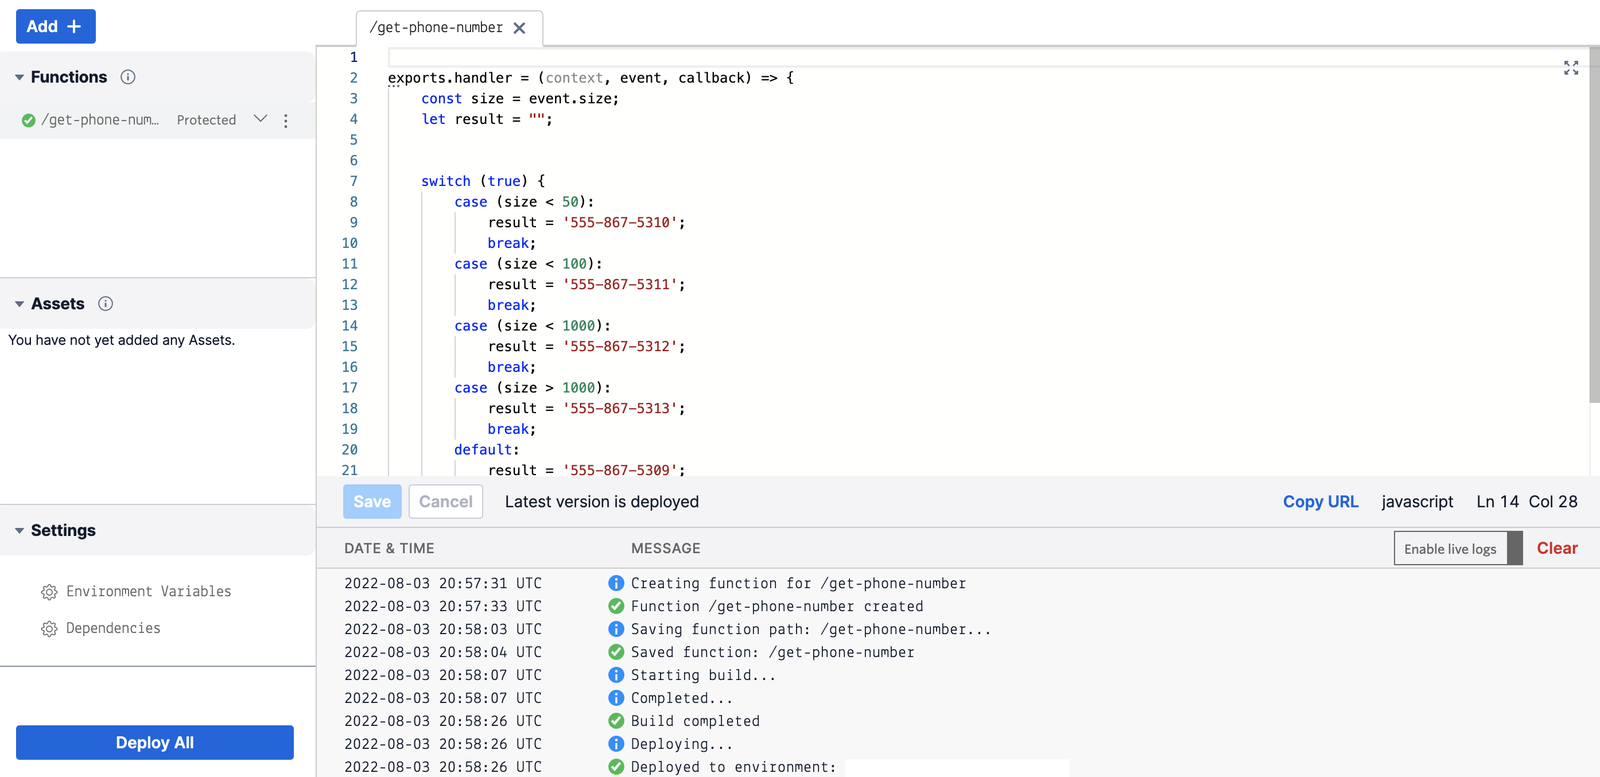
Click Save to save your Function. Deploy the function by clicking on Deploy All. You can now return to your Studio Flow.
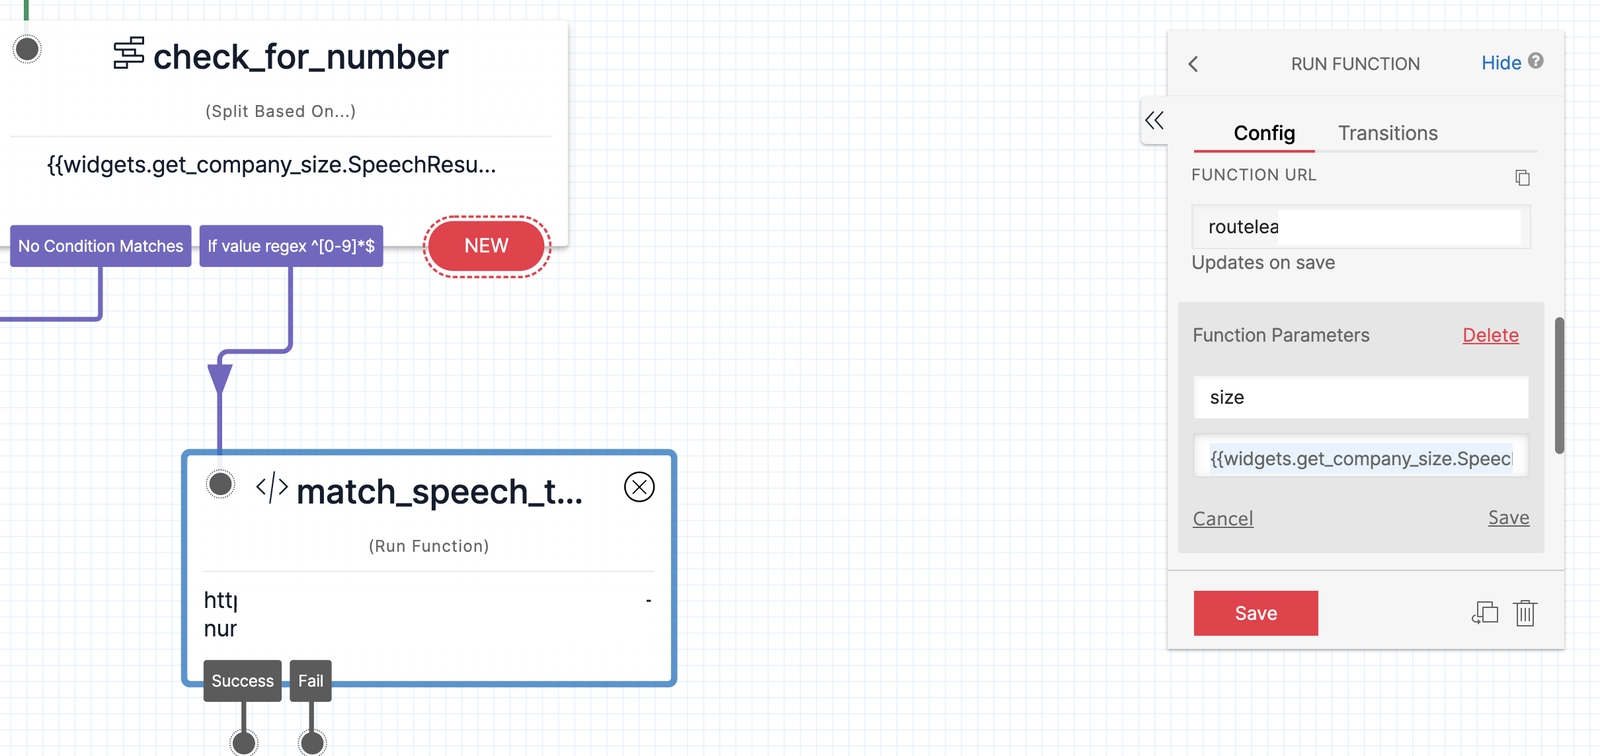
Drag a new Run Function Widget onto the Canvas, and connect it to the dangling regex dot from the Split Based On... Widget. You'll need to pass one parameter to the Function — the size that we gathered from the SpeechResult. Click + in the Function Parameters section of the right sidebar to create a new parameter and set the key to size and the value to the SpeechResult — in this sample, it's {{widgets.get_company_size.SpeechResult}}. Save your new parameter.
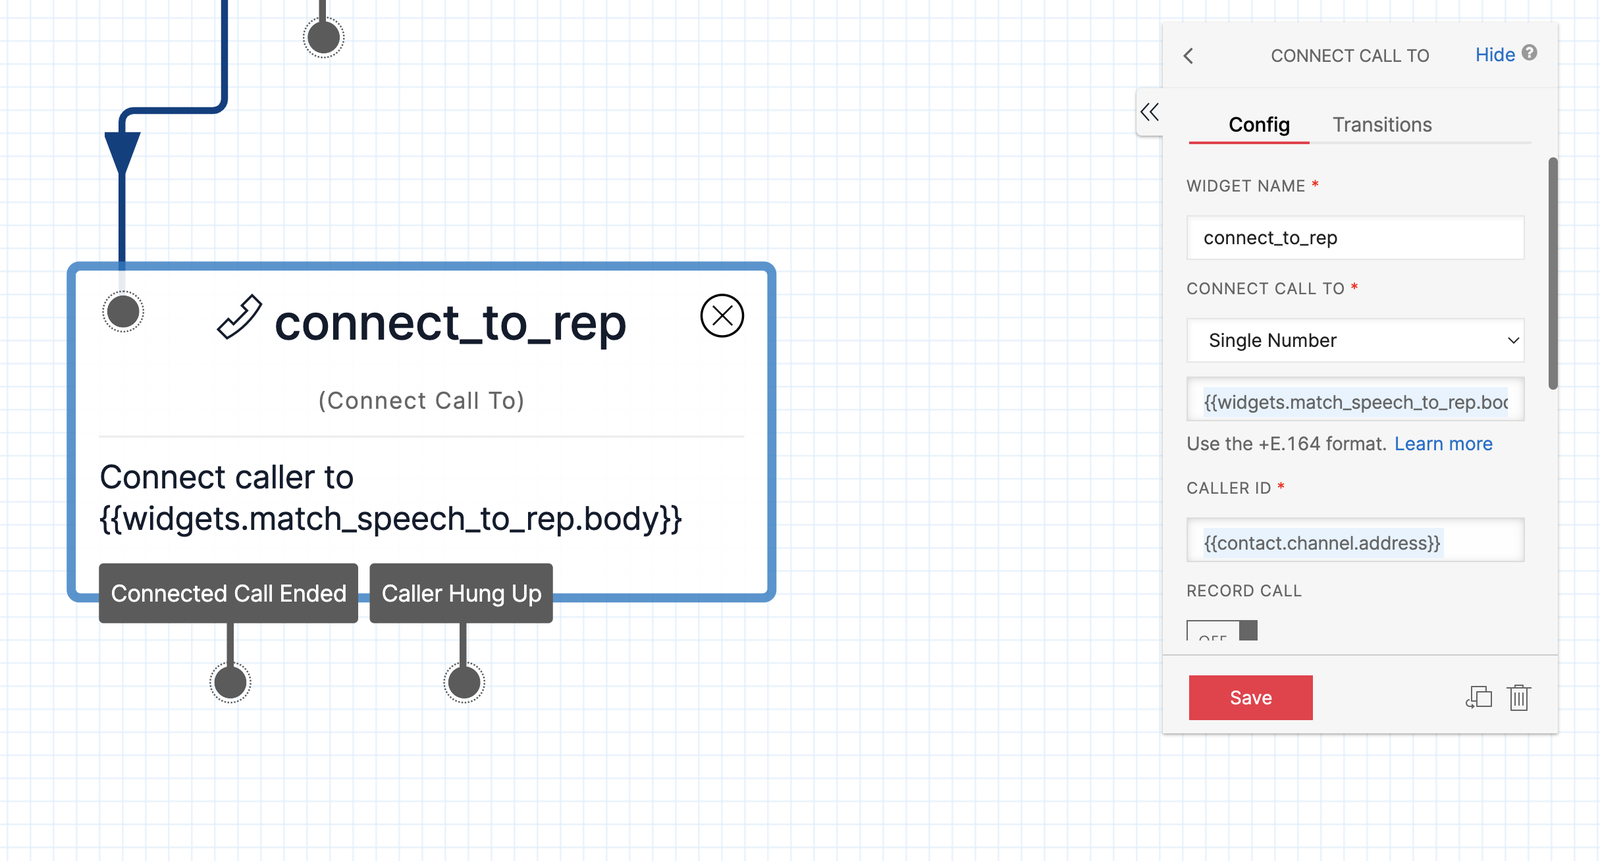
Now it's time to connect the call to the rep. The Function will return a phone number for the correct rep, and you can use the Connect Call To Widget to transfer the current call to that phone number. Drag the Success dot from the Run Function widget to the new Widget to connect them.
Choose a Single Number from the dropdown and set the next field to the result of your Function widget — in this case, {{widgets.match_speech_to_rep.body}}. When the Function returns a phone number, this Widget will then open up a call to that number, connecting the original caller to the most appropriate rep for their company size.
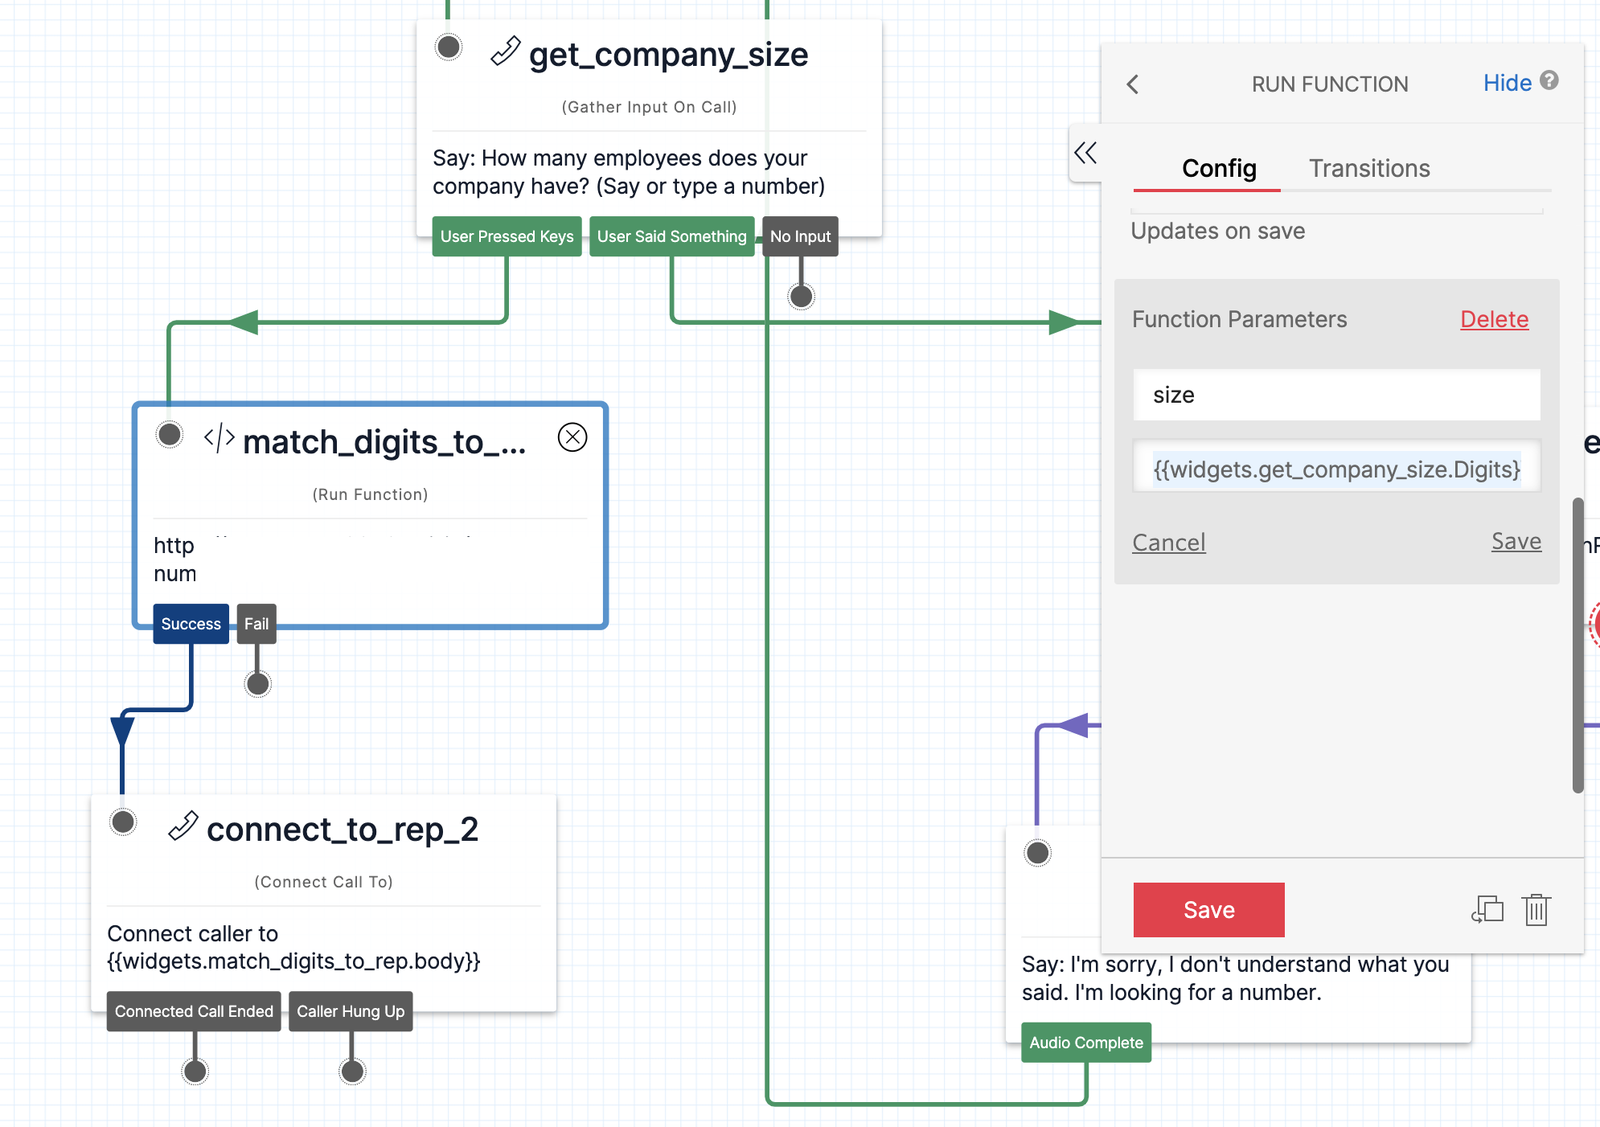
Now, you need to handle keypress inputs if the user chooses to type a number instead of using the voice functionality. It's going to work mostly the same way as voice input, but since we know the user is going to be typing numbers, we don't need the Split Based On... Widget.
Instead, you can go directly to the Function call. Drag another Run Function and Connect Call To Widget onto the Canvas, this time setting the size parameter to the keypress result from your Gather widget — in this case {{widgets.get_company_size.Digits}}.
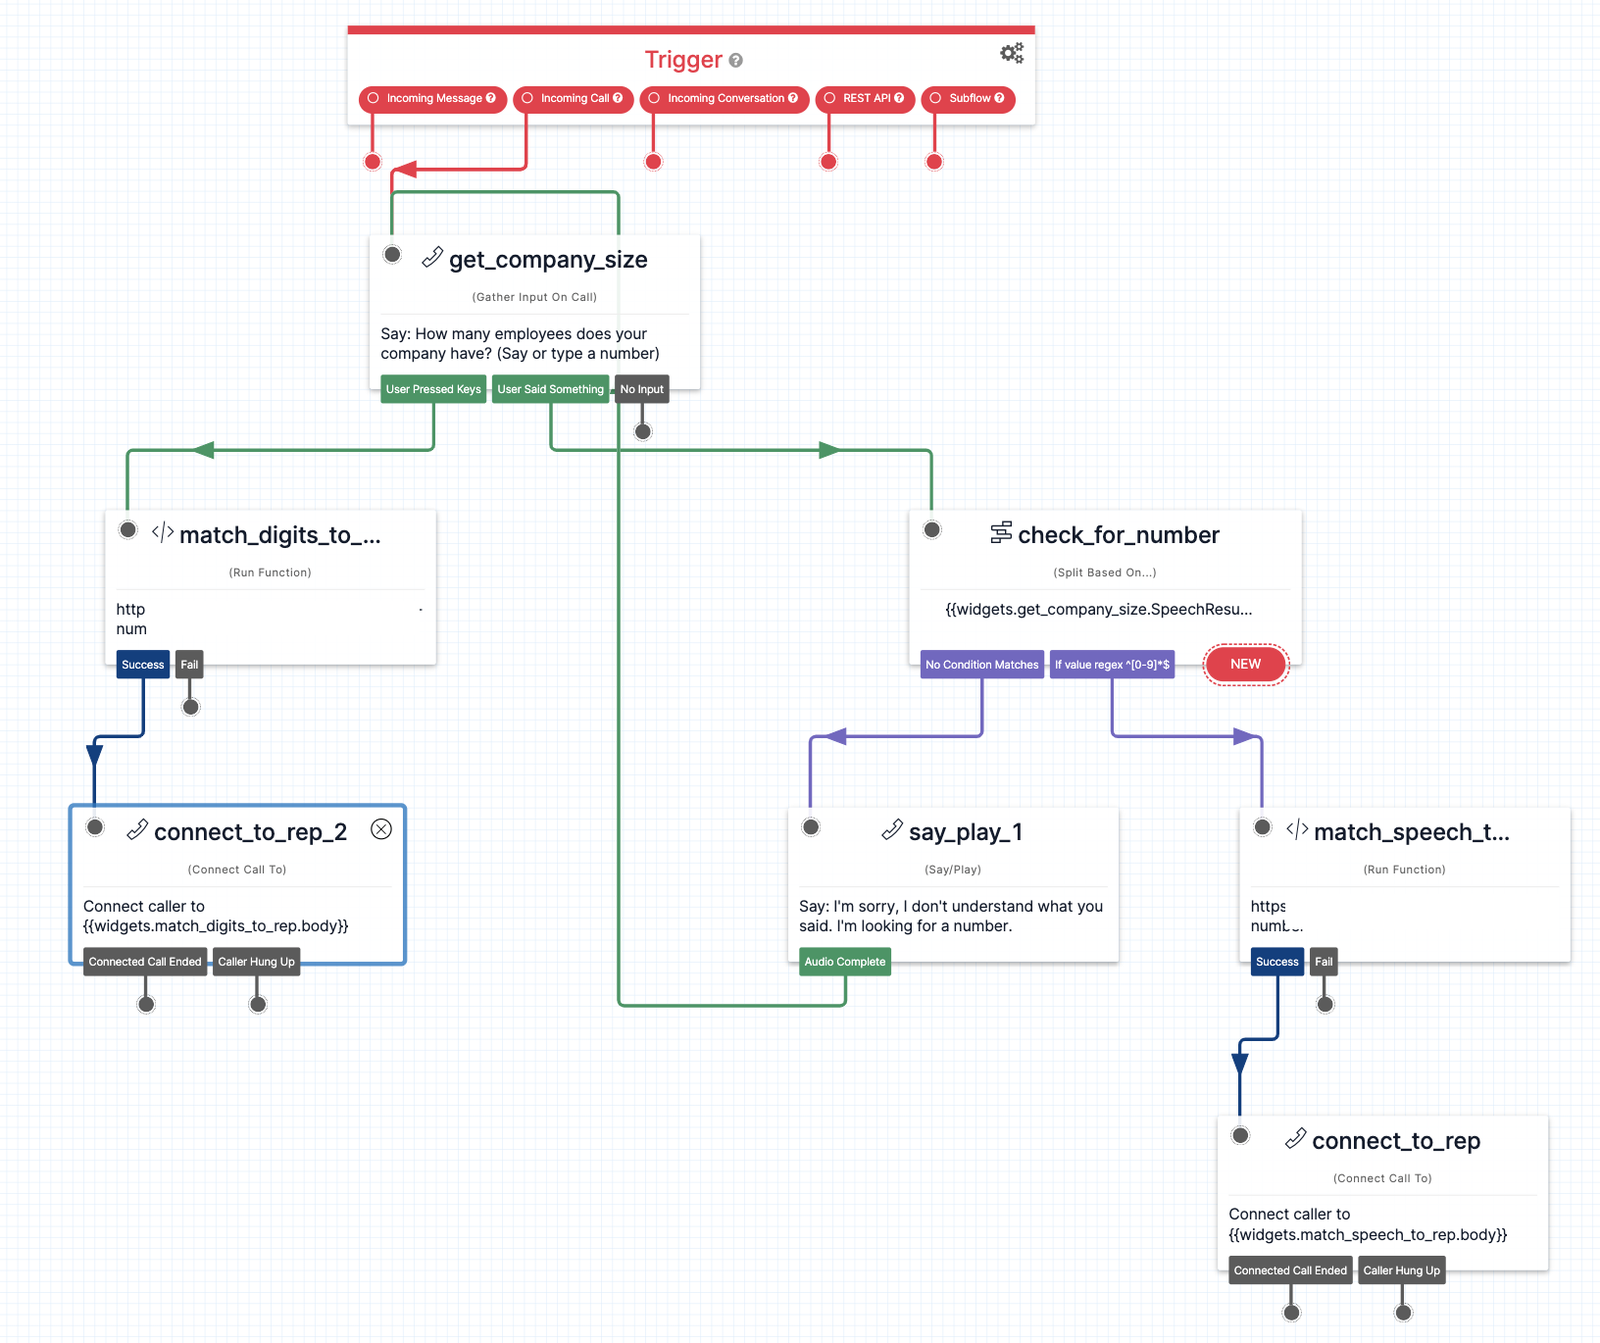
Your final Canvas should look something like this:
Once you're happy with your Flow and you've published all changes, you can connect it to a Twilio Number so people can start interacting with it.
Navigate to the Active Numbers section of the Twilio Console and click on the number you'd like to connect to the Flow. (If you do not have any phone numbers, you can purchase one from the Console.)
After clicking on the number, you will see its configuration menu where you can connect the number to your Studio Flow.
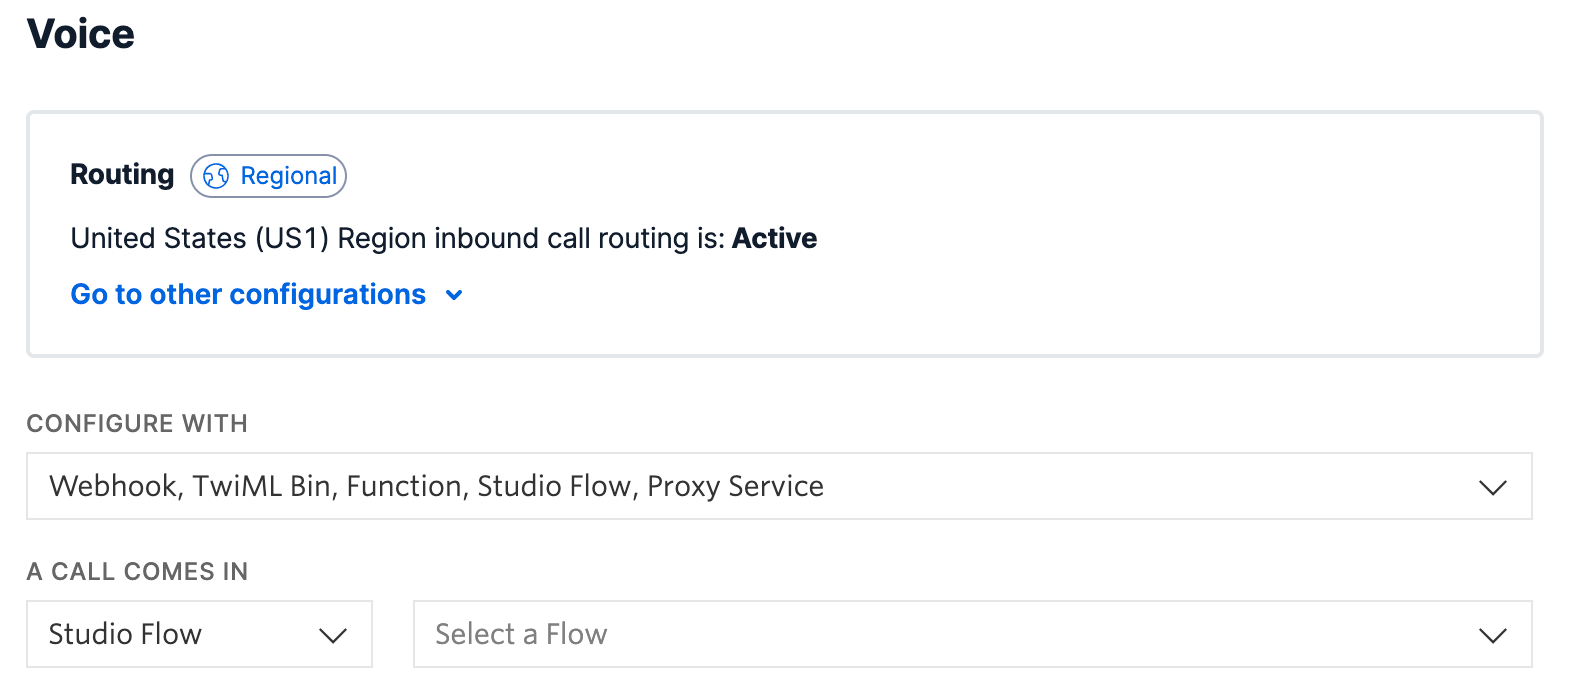
To configure this number to trigger your Studio Flow from an Incoming Call, scroll down to the Voice & Fax section of the configuration menu. Under Configure With, select the dropdown option "Webhook, TwiML Bin, Function, Studio Flow, Proxy Service". Then, under A Call Comes In, select the dropdown option "Studio Flow". You'll see another dropdown menu appear where you can select the Studio Flow you'd like to connect to when a call comes in to this number.
Choose the Flow you'd like to connect the number to, and then press Save to save these changes. Your Flow is now connected to your Twilio number!
You're ready to test out your Flow! Give your Twilio number a call, follow the prompt to say or enter a number, then get routed to the rep that matches the company size you stated. Ready to take things to the next level? Try modifying the Function further — accept additional inputs beyond numbers, return more information, or try this routing flow with SMS!