Import and export functionality for Flows is also available via the REST API v2. Check out the Flows API Quickstart to learn how to export the Flow JSON and import it into a new Flow via the REST API and helper libraries.
On this page
Studio User Guide
Twilio Studio is a visual low-code/no-code tool that enables anyone to design, deploy, and scale customer communications. Companies can now fast-track their customer engagement roadmap using the creative talent of all builders within their organization.
Any builder can use Twilio Studio to quickly create and modify workflows with little to no code. Studio is designed for use by cross-functional teams as well as individuals who want to build communications tools. It provides a common framework for everyone to do the work they need to do and collaborate on a project using a single tool. Designers can make swift UX modifications, copywriters can implement their own changes to messaging, and developers can delegate work to others and focus on building more complex features (such as calling Twilio Functions).
- Trigger Flows via inbound messages, inbound voice calls, webhooks, and other Studio Flows
- Create, modify, and deploy Flows (Workflows)
- Import and export Flows
- Add and remove Transitions between Widgets
- Manage Widget settings with the Inspector Panel
- Define Transitions to advance users through Flows
- Create and pass variables
- View Executions (individual runs through Flows)
- Organize use cases and logic in separate Flows
If you are new to using Twilio Studio, check out the Getting Started guide to familiarize yourself with the core concepts and mechanics of working with Studio. Once you are familiar with the Studio interface, you can come back to this guide for more detailed information about specific Widgets and actions you can perform with Studio.
Studio retains Execution and Step data for 30 days after an Execution starts. (Before October 1, 2021, we retained this data for 30 days after an Execution ended.) Once the data expires, it is unavailable via the Studio REST API and Twilio Console.
(information)
Info
To access your Execution and Step logs past 30 days, use Event Streams to subscribe to Studio Flow events and log them in your own systems.
Active Executions that are still awaiting a response from your end user after 30 days will also be deleted. If your end user responds after their Execution is deleted, they will return to the top of the Flow and start a new Execution.
(warning)
Warning
Studio Step logs, the resource that represent the runtime processing of a Widget, are best-effort delivery. This means that the network does not guarantee that this data will be delivered.
Data relating to underlying products used via Studio, such as SMS or Voice call logs, are not automatically deleted at the same time as Execution data. Data generated by other products is retained in line with those products' data policies. Details of individual product data retention policies can be found in the specific product documentation, such as here for SMS and here for Voice calls.
Studio does not support the PCI Mode setting in Programmable Voice, however you can build PCI compliant Flows that process payments with Studio using the Capture Payments Widget.
(warning)
Warning
Studio does not redact <Gather> data collected by the Gather Input Widget. To use <Gather> for collecting PCI sensitive data, use the TwiML Redirect Widget to redirect the call away from Studio to an external URL that can collect <Gather> data in a compliant way.
Learn more about Twilio's PCI Compliance.
There are four ways to trigger a Flow's start:
- Incoming Message
- Incoming Call
- REST API (Inbound Request)
- Subflow
All four of these appear in the Trigger Widget, and you can drag and drop from one or more to reflect your use case.
The Incoming Message trigger is invoked when your Twilio Phone Number (or other message-based channel) receives a new message from the Programmable Messaging API and sends it to your Studio Flow Webhook URL:
https://webhooks.twilio.com/v1/Accounts/{AccountSid}/Flows/{FlowSid}
By connecting Send Message or Send & Wait for Reply Widgets, you can respond to those incoming messages and carry on a conversation with the contact.
Studio maintains a unique session based on the Contact's identifier (usually a phone number). For a messaging Flow, Studio only allows a single active Execution per contact. All messages from the contact to that Flow during an active Execution will be handled by that same Execution.
The Incoming Call trigger is invoked when your Twilio Phone Number (or other voice-based channel) receives a new call and sends it to your Studio Flow Webhook URL:
https://webhooks.twilio.com/v1/Accounts/{AccountSid}/Flows/{FlowSid}
By connecting voice Widgets, such as Say/Play and Gather Input, you can guide the Contact through a series of interactive voice responses (IVR) and even connect the contact to another party with Connect Call To or route them to Record Voicemail.
By default, Studio maintains a unique voice session based on the combination of the Contact's identifier (usually a phone number) and the unique Call SID, ensuring every call is handled uniquely, even if concurrent calls use the same Caller ID.
The concurrent calls setting only applies to Executions created via the Incoming Call trigger type. Incoming Message and REST API triggered Executions are not affected.
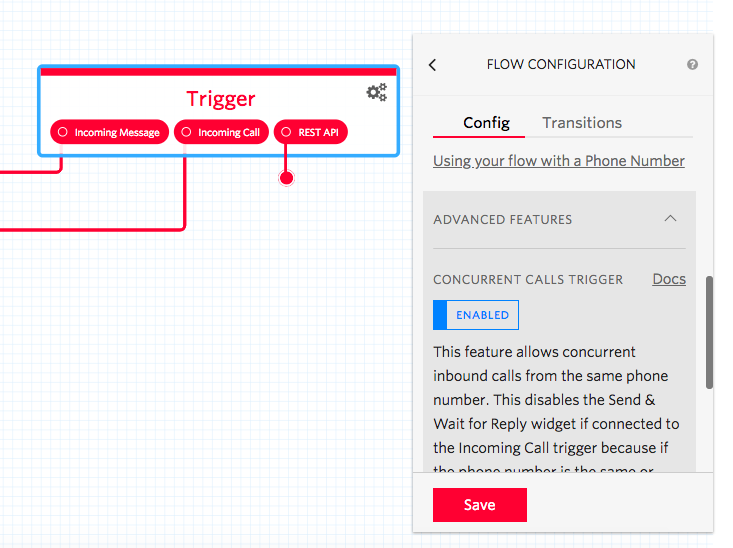
Note: This functionality changed on October 1st 2018. New Flows created after this date will handle concurrent calls from the same caller ID by default. For Flows created before that date, the switch must be made manually in the call trigger (see screenshot below).
By default, Studio Flows can handle inbound concurrent calls from the same number. The Send and Wait For Reply Widget cannot be attached anywhere downstream of the Incoming Call trigger point. This is because if multiple users are calling from the same number, Studio can't uniquely text back one user in an active execution and correctly identify a reply, because callers all share the same number.
For certain specific use cases, where you know callers to a Studio Flow will always have a unique visible caller ID, you can disable the concurrent calls mode via the Advanced Features dropdown in the Trigger Widget (see below). When disabled, you will be able to add the Send and Wait for Reply Widget to incoming call trigger connected Flows. This is only recommended for advanced users who know that their Flow is triggered from visible unique caller IDs.
Note: Concurrent Calls does not apply to Executions triggered by an Incoming Message or the REST API. Those trigger types can only handle one concurrent Execution per Contact to ensure each session is uniquely tracked.
The Incoming Conversation trigger is invoked when a Conversation invokes a Studio Webhook for a new message.
By connecting Send Message or Send & Wait for Reply Widgets, you can respond to those incoming messages and carry on a conversation with the contact.
(information)
Info
Follow this guide to connect Studio to Twilio Conversations.
Studio maintains a unique session based on the Conversation's identifier. For a Conversations Flow, Studio only allows a single active Execution per Conversation. All incoming messages from the Conversation to that Flow during an active Execution will be handled by that same Execution. Multiple participants of the same Conversation are, therefore, able to advance the same Execution.
(warning)
Warning
Sending media is not supported when using the Conversations integration.
Using the Studio REST API, you can trigger an outbound call or message to a Contact. Use this trigger type to initiate appointment reminders, surveys or alerts from your own application. Add Widgets to the REST API trigger to control the conversation just as you would for Incoming Message or Incoming Call.
For outbound voice calls, use the Make Outgoing Call Widget to initiate the call; for oubound messages, use either Send Message to fire and forget or Send & Wait for Reply to initiate a two-way conversation.
Studio maintains a unique session based on the Contact's identifier (usually a phone number). For a REST API Flow, Studio only allows a single active Execution per Contact. In the V2 version of the Studio API, if an Execution is already active for a Contact, the API will return a 409 error.
Tip: Be sure the To and From phone numbers are formatted as E.164 (e.g. +1xxxxxxxxxx) to ensure correct session tracking.
See the Studio REST API docs for more details.
To invoke a Flow as a Subflow, connect Widgets to the Subflow trigger. The Subflow trigger is invoked by the Run Subflow Widget.
See Studio Subflows for more details.
As your Flow executes, it saves the state in the Flow Context. Any data in the Flow Context can be accessed by your Widgets as variables, either in configuration fields or in text areas as variable substitution.
Studio supports the Liquid template language, which provides both output tags and logic tags. For example, to send a text message and include the contact's name, you could use variables like so:
Hello {{flow.data.first_name}}
More sophisticated logic is also supported. In this example, assume you want to check if you actually know the contact's name before trying to reference it:
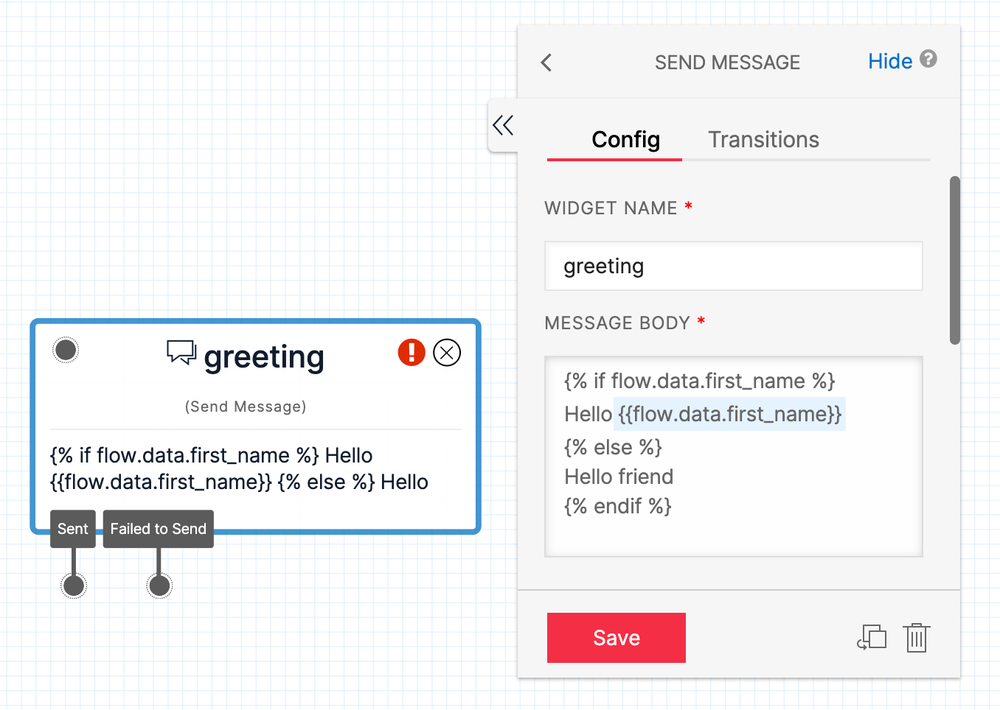
_10{% if flow.data.first_name %}_10Hello {{flow.data.first_name}}_10{% else %}_10Hello friend_10{% endif %}
Note: Liquid template variables can render up to 16KB strings max.
There are 4 types of data stored in the Context:
- Flow: data intrinsic to the Flow, such as the phone number associated with it
- Trigger: data that gets set when a Flow is initiated, such as the initial incoming message, phone call, or REST API.
- Widgets: data that each Widget sets itself and adds to the context as it gets executed, such as the digits a user presses or the body of an incoming message.
- Contact: data about the current contact engaging with your Flow, such as their phone number
| Description | Liquid Variable |
|---|---|
| The Flow's SID | {{flow.flow_sid}} |
| The contact's SID for the current Flow Execution | {{flow.sid}} |
| The Flow's address (e.g. Twilio phone number) | {{flow.channel.address}} |
Example Flow variables in JSON format:
_10{_10 "flow": {_10 "flow_sid": "FWxxxx",_10 "channel": {_10 "address": "+1xxxxxxxxxx"_10 },_10 "sid": "FNxxxxx"_10 }_10}
| Description | Liquid Variable |
|---|---|
| The user's address (e.g. handset phone number) | {{contact.channel.address}} |
After execution, many Widgets publish data variables to the Execution context, and these variables may be referenced by subsequent Widgets. For example, when the Send Message Widget step completes, it will have stored the following variables:
| Description | Liquid Variable |
|---|---|
| SID | {{widgets.MY_WIDGET_NAME.message.Sid}} |
| To (User's Contact Address) | {{widgets.MY_WIDGET_NAME.message.To}} |
| From (Studio Flow's Contact Address) | {{widgets.MY_WIDGET_NAME.message.From}} |
| Body (Message content) | {{widgets.MY_WIDGET_NAME.message.Body}} |
Note the casing of variable names, and remember that Widget names must be unique, must start with a letter and cannot include spaces or additional periods. Any variables that come from an external source, such as a status callback or Twilio API call, are cased according to the relevant spec for that callback. For example, an incoming message will have a "Body" parameter, where we keep the capitalized "Body" like in the Twilio SMS API. Variables specific to the flow, trigger, and widgets context are lower cased.
If a Flow is triggered via an inbound request (REST API), variables can be passed in at request time.
You can use Event Streams to subscribe to Execution and Step events from your Flow. Options for streaming Studio data include both Kinesis and traditional webhooks.
Use these events to log data, generate real-time reports, or trigger other actions:
-
com.twilio.studio.flow.execution.started -
com.twilio.studio.flow.execution.ended -
com.twilio.studio.flow.step.ended
Try the Event Streams Webhook Quickstart.
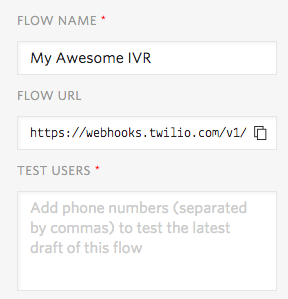
You can test a draft of your Studio Flow without publishing changes. To do this, click the Trigger Widget to open the Trigger Widget Inspector Panel. Then, add your phone number to the Test Users section. You can multiple phone numbers, separated by commas. Numbers should be in E.164 format.
When you use one of the numbers that you entered in the Test Users section to contact the Twilio Phone Number associated with this Studio Flow, the Flow will run through the latest draft Flow, rather than the latest published Flow.
When you are finished testing, you can click Publish to make your changes accessible to everyone.
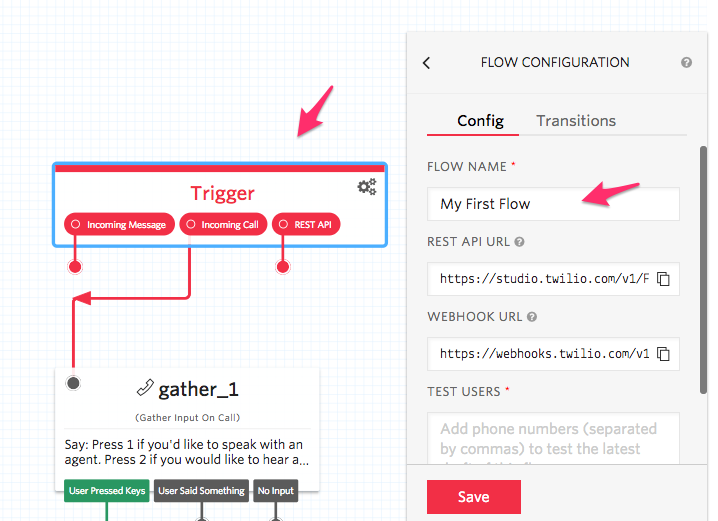
To change the name of your Flow, click on the Trigger Widget. The right-side configuration panel includes a field for Flow Name. Enter the new name, and click Save to rename your Flow.
To make a copy of an existing Flow, navigate to your list of Flows and locate the one you'd like to copy. Click on Duplicate Flow and a new copy of the Flow will be created and automatically opened.

If you'd like to delete a Flow, navigate to your list of Flows and locate the one you'd like to remove. Click on Delete Flow to remove the Flow.

(error)
Danger
Deleting a Flow is not recoverable. If you delete a Flow that is being used in production to handle calls or messages, you will need to rebuild the Flow to restore service.
Use this functionality to export flow definitions as JSON and import them to other Twilio accounts.
Note that if you want to duplicate a Flow within your own account, it is best to use the Duplicate Flow method to create a copy of a Flow in the same account. Importing and exporting Flows is intended for exporting a Flow to store elsewhere, e.g. source control and/or to move Flows between Twilio accounts.
(warning)
Warning
Your Studio Flow definition may reference other Twilio resources (like phone numbers, Functions, etc.). These references are not automatically copied when the Flow is imported to another account, and you may need to make manual updates to your Flow to refresh references to those resources.
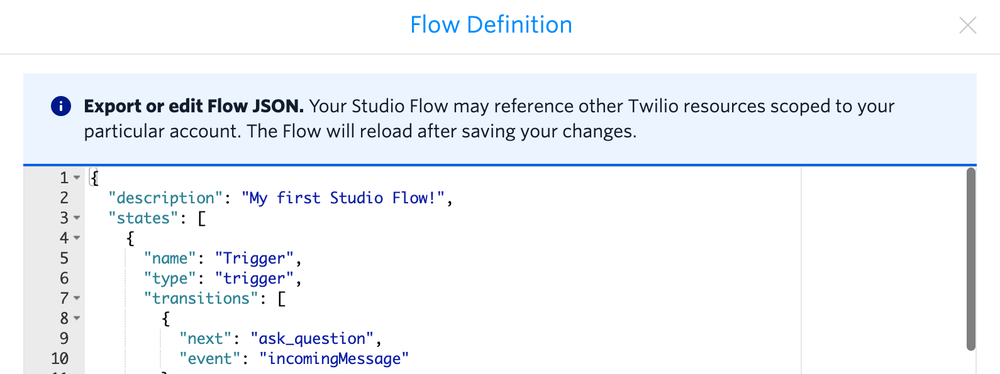
Click on the Trigger Widget and select Show Flow JSON.
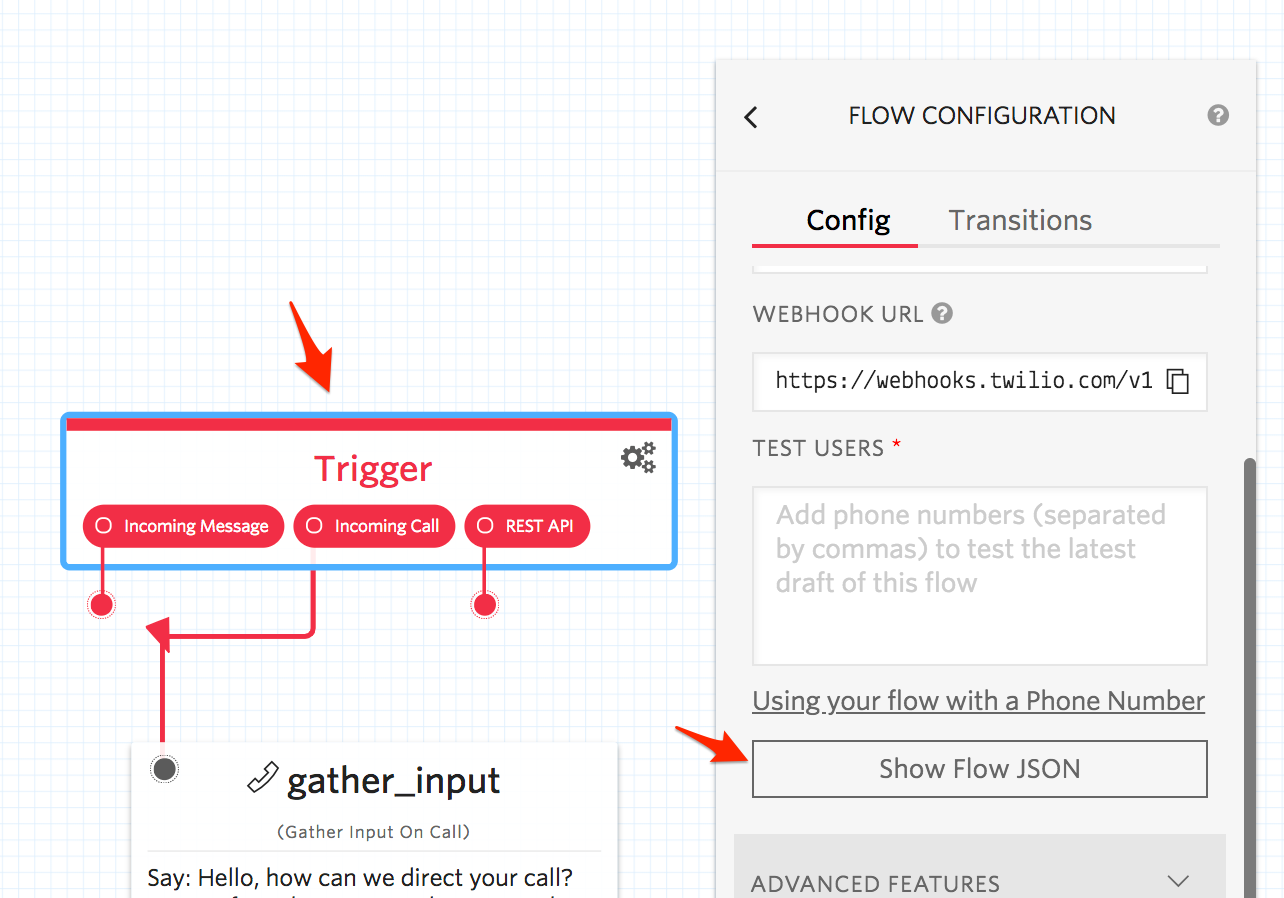
This will display the JSON data that defines your Flow. You can copy this data and store it elsewhere.
Create a new Flow, and select Import from JSON from the list of templates. Then, click Next.
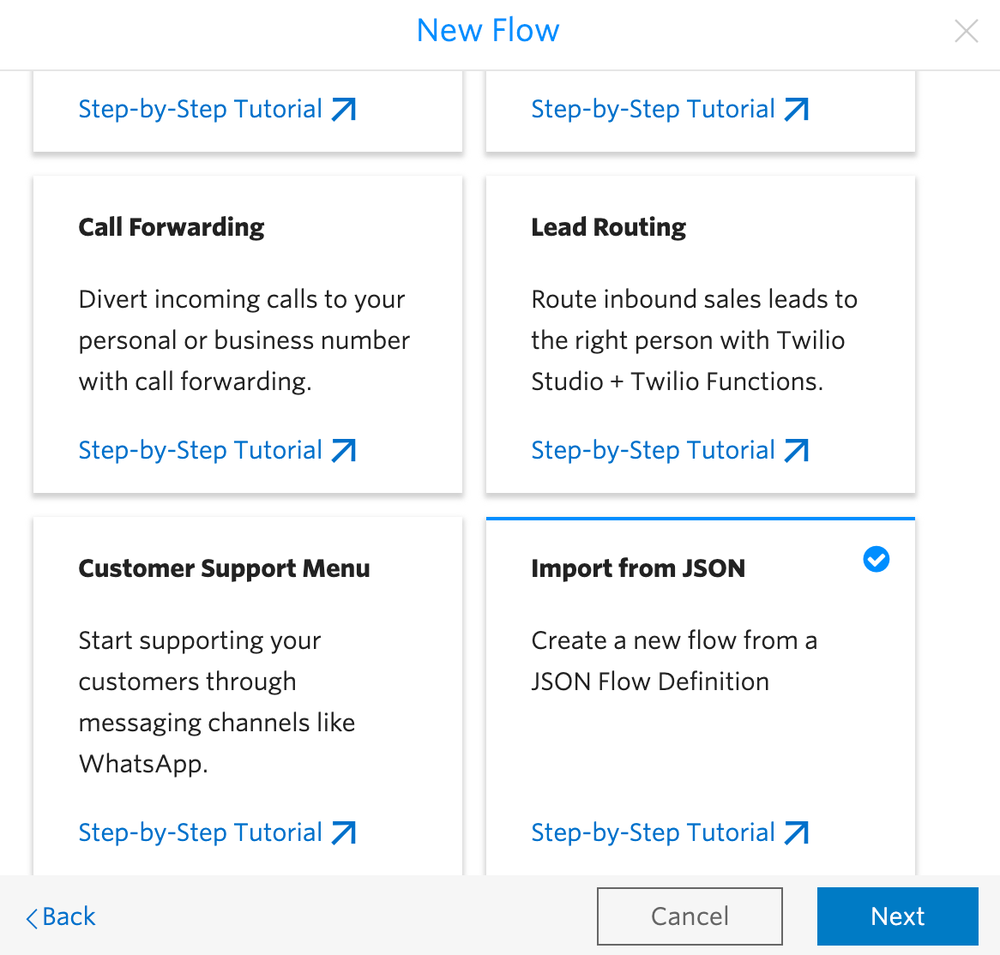
In the next window, you can paste the Flow JSON and click Next. This will create the new Flow as defined in the JSON you pasted.

Learn to troubleshoot Studio Flows with this Troubleshooting guide.
Review the built-in limits in the Studio FAQ.