How to Work with your Free Twilio Trial Account (outside of US & CA)
So you want to give Twilio a spin, or you've already signed up for your trial account and want to understand what you can and can't do? You're in the right place!
- First, sign up for your free Twilio trial account . The signup process includes verifying your personal mobile phone number, i.e. entering a security code that you've been sent to a mobile number you've designated. This is a security measure that is mandatory before you can try Twilio.
- Once you finish signup, you should see your Console Dashboard . This is your home for finding your Twilio credentials, checking your usage, procuring a phone number and generally beginning your exploration of Twilio messaging technology.
- We give you a small preloaded balance to test out Twilio's functionality. You will not be charged for Twilio phone numbers or usage until you upgrade.
If you've indicated an interest in Twilio Messaging products during your Free Trial sign-up, upon completion of signup you'll land on a page like the one shown in the screenshots below. Please note that this guide assumes you've signed up with a personal mobile number that indicates you reside outside of the United States. If you've instead used a U.S. mobile phone to sign up, you'll be shown a somewhat different landing page and should refer to this guide instead.
We've broken up this initial landing screen into three separate shots to emphasize three key features of this page:

From this page, the Console offers a 5-step guided experience to start you on your journey exploring Twilio Messaging technology. After you've been provisioned with your own free Twilio phone number, you'll be able to use that number for progressively more involved messaging tasks, all while still in your Free Trial account. In the final step you'll learn how you can take further steps in Twilio Programmable Messaging by upgrading to a Paid acount.

What kind of number you receive here will depend on where you're located. Users whose personal mobile number used for signup indicates they are residents of the U.K. will receive a U.K.-based Twilio 10DLC number. Users outside the U.S., Canada and the U.K. will receive a U.S.-based 10DLC number. Local (10DLC) numbers in the UK typically begin with a two-digit area code followed by two sequences of four digits for the local number, e.g.20 7123 4567, for 10 digits altogether U.S. 10DLC numbers begin with a 3-digit area code (in the example below, the area code is '205' which would indicate a location in the region of Birmingham, Alabama), followed by a 3-digit and then 4-digit sequence, for 10 digits altogether. Here we have pressed the blue Get phone number button and been provisioned the following US 10DLC number:

This number begins with the +1 country code prefix, indicating it is a United States number; then the 10-digit part would typically be written as (205) 946-1241 or 205.941.1241. If you were to specify this number as the sender in your Twilio code, however, you would use the full number without punctuation: +12059461241. We will start using this number shortly to send SMS messages programmatically.
But where are we sending these messages, and where are they actually being sent from? Using this new free Twilio number, you can send SMS messages to anywhere you want, at least outside of the United States (please see this guidefor the regulatory guidelines on the use of Twilio phone numbers in various countries outside the US). As the Console text suggests, sending an SMS from a US-based 10DLC number to another number in the US first requires that the sending number be registered for A2P 10DLC. Such registration might eventually be necessary for a non-US company wishing to do messaging business in the United States, but it certainly shouldn't be a barrier to a developer outside the US who simply wishes to begin exploring Twilio Messaging technology. Most users who are just beginning their exploration of Twilio Messaging want to begin with the simplest thing: sending a message via Twilio Messaging API to their own mobile phone. Since we've indicated on signup that we reside outside the US (and also outside of Canada and the UK), we have been given a US-based Twilio 10DLC number (in this case+12059461241) which will be used to send text messages to our own mobile phone located, for example, in Europe or Asia. (If you'd like to be able to message additional recipients beyond your own mobile number, see Appendix One below for how to add more verified numbers or Caller IDs to your account.)
The final area on this first landing page to note here is the panel at the bottom left, which tells you some crucial information about your new Free Trial account:
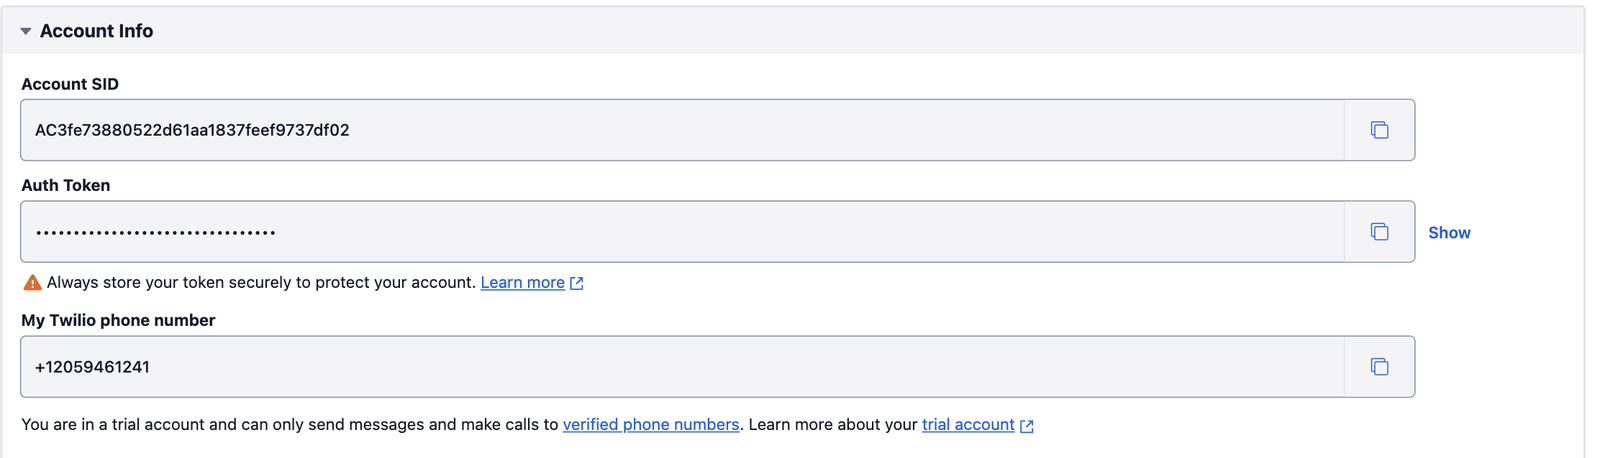
This information will be crucial as you begin using Twilio tools to send text messages (or Voice calls or other related products). Your Account SID uniquely identifies the Twilio account you've just created; this will need to be included in many Twilio API calls, and will remain the same even after you upgrade this account from Free Trial to a paid account. The Auth Token is one of several ways that you can grant yourself or others permission to call Twilio's APIs; it is appropriate for your own Trial and prototyping use, but in a commercial application with large numbers of users this would typically be replaced by a more secure authentication method.
At any point after you've exited this initial Free Trial workflow, your account information can always be retrieved by going to the top left of the Console and clicking on the name of your account, which will return you to a version of this homepage.
To move past this initial screen, you can either click the blue Next button on the far lower right of the screen, or simply click on the circled 2 in the workflow image we saw above. Either will take you to the second main screen in the Trial workflow, which is now reflected in the workflow image (this can always be used subsequently to navigate back and forth through this workflow):

What is involved in sending your first SMS message through Twilio? There are two main parts to this second screen. The first is a set of controls allowing you to specify a Receiver (To), Sender (From) and Message Body for the text message you'd like to send:

For the moment, and assuming you've taken no actions outside the sequence of this Guide, both To and From will be read-only fields: you only have a single Twilio number from which to send messages, the one you've just been provisioned (and you can only have this one until you upgrade from a Trial to a Paid account, and have the opportunity to acquire more numbers); and so far you have authorized only a single non-Twilio number to receive messages (see Appendix One of this Guide for how to authorize additional receiver numbers). What that leaves is the Body or message of the text, which you would input in the Body text field. Bearing in mind that text messages are not meant to be emails or blog posts, we will keep our message body short and sweet: "Hello from Rafal via Twilio!" We will then press the blue Send test SMS button at the bottom.
Now the magic happens. Within a few seconds, you should see a confirmation message like the following:

Congratulations! You've just sent your first SMS message using the Twilio Messaging API!
But how exactly has this message been sent? Let's have a look at what can now be seen in the right-hand panel of this screen. There are actually two panels, a Request panel showing the call that the Console has made on our behalf to Twilio's public Messaging API, and below it a Response panel showing the json payload that this API call has returned. Let's consider the first, Request panel:

One thing to note immediately is the format of the code in question: this is a call made in curl, the most basic of REST-API calling formats. You'll note the tabs next to curl for Java, Ruby, PHP, Python, C# and Node.js: here as in nearly all Twilio API documentation, we will always make available the relevant code for at least these seven popular libraries. Tabbing over into Python, for example, would show us the same call, but formatted as a complete Python class that you could use from within a Python project to call the Twilio API:
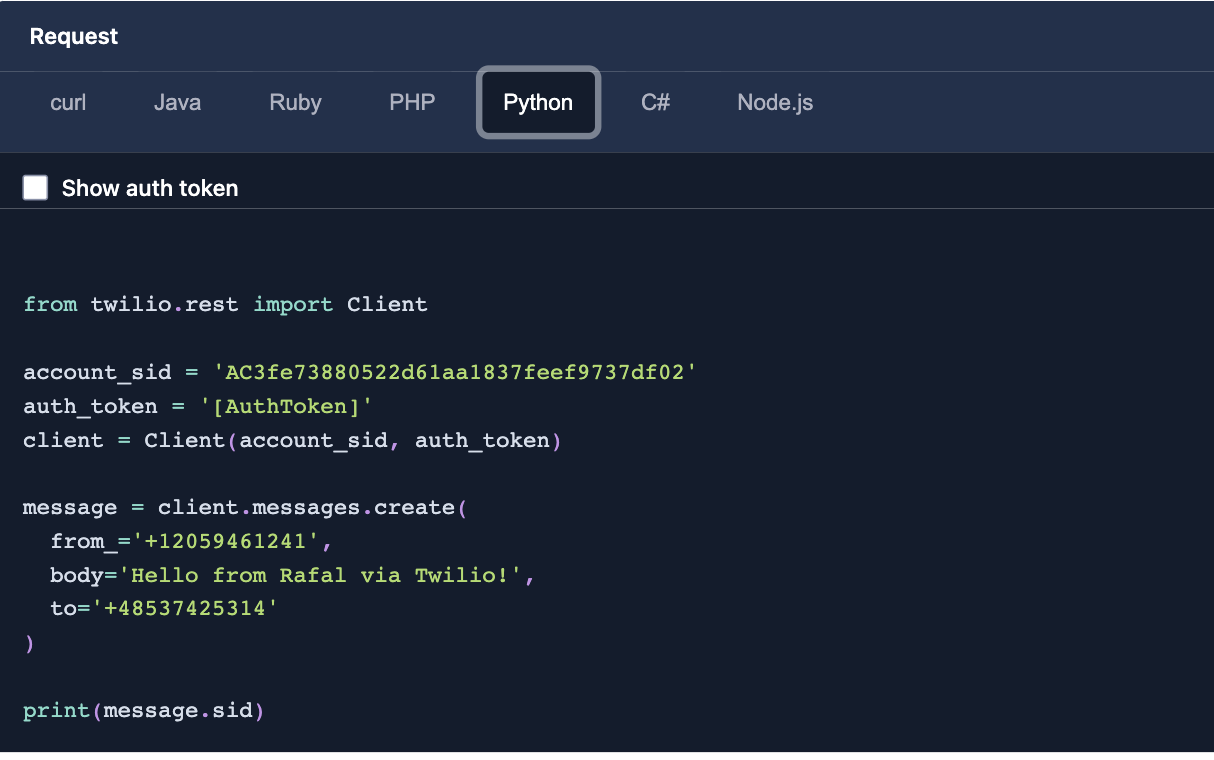
Even without familiarity with Python (or for that matter curl) it should be possible to make out the basic elements or parameters necessary for this API call. We are calling the CREATE method or endpoint of Twilio's public Messages REST API. We are specifying (albeit in two different ways in curl and Python) the Account SID and the Auth Token, which together give us permission to make this call. Then we are giving it the three crucial bits of information specified in the left-hand part of the panel: a To (our personal mobile phone, which in this case resides in Poland), a From, which of course must be our Twilio phone number; and a body, in this case our message "Hello from Rafal via Twilio!". The code in this panel is read-only, but it has a copy button and could be copied, for example into your own Postman instance or Python app, and modified in whatever way would still be functional---for the moment only the message body could be altered, at least if we wanted the message sent successfully.
As for the success of this message, we can see that in the second, Response panel immediately beneath the first. This is the response that the above API call has returned:
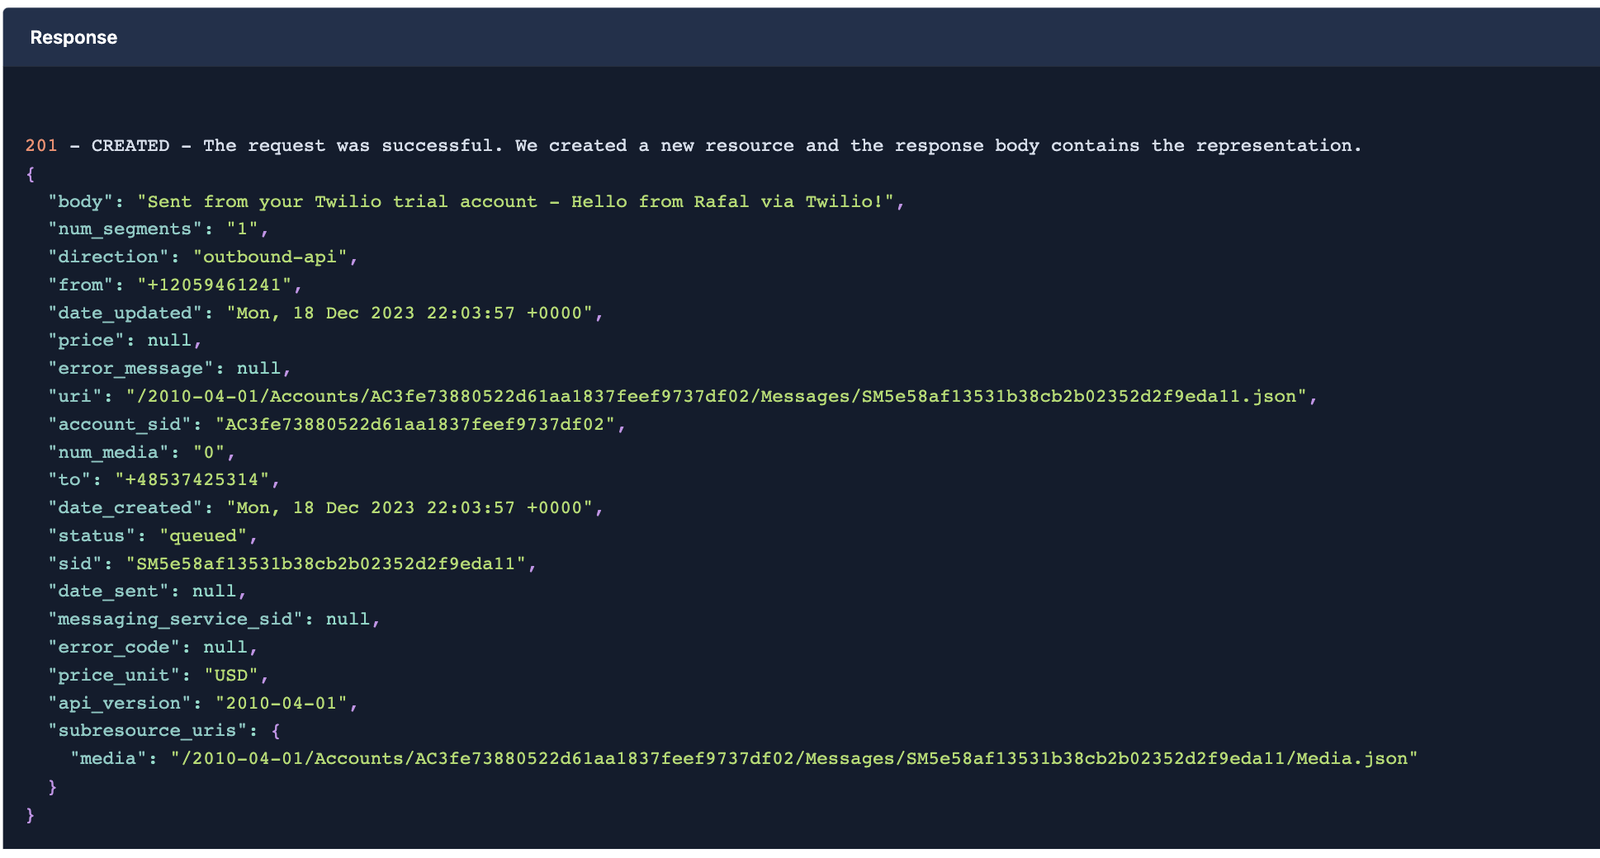
To start, we see the message 201 -- CREATED. The request was successful. We created a new resource and the Response body contains the representation. Any time you successfully send a message via Twilio's Messaging API, you create a new database entity (called a resource) representing that message. Note that the status shown here is queued; as this is a real text message being sent over real mobile phone networks from the United States to Poland, the most we can say in near-real-time is that the message has been successfully queued for transmission. If the message makes it successfully to our Polish mobile device, this status would transition fairly rapidly to sending, then sent, then finally delivered (assuming the receiving device was on). Of course the message could instead have failed or been rejected at several points, and have other statuses as well depending on the situation between Twilio's API and the Polish mobile carrier (to see a full list of possible statuses, and how to learn them for a given message, see this Messaging How-to Guide). The "send your first message" setup in this Free Trial workflow has been designed to minimize the possibility of failure, but it's important to understand that even at this early point, we are working with real-world communication infrastructure.
Having grasped the mechanics involved in sending your first SMS message with the Twilio API, you might want to send another few messages just to see the body text change, but in general at this point it's probably time to move on to the next step in your Twilio Messaging journey.
Clicking on either the blue Next button at the far bottom right of this screen, or simply clicking on the circled 3 in the workflow diagram, you will be taken to the 3rd step of this guided onboarding workflow. This step offers two different routes to begin further exploring Twilio programmable messaging, through applications that address two different use cases.
The first of these apps allows you to send SMS messages to a list of verified phone numbers using a web app in JavaScript; in other words, you can "broadcast" a message to a specified list of phone numbers using your web browser. Moreover, while the Javascript code for this app can be readily accessed, this app also show-cases the "no-code" or serverless functionality available at Twilio, with which we can host your code and operate it for you as a service:

Pressing the blue Launch demo app button launches a screen in a new browser tab. The first thing to notice here is the url: https://www.twilio.com/code-exchange/browser-based-sms-notifications. This is no longer the Twilio Console, but rather a page within Twilio's CodeExchange, an extensive library of curated 3rd-party code sets for creating a vast number of apps using our various products and services. In this case we're on the page for "Browser-based SMS Notification". Let's take in the main features of this page:
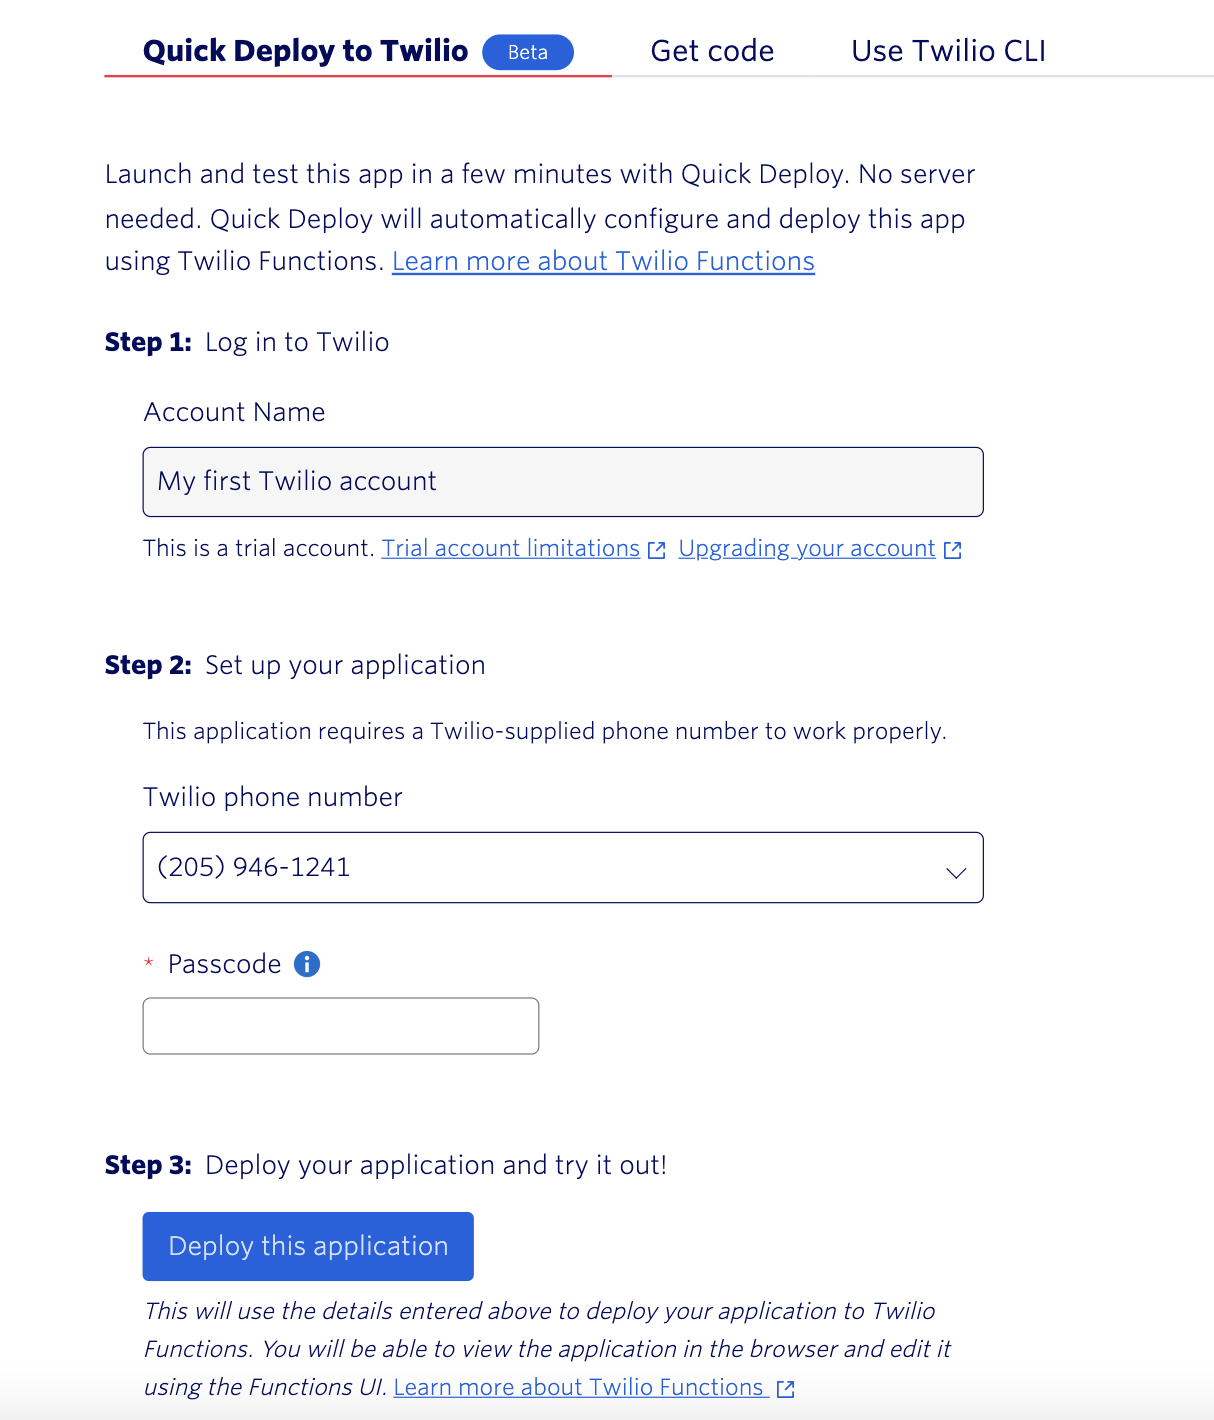
Like most CodeExchange libraries, we have the option here of Quick Deploy to Twilio (which is open by default), Get Code (which would allow you to view this demo app's Javascript code on GitHub) or Use Twilio CLI, which would walk you through the steps necessary, using your CLI, to install Node.js, install Twilio's custom CLI utility and plugins, download and configure the template for this app, and host the app on Twilio itself. We will use QuickDeploy to accomplish these same steps automagically.
As you see, Step 1 of this codeless setup is to log in to Twilio--we've already done this, so Account Name here is a read-only field with "My First Twilio Account" as the name. Step 2 is to Set up your Application. This requires specifying the Sender, a Twilio phone number; again this field is read-only here, because at this point we only have the one US 10DLC number we've been provisioned with for Free Trial (so this is the number displayed). We're then asked to input a Passcode which any user will need to be able to run our SMS notification app. Having entered a satisfactory passcode, we click on the blue Deploy this application button. As long as the deployment is successful, we will see the following:
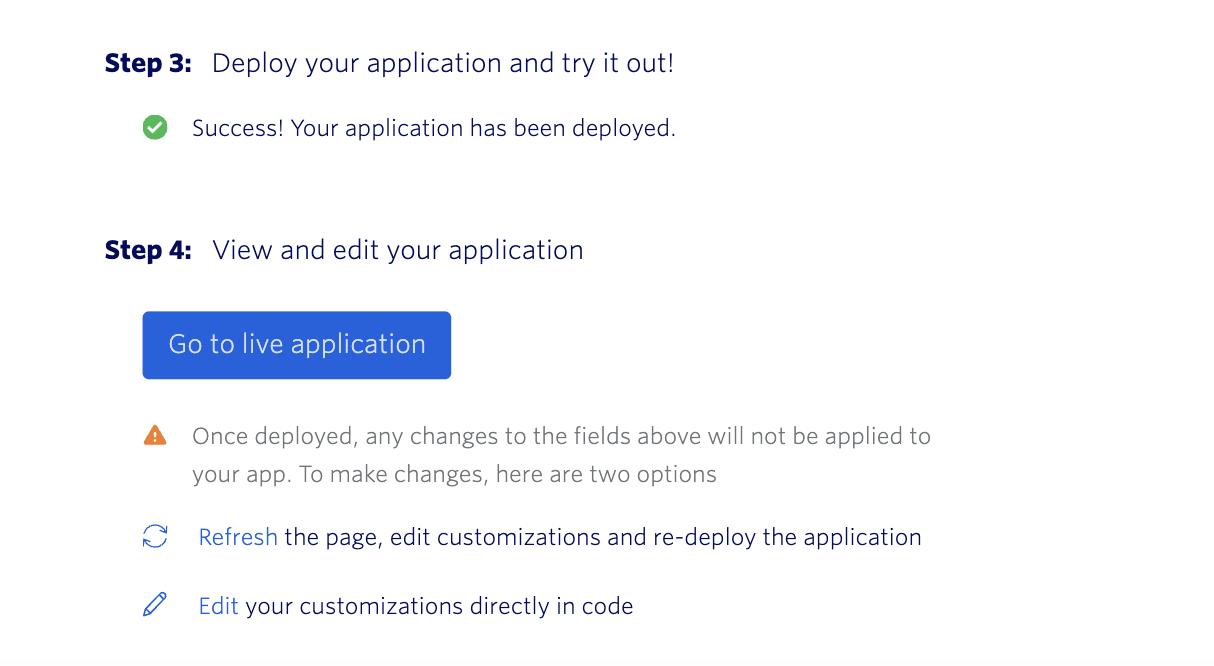
Shall we take a look at our new Web app? Clicking the blue Go to live application button launches a further browser window, with this url: https://sms-notifications-6044-d9bmhf.twil.io/index.html. Again, this is a Javacript-based web app hosted on a Twilio service, built from a template found on CodeExchange and configured with our Twilio phone number as the Sender. The app itself looks like this in terms of user interface:
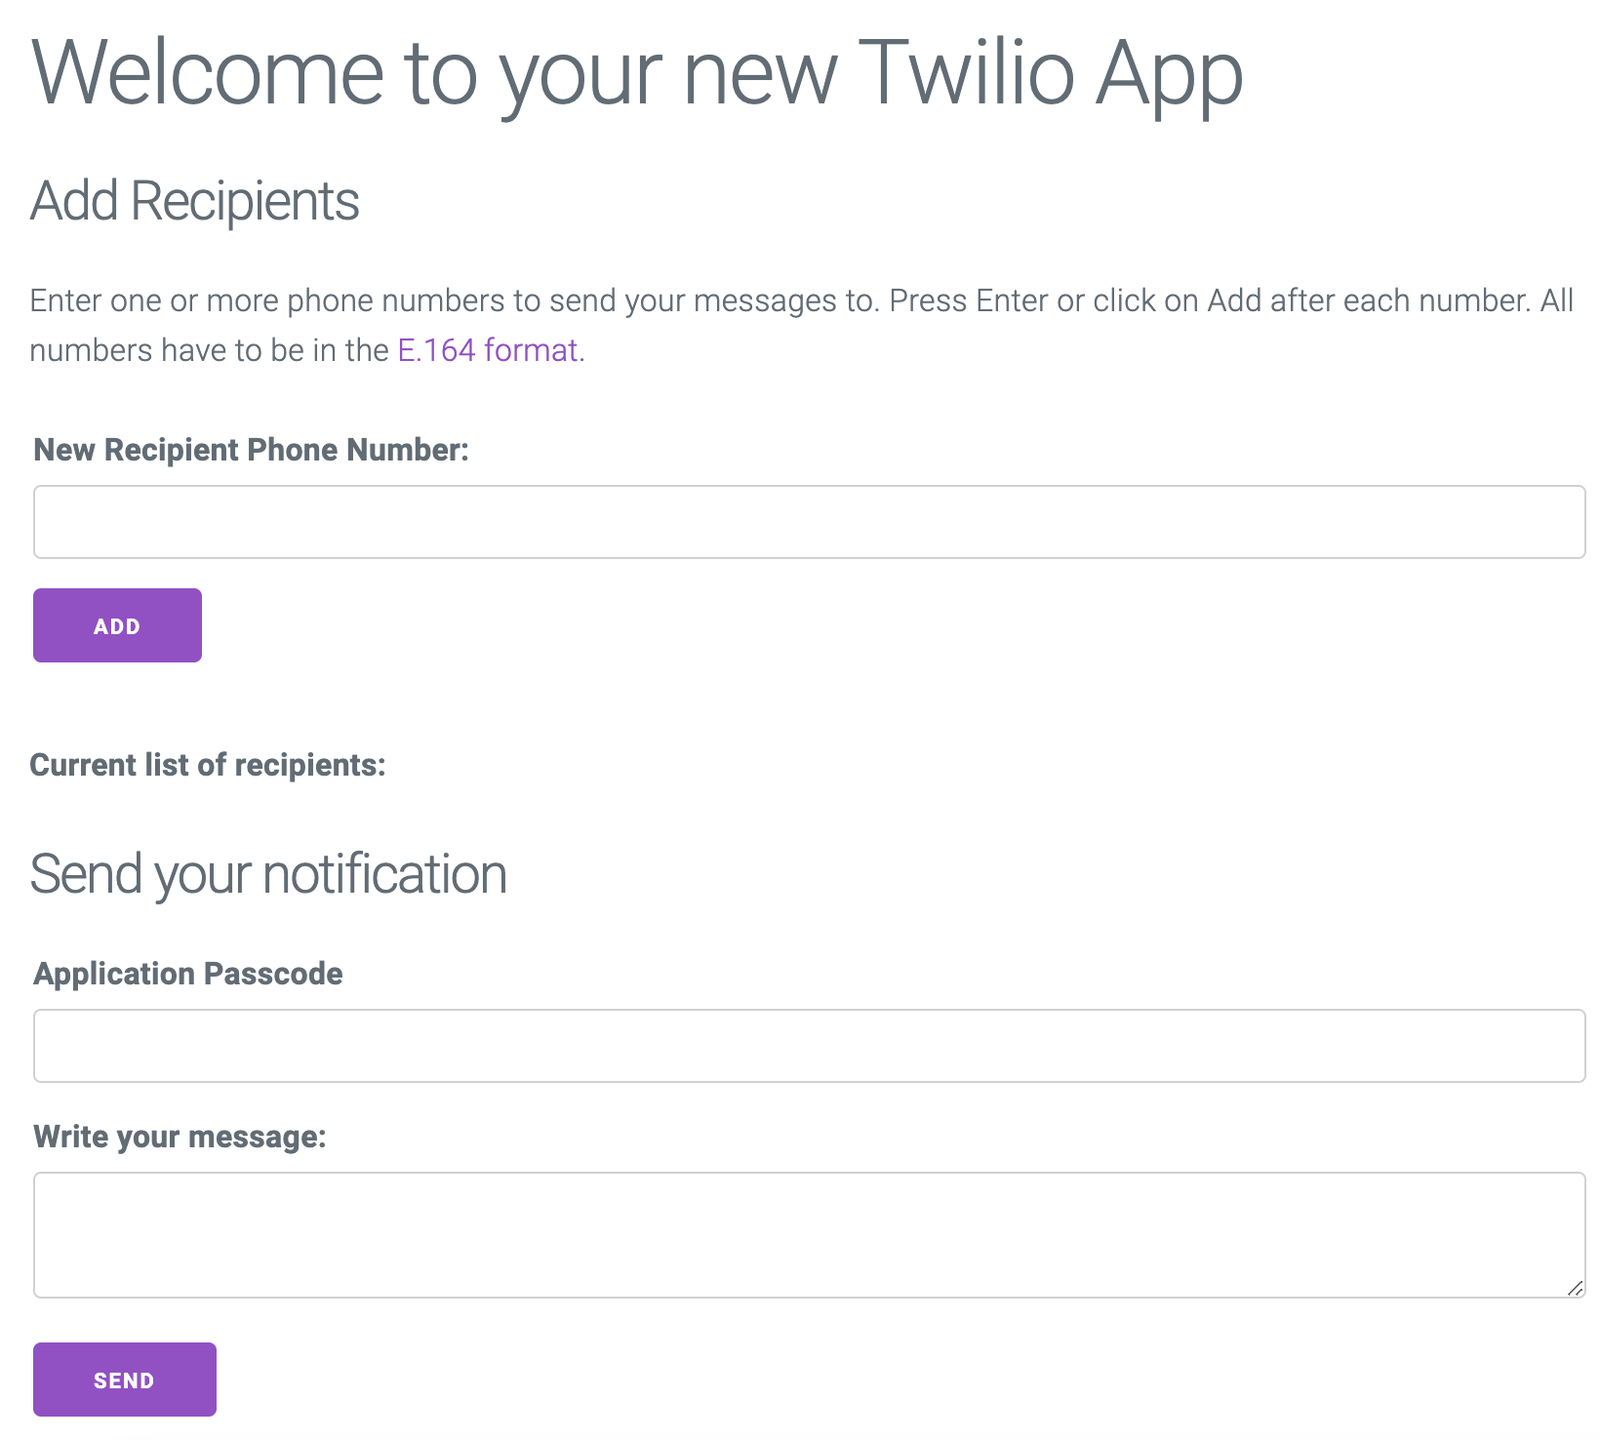
The Recipient Phone Numbers added here would correspond to the To we saw in the simplest version of our Twilio Messaging API call, except that this app is capable of iterating through a list of recipients and making a separate sender API call for each (Sender phone number doesn't need to be specified; it's been hard-coded into the app code and is our single Twilio 10DLC number). Although the app itself has no sense of this context, at this point we have still only a single valid recipient number: the Polish mobile number we used to create the Free Trial account. Once we've learned how to add in more verified recipient phone numbers (see Appendix One below), we could add up to five numbers within the context of a trial account, and in that case we could add each of those five numbers to the list in this app. In the following screenshot we've added four numbers to the list:
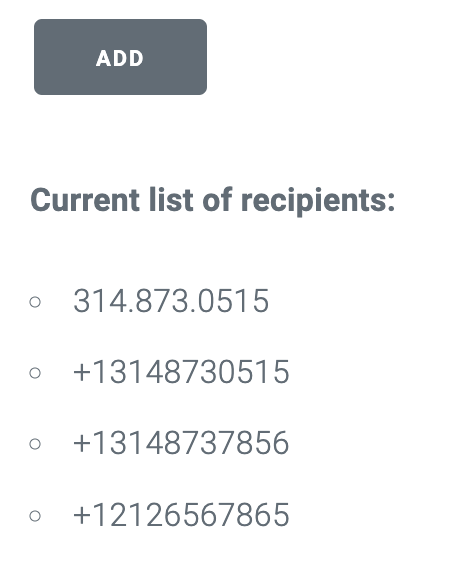
Actually this is only three numbers, with the first one added initially in the invalid format of 314.873.0515; as the app text says and as we saw with the API call above, the only valid phone number format for Twilio automated messaging is E.164, which in this case would be +13148730515. However, simply adding phone numbers to this list, even verified phone numbers in the correct format, doesn't guarantee that each of these numbers would actually receive a message from this app. In fact, none of these numbers would. Why? Because, as the +1 country code indicates, these are all U.S. mobile phone numbers, and for our US 10DLC sender to successfully message these numbers, it would have to have successfully gone through the A2P 10DLC registration process (which can't even be initiated within a Free Trial account, and which in any case is of a complexity that one wouldn't want to bother with in an initial exploration of Twilio technology).
However, we could add our Polish mobile phone number to this list, enter the appropriate passcode, specify some text (body) message, hit the purple Send button, and our app would iterate through the list of recipients, calling the Messaging API for each of them, whereupon it would fail on most of them (technically the API call would succeed, but the message would be blocked from transmission by the carriers), but it would succeed on the Polish number. If you've been following along, then congratulations! You've just created and tested your first "codeless" or hosted Messaging app on Twilio. Again, the app is not truly codeless at all: it's coded in Javascript, and if you want to see this code for yourself, as it resides as a hosted application, you can go to the bottom of your web app screen once you've tried at least one send experiment:
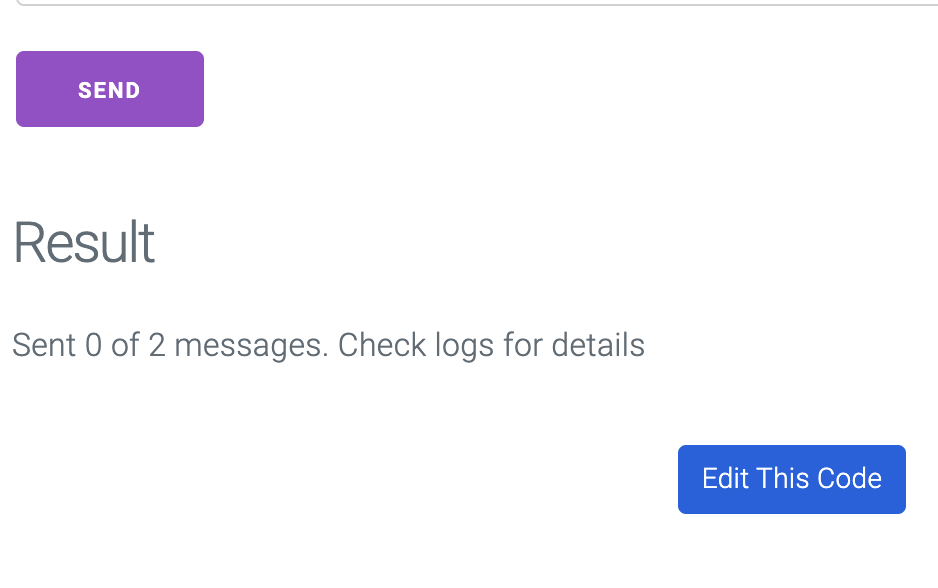
The blue Edit this Code button will launch a separate page of the Twilio Console (separate from Free Trial), where among other things you would be able to see, and edit, the javascript code living in a file called index.js:
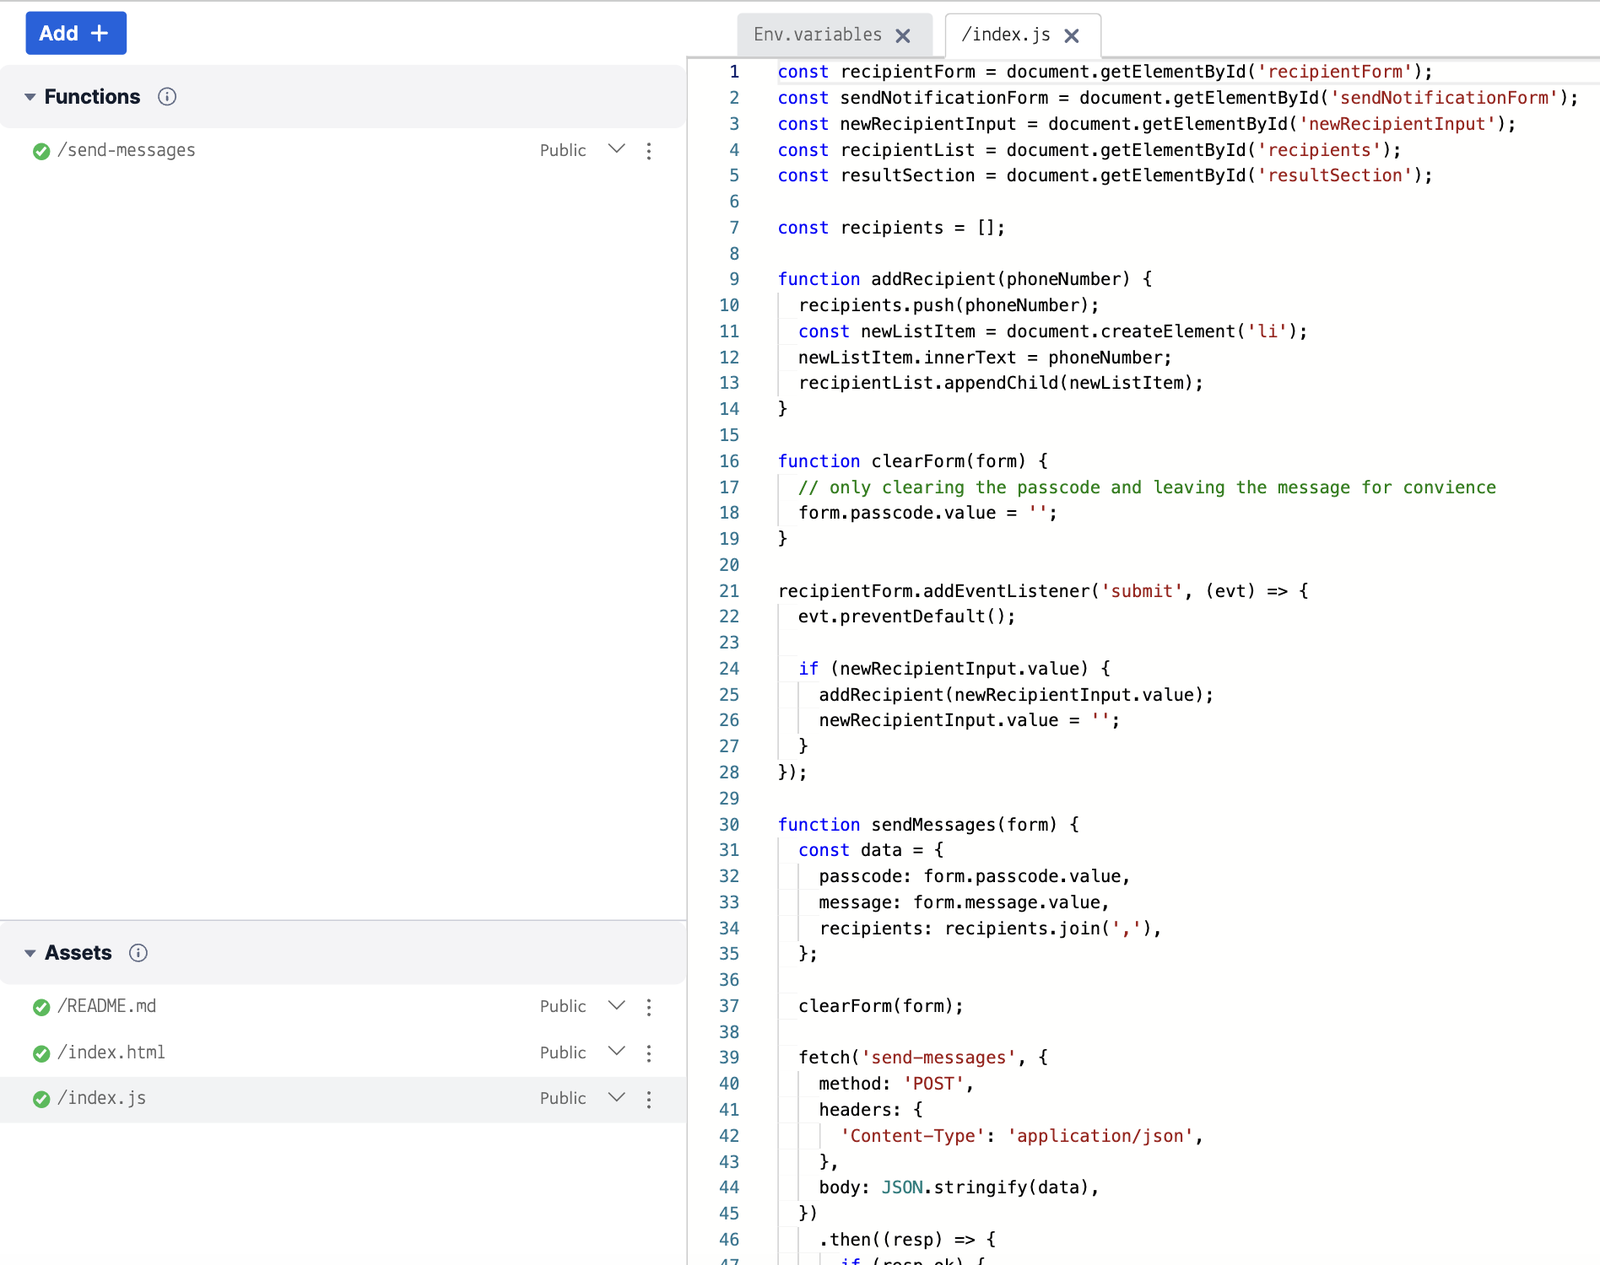
Of course, you have not actually "built" this app; you've used one of our pre-built app templates and, in this first instance, used it straight out of the box. But using this final Console screen, and any Javascript mastery you might have, you could add or edit anything you wanted about your app's UI or internal logic. You could make it refuse recipient entries that weren't correctly formatted; you could parse the json return for a more specific status to display, or even configure a webhook from which to derive much more granular message failure or success information. Ultimately, most of us learn coding from templates; "building" (or "coding") is a matter of how completely we rewrite those templates to suit our particular use case.
For a more elaborate application addressing a more complex use case (and also available in more languages), we can return to the 3rd screen of our Free Trial workflow; and just below the button we used to launch our codeless/hosted demo app we'll find another button inviting us to try out something more complex:

Get sample code will take us to another page of CodeExchange, this one featuring an app which mimics a vacation rental website where a host can accept reservation requests, and then notify guests of reservation status via text message. More specifically, the app's workflow looks like this:
- A host creates a vacation property listing through the website
- A guest requests a reservation for a property through the website
- The host receives an SMS notifying them of the reservation request
- The host can either Accept or Reject the reservation by responding to the SMS
- The guest is notified via SMS whether their request was rejected or accepted
The code for this app is available in Java, Python, PHP, Javascript and C#. This code is intended to be downloaded from Github (the link is provided) and run locally, since it entails standing up a rental website and this is outside the usual functionality of Twilio-hosted code. Here, Twilio provides the Messaging REST API to be called remotely as part of this larger workflow.
If you would prefer to follow a step-by-step, written tutorial for sending a first (or second or fifth) SMS or MMS message, the 4th screen of our Free Trial workflow is for you:

The blue Read the Tutorial button on this screen will take you into the tutorials section of our Messaging documentation, and specifically to our send-an-sms starter tutorial which will allow you to choose your tutorial in one of six programming languages. Each tutorial will guide you from initial local-environment setup through to code completion (with copyable code samples where needed), and finish with suggestions for more in-depth resources to take your messaging programming to the next level.
And if you'd like to browse additional Twilio messaging tutorials, this link will show you that we have a lot of them, addressing a multitude of use cases. Many of these use cases can be tried out within the limits of a Trial account, as long as you are comfortable limiting yourself to a single Sender and no more than five (pre-approved) Receiver phone numbers.
The fifth and final screen in the Free Trial workflow invites you to leave the world of Free Trial altogether.
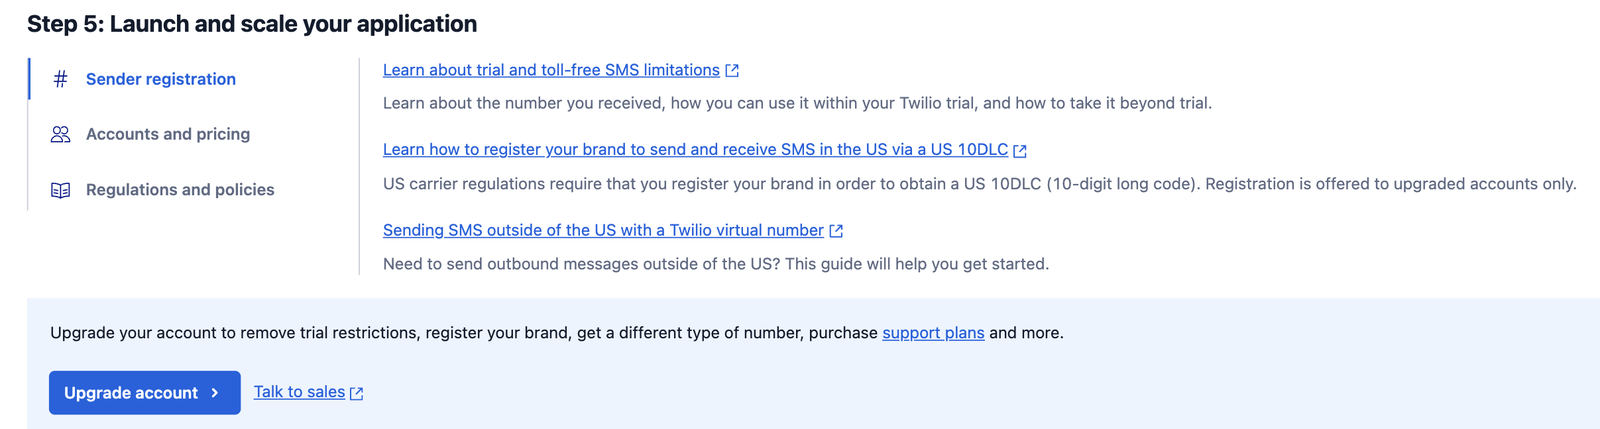
Twilio's Free Trial accounts are intended to give users a good first sense of what can be accomplished with Twilio Messaging technology (as well as Voice and other channels, but this guide has focused on messaging). As you've seen, a good deal of learning and exploration can be accomplished within the limits of Free Trial. However, at some point most readers will want to move beyond the constraints of a Trial account.
- If you are interested in messaging in the context of business, or even a hobbyist context involving more than a set of pre-approved recipients, you'll need a to upgrade to a Paid account for this.
- If you'd like to choose your own Twilio Sender number(s)--for example, toll-free or local numbers in your own country--you'll need a paid account which will let you go to the Phone Numbers section of the Console and buy the number of your choice.
- If you're located outside the US but would like to message to US customers, using either the US 10DLC number you were given on signup, or another one, you'll need a Paid account to submit an A2P 10DLC registration application .
The links available on this page will allow you to inform yourself about regulatory constraints in different locations, and how to work with these, about pricing options for Paid plans, and generally about everything you need to know to move further into the world of Twilio communication technology.
When you signed up for your trial account, you verified your own personal mobile phone number by receiving an entering a code sent to it. If you would like to send sms messages to recipient phones beyond this first one, while still in Free Trial mode, you may add additional verified numbers or Caller IDs. You can see your list of verified phone numbers on the Verified Caller IDs page.
You must verify any non-Twilio phone numbers you wish to send SMS or MMS messages or place phone calls to while in trial mode. Additionally, you must verify any non-Twiio phone numbers you wish to receive inbound calls from while in trial mode. These are extra security measures for trial accounts that we remove once you upgrade your account. You may verify as many phone numbers as you like.
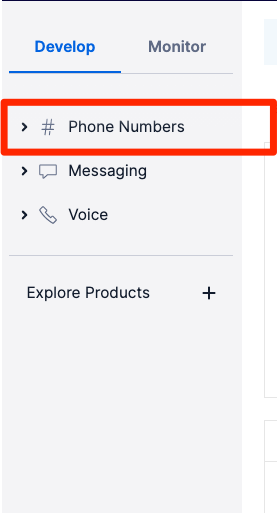
To make other non-Twilio phone numbers available to you in trial mode:
-
Click the Phone Numbers dropdown on the side navigation menu:
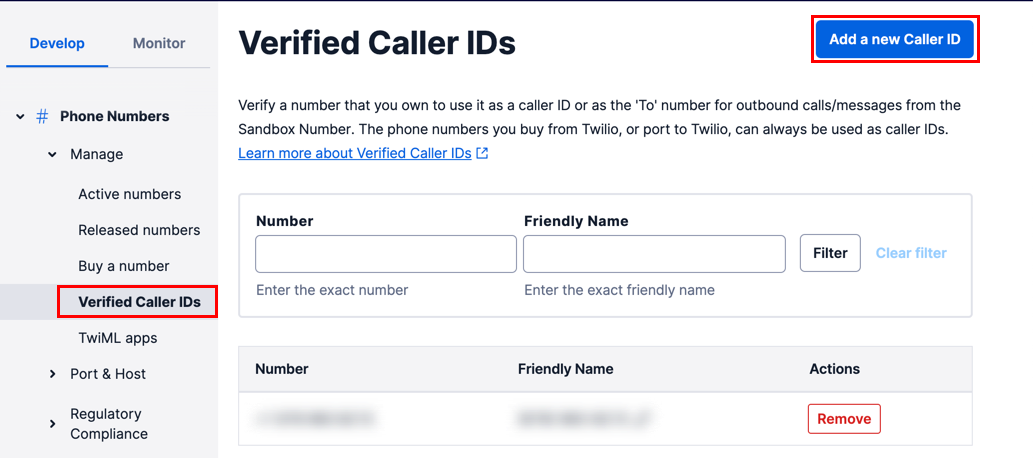
-
Click Verified caller IDs under the Manage dropdown. Once on the Verified caller IDs page, click the Add a new Caller ID button to add a new number:
-
Enter the desired phone number to verify, select the desired verification method, and then click Verify Number:
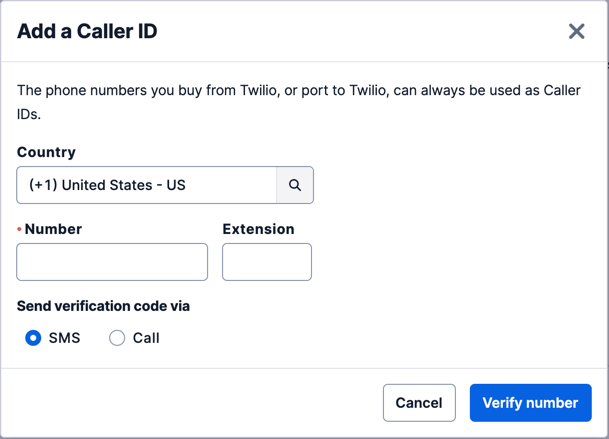
Note You will need access to this device to receive the call or text with your verification code.
-
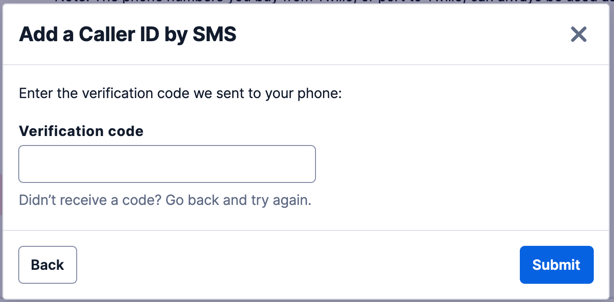
Enter the verification code. You're now ready to text or call this number with your trial Twilio account.
The processes for sending messages, making phone calls, and setting up an Elastic SIP Trunk are the same for a trial account as a full paid account. However, there are some restrictions and limitations imposed while you are in trial mode.
- Calls to and from your free trial phone number will play a short trial message before your TwiML runs. Within that message, we ask you to press any key to proceed with the call itself. Only after pressing a key will the code from your website will be requested. If you don't press a key, the call will not connect to your code .
- Concurrent calls are limited to 5 while in trial mode.
- Calls are limited to 10 minutes while in trial mode.
- Calls per second (CPS) is limited to 1 while in trial mode.
- Any non-Twilio phone numbers you want to place calls to must be verified first, or the call will fail. Additionally, any non-Twilio phone numbers you want to receive inbound calls from must be verified first, or the call will fail. These are security measures required for all trial accounts.
-
You can use either your Twilio number or a
verified caller ID
as your
Fromnumber. You can add a verified outbound caller ID via the console . You may verify as many phone numbers to be used as your caller ID as you like. - You may make international calls from your trial account. However, you only have access to GA and Public Beta phone numbers. Check out the limited list of countries you can make calls to while in trial mode.
You cannot send SMS messages from your personal phone number with Twilio, whether on a paid or a trial plan. You can always send messages from Twilio numbers.
- When you send an SMS from your free trial phone number, it will always begin with "Sent from a Twilio trial account." We remove this message after you upgrade.
- While in trial mode, you can only send messages to non-Twilio phone numbers you've verified with Twilio.
- While in trial mode, you cannot send messages using an alphanumeric sender ID
- Whether in trial mode or on a paid plan, you cannot send messages from a Twilio US 10DLC number to a U.S.-based private phone number unless the 10DLC sender has been registered for A2P 10DLC. Likewise, you cannot send messages from a U.S. based Twilio Toll-Free number to a U.S. based private phone number unless the Twilio number has gone through Toll-Free Verification.
You can send international messages from your trial project as long as you:
-
Ensure your trial number is SMS-enabled and not restricted to sending/receiving messages and calls from local numbers. You can see your phone number's capabilities on the Phone Numbers page in the Console:
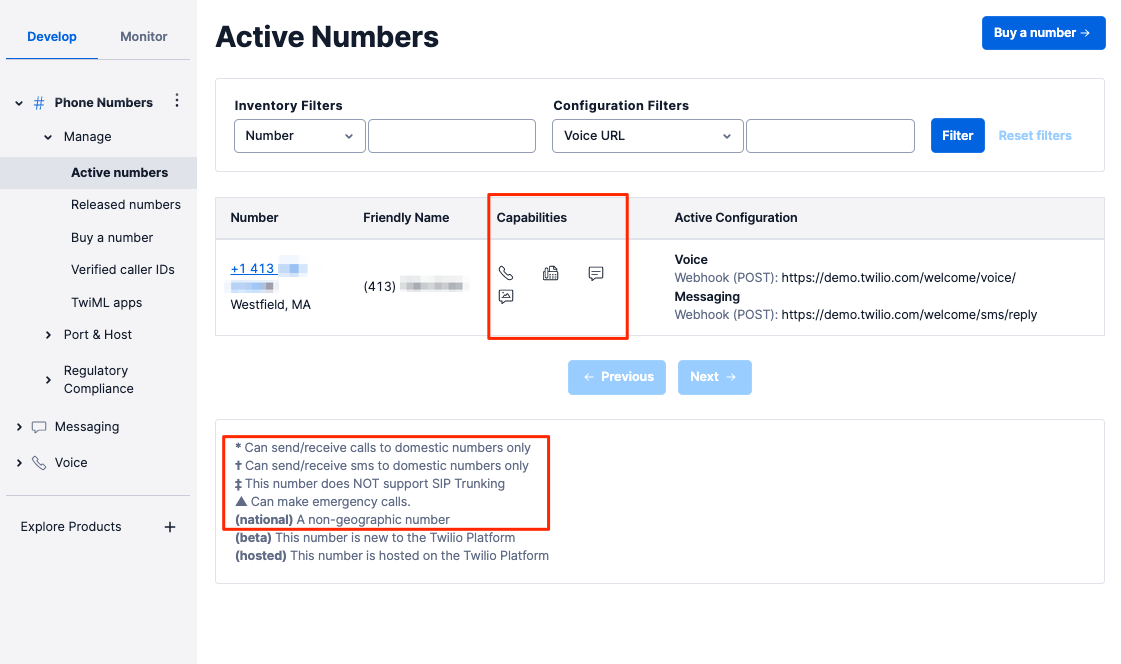
This number is restricted to domestic calls and messages and has Voice, SMS, and MMS capabilities.
- Review your SMS Geo Permissions to make sure the target country you're sending messages to is enabled.
- Remember, you can only send messages to verified phone numbers when you're in trial mode. Make sure you verify the international phone number you're sending to in the Console .
When you sign up for Twilio, you will get a free telephone number and a free trunk. You can fully configure this SIP Trunk for testing and placing actual calls to and from your business. Twilio Trial accounts can take full advantage of SIP Trunking services for testing, there are a few restrictions that apply only to trial accounts. Keep these in mind as you develop:
Trial Accounts have a maximum of:
- 1 unique SIP trunk
- 1 origination phone number
- 1 Trunking termination call per second (CPS)
- 4 concurrent calls
Note: Trial accounts may only place Trunking calls TO and FROM verified numbers. Be sure to verify any non-Twilio phone number first by having Twilio place a verification call to it. This is an extra security measure that we remove once you're calling from an upgraded account. A purchased Twilio phone number also qualifies as a verified number you can use as the caller ID.
If your Twilio needs expand, or you need to accomplish something that isn't available to your trial account, you'll need to upgrade your trial account to a full paid account. All you need to do to upgrade is provide payment information — your credit card details or Paypal account — on the billing page. You can have Twilio automatically charge you when your balance falls below a certain threshold that you set, or you can buy Twilio credits with individual payments.