Java-Spring Quickstart for Twilio Authy Two-factor Authentication
Warning
As of November 2022, Twilio no longer provides support for Authy SMS/Voice-only customers. Customers who were also using Authy TOTP or Push prior to March 1, 2023 are still supported. The Authy API is now closed to new customers and will be fully deprecated in the future.
For new development, we encourage you to use the Verify v2 API.
Existing customers will not be impacted at this time until Authy API has reached End of Life. For more information about migration, see Migrating from Authy to Verify for SMS.
Adding Two-factor Authentication to your application is the easiest way to increase security and trust in your product without unnecessarily burdening your users. This quickstart guides you through building a Java, Spring and AngularJS application that restricts access to a URL. Four Authy API channels are demoed: SMS, Voice, Soft Tokens and Push Notifications.
Ready to protect a tiny app from big hacking efforts?
Create a new Twilio account (you can sign up for a free Twilio trial), or sign into an existing Twilio account.
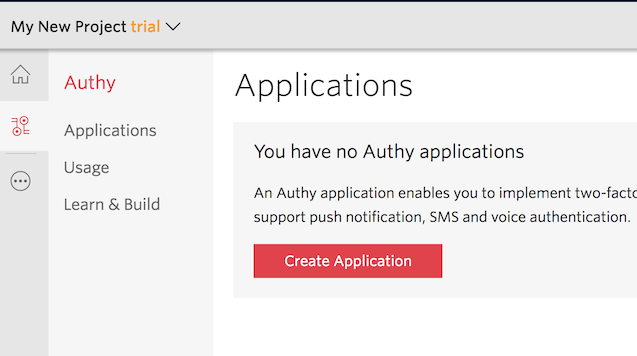
Once logged in, visit the Authy Console. Click on the red 'Create New Aplication' (or big red plus ('+') if you already created one) to create a new Authy application then name it something memorable.
You'll automatically be transported to the Settings page next. Click the eyeball icon to reveal your Production API Key.
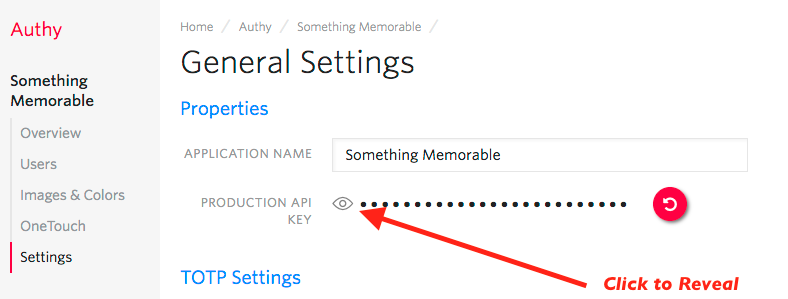
Copy your Production API Key to a safe place, you will use it during application setup.
This Two-factor Authentication demos two channels which require an installed Authy Client to test: Soft Tokens and Push Notifications. While SMS and Voice channels will work without the client, to try out all four authentication channels download and install Authy Client for Desktop or Mobile:
Clone our Java repository locally, then enter the directory. Install all of the necessary node modules:
_10gradle build
Next, open the file .env.example. There, edit the ACCOUNT_SECURITY_API_KEY, pasting in the API Key from the above step (in the console), and save the file as .env. Either source the .env file or otherwise set the ACCOUNT_SECURITY_API_KEY in your environment.
Enter the API Key from the Account Security console and optionally change the port.
_10# You can get/create one here :_10# https://www.twilio.com/console/authy/applications_10export ACCOUNT_SECURITY_API_KEY=ENTER_SECRET_HERE
Once you have added your API Key, you are ready to run! Launch the app with:
_10gradle appRun
You should get a message your new app is running!
With your phone (optionally with the Authy client installed) nearby, open a new browser tab and navigate to http://localhost:8080/register/index.html
Enter your information and invent a password, then hit 'Register'. Your information is passed to Twilio (you will be able to see your user immediately in the console), and the application is returned a user_id.
Now visit http://localhost:8080/login/index.html and login. You'll be presented with a happy screen:
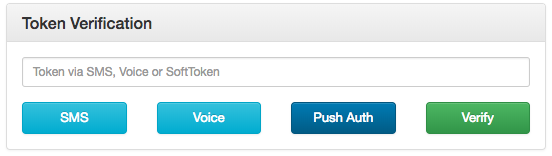
If your phone has the Authy Client installed, you can immediately enter a Soft Token from the client to Verify. Additionally, you can try a Push Notification simply by pushing the labeled button.
If you do not have the Authy Client installed, the SMS and Voice channels will also work in providing a token. To try different channels, you can logout to start the process again.
_108package com.twilio.accountsecurity.services;_108_108import com.authy.AuthyApiClient;_108import com.authy.OneTouchException;_108import com.authy.api.*;_108import com.twilio.accountsecurity.controllers.requests.VerifyTokenRequest;_108import com.twilio.accountsecurity.repositories.UserRepository;_108import com.twilio.accountsecurity.exceptions.TokenVerificationException;_108import com.twilio.accountsecurity.models.UserModel;_108import org.slf4j.Logger;_108import org.slf4j.LoggerFactory;_108import org.springframework.beans.factory.annotation.Autowired;_108import org.springframework.stereotype.Service;_108_108@Service_108public class TokenService {_108_108 private static final Logger LOGGER = LoggerFactory.getLogger(TokenService.class);_108_108 private AuthyApiClient authyClient;_108 private UserRepository userRepository;_108_108 @Autowired_108 public TokenService(AuthyApiClient authyClient, UserRepository userRepository) {_108 this.authyClient = authyClient;_108 this.userRepository = userRepository;_108 }_108_108_108 public void sendSmsToken(String username) {_108 Hash hash = authyClient_108 .getUsers()_108 .requestSms(getUserAuthyId(username));_108_108 if(!hash.isOk()) {_108 logAndThrow("Problem sending token over SMS. " + hash.getMessage());_108 }_108 }_108_108 public void sendVoiceToken(String username) {_108 UserModel user = userRepository.findFirstByUsername(username);_108_108 Hash hash = authyClient.getUsers().requestCall(user.getAuthyId());_108 if(!hash.isOk()) {_108 logAndThrow("Problem sending the token on a call. " + hash.getMessage());_108 }_108 }_108_108 public String sendOneTouchToken(String username) {_108 UserModel user = userRepository.findFirstByUsername(username);_108_108 try {_108 ApprovalRequestParams params = new ApprovalRequestParams_108 .Builder(user.getAuthyId(), "Login requested for Account Security account.")_108 .setSecondsToExpire(120L)_108 .addDetail("Authy ID", user.getAuthyId().toString())_108 .addDetail("Username", user.getUsername())_108 .addDetail("Location", "San Francisco, CA")_108 .addDetail("Reason", "Demo by Account Security")_108 .build();_108 OneTouchResponse response = authyClient_108 .getOneTouch()_108 .sendApprovalRequest(params);_108_108 if(!response.isSuccess()) {_108 logAndThrow("Problem sending the token with OneTouch");_108 }_108 return response.getApprovalRequest().getUUID();_108 } catch (OneTouchException e) {_108 logAndThrow("Problem sending the token with OneTouch: " + e.getMessage());_108 }_108 return null;_108 }_108_108 public void verify(String username, VerifyTokenRequest requestBody) {_108 Token token = authyClient_108 .getTokens()_108 .verify(getUserAuthyId(username), requestBody.getToken());_108_108 if(!token.isOk()) {_108 logAndThrow("Token verification failed. " + token.getError().toString());_108 }_108 }_108_108 public boolean retrieveOneTouchStatus(String uuid) {_108 try {_108 return authyClient_108 .getOneTouch()_108 .getApprovalRequestStatus(uuid)_108 .getApprovalRequest()_108 .getStatus()_108 .equals("approved");_108 } catch (OneTouchException e) {_108 logAndThrow(e.getMessage());_108 }_108 return false;_108 }_108_108 private void logAndThrow(String message) {_108 LOGGER.warn(message);_108 throw new TokenVerificationException(message);_108 }_108_108 private Integer getUserAuthyId(String username) {_108 UserModel user = userRepository.findFirstByUsername(username);_108 return user.getAuthyId();_108 }_108}
And there you go, Authy Two-factor Authentication is on and your Java app is protected!
Now that you are keeping the hackers out of this demo app using Two-factor Authentication with Twilio Authy, you can find all of the detailed descriptions for options and API calls in our Authy API Reference. If you're also building a registration flow, also check out our Verify product and the phone verification quickstart which uses this codebase.
For additional guides and tutorials on account security and other products, in Node.js and in our other languages, take a look at the Docs.