Programmable Messaging Quickstart - Python
Info
Ahoy there! All messaging transmitted using Twilio's messaging channels is treated as Application-to-Person (A2P) messaging and subject to Twilio's Messaging Policy. For detailed information on policy rules to ensure you remain compliant while using Twilio's services, please see our Acceptable Use Policy.
With just a few lines of code, your Python application can send SMS messages with Twilio Programmable Messaging.
This Programmable Messaging Quickstart will walk you through the entire process step-by-step, starting with setting up your Twilio account all the way through sending an SMS using a Messaging Service.
In this Quickstart, you will learn how to:
- Sign up for Twilio and get your first SMS-enabled Twilio phone number
- Set up your development environment to send outbound messages
- Send your first outbound SMS
- Set up your first Twilio Messaging Service
- Send a second SMS from that Messaging Service
By the end of this Quickstart, you'll have a solid foundation for building and scaling with Twilio's Programmable Messaging for your specific use cases.
Info
Already have a Twilio account? Go ahead and skip this section.
Warning
If you are sending SMS to the U.S. or Canada, before proceeding further please be aware of updated restrictions on the use of Toll-Free numbers for messaging, including TF numbers obtained through Free Trial. Please click here for details.
You can sign up for a free Twilio trial account here.
- When you sign up, you'll be asked to verify your personal phone number. This helps Twilio verify your identity and also allows you to send test messages to your phone from your Twilio account while in trial mode.
- Once you verify your number, you'll be asked a series of questions to customize your experience.
- Once you finish the onboarding flow, you'll arrive at your project dashboard in the Twilio Console . This is where you'll be able to access your Account SID, authentication token, find a Twilio phone number, and more.
If you don't currently own a Twilio phone number with SMS functionality, you'll need to purchase one. After navigating to the Buy a Number page, check the SMS box and click Search.
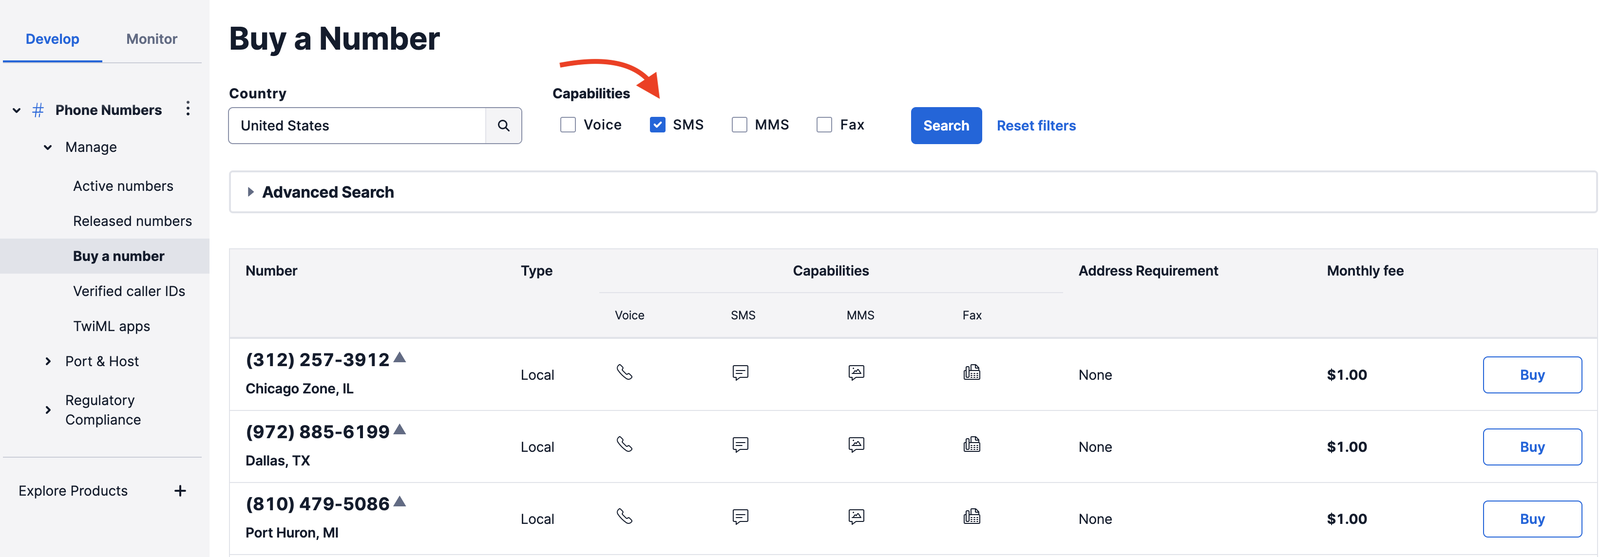
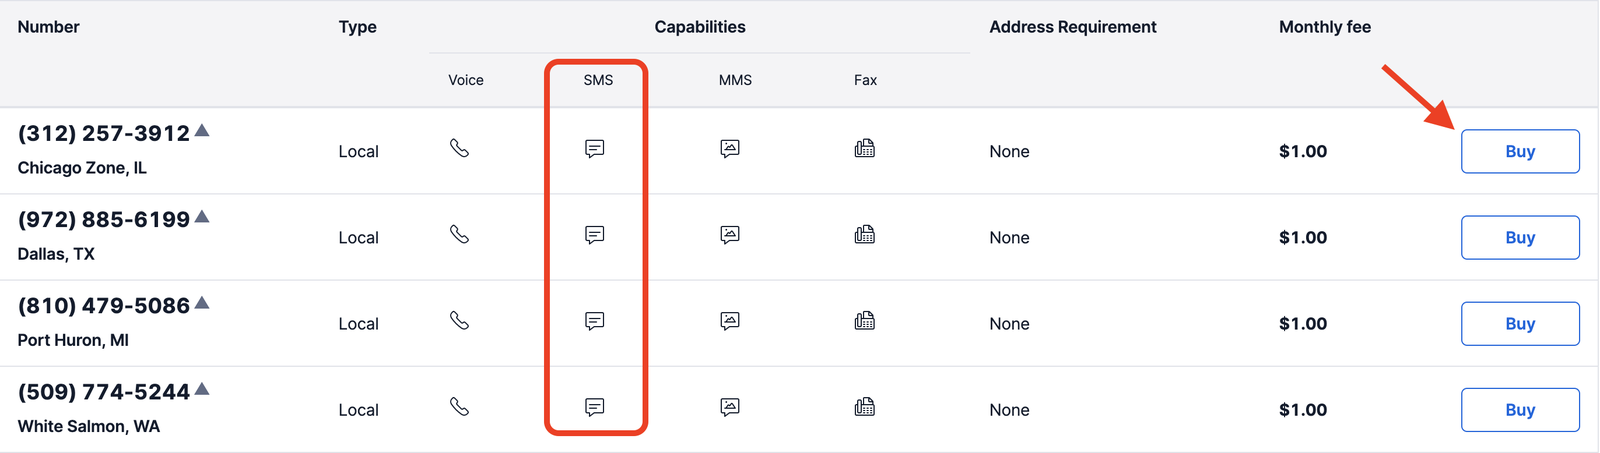
You'll then see a list of available phone numbers and their capabilities. Find a number that suits your fancy and click Buy to add it to your account.
We'll use the Twilio CLI (command line interface) for a few tasks, so let's install that next.
The suggested way to install twilio-cli on macOS is to use Homebrew. If you don't already have it installed, visit the Homebrew site for installation instructions and then return here.
Once you have installed Homebrew, run the following command to install twilio-cli:
_10brew tap twilio/brew && brew install twilio
Info
For other installation methods, see the Twilio CLI Quickstart.
Run twilio login to get the Twilio CLI connected to your account. Visit the Twilio Console, and under Account Info, you'll find your unique Account SID and Auth Token to provide to the CLI.
Once you have your SMS-enabled Twilio phone number and the Twilio CLI, you can proceed to install Python and the Twilio Python Helper Library.
Info
If you've gone through one of our other Python Quickstarts already and have Python and the Twilio Python helper library installed, you can skip this step and get straight to sending your first text message.
To send your first SMS, you'll need to have Python and the Twilio Python helper library installed.
If you're using a Mac or Linux machine, you probably already have Python installed. You can check this by opening up a terminal and running the following command:
_10python3 --version
You should see something like:
_10$ python3 --version_10Python 3.7
Windows users can follow this excellent tutorial for installing Python on Windows, or follow the instructions from Python's documentation.
Twilio's Python server-side SDK supports Python 3.
Info
For a full list of which versions of Python are supported, refer to our Helper Library documentation.
The easiest way to install the library is using pip, a package manager for Python that makes it easier to install the libraries you need. Simply run this in the terminal:
_10pip install twilio
Info
Depending on how Python or pip are configured in your operating system, you may need to run pip3 install twilio instead.
If you get a pip: command not found error, you can also use easy_install by running this in your terminal:
_10easy_install twilio
If you'd prefer a manual installation, you can download the source code (ZIP) for twilio-python and then install the library by running:
_10python setup.py install
in the folder containing the twilio-python server-side SDK library code.
Now that we have Python and twilio-python installed, we can send an outbound text message from the Twilio phone number we just purchased with a single API request. Create and open a new file called send_sms.py and type or paste in this code sample.
This code creates a new instance of the Message resource and sends an HTTP POST to the Message resource URI.
You'll need to edit your send_sms.py file a little more before your message will send.
Swap the placeholder values for account_sid and auth_token with your personal Twilio credentials. You can find these values in your Twilio console, as described previously.
Open send_sms.py and replace the values for account_sid and auth_token with your unique values.
Danger
Please note: it's okay to hardcode your credentials when getting started, but you should use environment variables to keep them secret before deploying to production. Check out how to set environment variables for more information.
Remember that SMS-enabled phone number you bought just a few minutes ago? Go ahead and replace the existing from_ number with that one, making sure to use E.164 formatting:
[+][country code][phone number including area code]
Replace the to phone number with your mobile phone number. This can be any phone number that can receive text messages, but it's a good idea to test with your own phone so you can see the magic happen! As above, you should use E.164 formatting for this value.
Warning
If you are on a Twilio Trial account, your outgoing SMS messages are limited to phone numbers that you have verified with Twilio. Phone numbers can be verified via your Twilio Console's Verified Caller IDs.
When you send an SMS from your free trial phone number, it will always begin with "Sent from a Twilio trial account." We remove this message after you upgrade.
Save your changes and run this script from your terminal:
_10python send_sms.py
That's it! In a few moments, you should receive an SMS from your Twilio number on your phone.
In this code sample, we are making a POST request to the Programmable Messaging API's Message endpoint in order to create a new outbound message. We are using the twilio-python library's built-in create method, but you could make this request using the Twilio CLI (that you already installed), curl, or a request module of your choosing.
Check out the code samples to send an SMS with the Twilio CLI and curl. Don't forget to update the body, to, and from parameters!
This code sample makes a request to the Message resource using the Twilio CLI
This code sample makes a request to the Message resource using curl
Info
Are your customers in the U.S. or Canada? You can also send them MMS messages by adding just one line of code. Check out this guide to sending MMS to see how it's done.
Congratulations, you've sent your first SMS with Twilio Programmable Messaging and received it on your personal device.
At this point, we have acquired one Twilio phone number and used it to send one outbound SMS. You can imagine a time in the not-so-distant future where you'll need a more robust, feature-rich way to send messages, such as:
- Sending many messages over a short period of time
- Handling opt-ins and opt-outs
- Ensuring that your customers always receive a consistent messaging experience with the same phone number.
In the next part of the Quickstart, we'll walk through setting up your first Messaging Service. You can think of a Messaging Service as a container to hold all of your available phone numbers (and other senders) and comes with features that you may need along your messaging journey.
Run the following Twilio CLI command to create a Messaging Service that we will use to send our first programmable SMS.
_10twilio api:messaging:v1:services:create --friendly-name "My first Messaging Service"
Take note of the Messaging Service SID (It starts with "MGXXX..."). We'll need it to send our next message.
Next, add the phone number you just purchased. Forgot the number already? No worries, you can list it with the Twilio CLI:
_10twilio phone-numbers:list_10# Grab the SID ("PNXXXX...") of your number
Add your phone number to your newly created Messaging Service with the following command:
_10twilio api:messaging:v1:services:phone-numbers:create --service-sid MGXXXXXXXXXXXXXXXXXXXXXXXXXXXXXXXX --phone-number-sid PNXXXXXXXXXXXXXXXXXXXXXXXXXXXXXXXX
Sending an outbound SMS from a Messaging Service is similar to sending from an individual Twilio phone number. The primary difference is replacing the from_ parameter with the messaging_service_sid to indicate that you are sending from a phone number within your Messaging Service's sender pool. (Currently, there is only one phone number in your sender pool, so we'll be sending from that one.)
This code creates a new instance of the Message resource, this time with a messaging_service_sid parameter
Remember that Messaging Service you just created? We will modify the code from the first example to use your Messaging Service to send a message. Go ahead and open the send_sms.py file you used for that example. In that file, instead of the from_ parameter and your phone number, use the messaging_service_sid parameter with the "MGXXXX..." of your Messaging Service SID. Save your changes and run this script from your terminal:
_10python send_sms.py
And that's it to send an SMS using a Twilio Messaging Service! In a few seconds, you should receive a second SMS on your phone from your Twilio phone number. The Messaging Service seamlessly selected your number from its Sender Pool to send that second outbound message.
Now that you've sent your first SMS messages, check out the following resources to continue your messaging journey with Twilio:
- Learn about inbound messages with Receive and Reply to SMS and MMS messages .
- Want to send with WhatsApp? Check out our WhatsApp Quickstart for Python and our guide to Sending WhatsApp Notifications with Templates.
- Build Server Notifications with Twilio Programmable Messaging.
- Dive into the API Reference documentation for Twilio SMS.
- Track the delivery status of your messages with Python.
We can't wait to see what you build!