Skip to contentSkip to navigationSkip to topbar
Rate this page:
On this page

Using WhatsApp with Conversations


WhatsApp is increasingly the world's #1 conversational messaging platform as well as an absolutely critical engagement tool across South America, Middle East, Africa and many parts of Europe and Asia. Twilio Conversations supports WhatsApp out of the box and can help you address a number of patterns:

  • Delivery Coordination: Let your drivers reach out to the customer to make sure the last 100 yards of each delivery are successful.
  • Clienteling: Allow your employees to have long-term relationships (e.g. personal shoppers, wealth managers, or real estate agents) with your customers without using their personal devices.
  • Masked Communication: Facilitate communication between your employees and your customers without sharing private numbers.

This guide will show you how to set up a few common patterns that pair WhatsApp with other channels.


Prerequisites

prerequisites page anchor
(information)

Info

Please note that WhatsApp onboarding generally takes 1-2 weeks. WhatsApp has a thorough vetting process that requires business verification in the Meta Business Manager in order to protect the WhatsApp ecosystem.

We advise planning accordingly when setting up your WhatsApp Sender for Twilio. For more information, please read our guide to connecting your WhatsApp Business Profile with your Twilio number.

WhatsApp is a highly-regulated channel, requiring documentation and approval from Meta to get your business started. Specifically, you will need to secure an approved WhatsApp Business Profile, which gives you a Twilio WhatsApp Number to represent your business.

Get your WhatsApp templates approved

get-your-whatsapp-templates-approved page anchor
(information)

Info

The last section of the tutorial uses templates to initiate contact between two separate WhatsApp participants. If you follow the steps chronologically, you will still be able to complete the tutorial because you will have opted into the WhatsApp's 24-hour window. However, the screenshots will looks lightly different from what you see in the WhatsApp interface.

Depending on your use-case, you may need to secure some approved WhatsApp templates. This is specifically required if you want to send a message to a new user on WhatsApp, or send a message more than 24 hours after the last response.

Note: If your use case can function such that you always receive WhatsApp messages first from your customers, you can skip the template registration step.

Now, you're ready to go!


Cross-Channel Masking: Connecting WhatsApp to SMS

cross-channel-masking-connecting-whatsapp-to-sms page anchor

SMS is the easiest channel to connect to WhatsApp in a Twilio Conversation. To do this we'll use:

  • A Twilio SMS-capable phone number (hereafter "TWI-SMS-NUMBER")
  • Your Twilio WhatsApp number (hereafter "TWI-WA-NUMBER")
  • The Twilio CLI

We recommend the Twilio CLI for experimenting, but these guides will work in any language in Twilio. Pick your favorite on the right and follow along.

Let's get down to it; our SMS-to-WhatsApp conversation will take four steps to set up.

Step 1. Create a Conversation

step-1-create-a-conversation page anchor

Create a Conversation

create-a-conversation page anchor

The Conversation will contain two participants, one on SMS and the other on WhatsApp.

Node.js
Python
C#
Java
Go
PHP
Ruby
twilio-cli
curl

_10
// Download the helper library from https://www.twilio.com/docs/node/install
_10
// Find your Account SID and Auth Token at twilio.com/console
_10
// and set the environment variables. See http://twil.io/secure
_10
const accountSid = process.env.TWILIO_ACCOUNT_SID;
_10
const authToken = process.env.TWILIO_AUTH_TOKEN;
_10
const client = require('twilio')(accountSid, authToken);
_10
_10
client.conversations.v1.conversations
_10
.create({friendlyName: 'SMS-to-WhatsApp Example'})
_10
.then(conversation => console.log(conversation.sid));

Output

_25
{
_25
"sid": "CHXXXXXXXXXXXXXXXXXXXXXXXXXXXXXXXX",
_25
"account_sid": "ACXXXXXXXXXXXXXXXXXXXXXXXXXXXXXXXX",
_25
"chat_service_sid": "ISXXXXXXXXXXXXXXXXXXXXXXXXXXXXXXXX",
_25
"messaging_service_sid": "MGXXXXXXXXXXXXXXXXXXXXXXXXXXXXXXXX",
_25
"friendly_name": "SMS-to-WhatsApp Example",
_25
"unique_name": "unique_name",
_25
"attributes": {
_25
"topic": "feedback"
_25
},
_25
"date_created": "2015-12-16T22:18:37Z",
_25
"date_updated": "2015-12-16T22:18:38Z",
_25
"state": "inactive",
_25
"timers": {
_25
"date_inactive": "2015-12-16T22:19:38Z",
_25
"date_closed": "2015-12-16T22:28:38Z"
_25
},
_25
"bindings": {},
_25
"url": "https://conversations.twilio.com/v1/Conversations/CHXXXXXXXXXXXXXXXXXXXXXXXXXXXXXXXX",
_25
"links": {
_25
"participants": "https://conversations.twilio.com/v1/Conversations/CHXXXXXXXXXXXXXXXXXXXXXXXXXXXXXXXX/Participants",
_25
"messages": "https://conversations.twilio.com/v1/Conversations/CHXXXXXXXXXXXXXXXXXXXXXXXXXXXXXXXX/Messages",
_25
"webhooks": "https://conversations.twilio.com/v1/Conversations/CHXXXXXXXXXXXXXXXXXXXXXXXXXXXXXXXX/Webhooks"
_25
}
_25
}

Step 2: Create the WhatsApp Participant

step-2-create-the-whatsapp-participant page anchor

Create the WhatsApp Participant

create-the-whatsapp-participant page anchor

Use your own WhatsApp phone number and the business profile you created.

Node.js
Python
C#
Java
Go
PHP
Ruby
twilio-cli
curl

_14
// Download the helper library from https://www.twilio.com/docs/node/install
_14
// Find your Account SID and Auth Token at twilio.com/console
_14
// and set the environment variables. See http://twil.io/secure
_14
const accountSid = process.env.TWILIO_ACCOUNT_SID;
_14
const authToken = process.env.TWILIO_AUTH_TOKEN;
_14
const client = require('twilio')(accountSid, authToken);
_14
_14
client.conversations.v1.conversations('CHxxxx')
_14
.participants
_14
.create({
_14
'messagingBinding.address': 'whatsapp:YOUR_WHATSAPP_NUMBER',
_14
'messagingBinding.proxyAddress': 'whatsapp:TWI_WA_NUMBER'
_14
})
_14
.then(participant => console.log(participant.sid));

Output

_20
{
_20
"account_sid": "ACXXXXXXXXXXXXXXXXXXXXXXXXXXXXXXXX",
_20
"conversation_sid": "CHXXXXXXXXXXXXXXXXXXXXXXXXXXXXXXXX",
_20
"sid": "MBXXXXXXXXXXXXXXXXXXXXXXXXXXXXXXXX",
_20
"identity": null,
_20
"attributes": {
_20
"role": "driver"
_20
},
_20
"messaging_binding": {
_20
"type": "sms",
_20
"address": "+15558675310",
_20
"proxy_address": "+15017122661"
_20
},
_20
"role_sid": "RLXXXXXXXXXXXXXXXXXXXXXXXXXXXXXXXX",
_20
"date_created": "2015-12-16T22:18:37Z",
_20
"date_updated": "2015-12-16T22:18:38Z",
_20
"url": "https://conversations.twilio.com/v1/Conversations/CHXXXXXXXXXXXXXXXXXXXXXXXXXXXXXXXX/Participants/MBXXXXXXXXXXXXXXXXXXXXXXXXXXXXXXXX",
_20
"last_read_message_index": null,
_20
"last_read_timestamp": null
_20
}

Step 3: Create the SMS Participant

step-3-create-the-sms-participant page anchor

Create the SMS Participant

create-the-sms-participant page anchor

Use your phone number and a Twilio SMS Number from your account.

Node.js
Python
C#
Java
Go
PHP
Ruby
twilio-cli
curl

_14
// Download the helper library from https://www.twilio.com/docs/node/install
_14
// Find your Account SID and Auth Token at twilio.com/console
_14
// and set the environment variables. See http://twil.io/secure
_14
const accountSid = process.env.TWILIO_ACCOUNT_SID;
_14
const authToken = process.env.TWILIO_AUTH_TOKEN;
_14
const client = require('twilio')(accountSid, authToken);
_14
_14
client.conversations.v1.conversations('CHxxxx')
_14
.participants
_14
.create({
_14
'messagingBinding.address': 'YOUR_SMS_NUMBER',
_14
'messagingBinding.proxyAddress': 'TWI_SMS_NUMBER'
_14
})
_14
.then(participant => console.log(participant.sid));

Output

_20
{
_20
"account_sid": "ACXXXXXXXXXXXXXXXXXXXXXXXXXXXXXXXX",
_20
"conversation_sid": "CHXXXXXXXXXXXXXXXXXXXXXXXXXXXXXXXX",
_20
"sid": "MBXXXXXXXXXXXXXXXXXXXXXXXXXXXXXXXX",
_20
"identity": null,
_20
"attributes": {
_20
"role": "driver"
_20
},
_20
"messaging_binding": {
_20
"type": "sms",
_20
"address": "+15558675310",
_20
"proxy_address": "+15017122661"
_20
},
_20
"role_sid": "RLXXXXXXXXXXXXXXXXXXXXXXXXXXXXXXXX",
_20
"date_created": "2015-12-16T22:18:37Z",
_20
"date_updated": "2015-12-16T22:18:38Z",
_20
"url": "https://conversations.twilio.com/v1/Conversations/CHXXXXXXXXXXXXXXXXXXXXXXXXXXXXXXXX/Participants/MBXXXXXXXXXXXXXXXXXXXXXXXXXXXXXXXX",
_20
"last_read_message_index": null,
_20
"last_read_timestamp": null
_20
}

Step 4: Send a message from WhatsApp

step-4-send-a-message-from-whatsapp page anchor

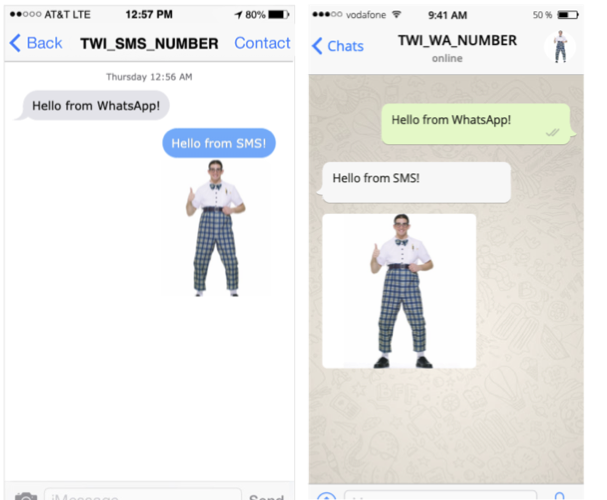
Because you've set up this conversation to proxy with SMS, you'll see the messages flowing back and forth automatically between your two channels.

Note: The WhatsApp user kicks off this conversation by sending the first message. By starting from an inbound WhatsApp message, we've avoided any need to use WhatsApp Templates to start the Conversation. These messages and media will flow just fine for the next 24 hours.

WhatsApp & SMS Phone Side-by-Side.

Masked Communication: Connecting Two WhatsApp Participants

masked-communication-connecting-two-whatsapp-participants page anchor

When you connect two WhatsApp participants, you'll have to solve two business problems:

  1. Who is speaking with whom?
    This is probably the bread-and-butter of your business idea: if you're a two-sided marketplace, you're probably connecting a buyer and a seller (or a passenger and a rider). The buyer is the most critical personality: the brand they see in WhatsApp is important and must establish enough trust to proceed with the conversation. When you create your WhatsApp Business Profile , keep that buyer personality in mind first.
  2. How will you get opt-in from both participants?
    Unsolicited outbound messages to WhatsApp are highly restricted. Until your customer replies, you can only send messages conforming to approved templates. In this scenario, both sides are on WhatsApp, so we will need to use one of those templates to get the conversation moving.

We'll start by setting up the Conversation and later show how to use templates to improve the customer experience.

Setting Up the Conversation

setting-up-the-conversation page anchor

We'll need the following to set up our WhatsApp-to-WhatsApp Conversation:

  1. A Twilio WhatsApp number; we'll call this "TWI_WA_NUMBER." You could use more than one, but it's not necessary.
  2. Two consumer WhatsApp accounts. Choose yourself and a friend who won't mind. These are typically your personal device numbers.
  3. The Twilio CLI(link takes you to an external page) .
(warning)

Warning

If you're going through this guide in chronological order and re-using your WhatsApp numbers to test out all of the use cases, you should remove the previous Conversation first. Each number pair (twilio+personal) can only appear in one conversation at a time.


_10
twilio api:conversations:v1:conversations:remove --sid CHxxxx

With that, connecting two WhatsApp participants in a Conversation will take five steps:

Step 1: Create the Conversation

step-1-create-the-conversation page anchor

The Conversation will map your two participants to each other, one on SMS and the other on WhatsApp.

Node.js
Python
C#
Java
Go
PHP
Ruby
twilio-cli
curl

_10
// Download the helper library from https://www.twilio.com/docs/node/install
_10
// Find your Account SID and Auth Token at twilio.com/console
_10
// and set the environment variables. See http://twil.io/secure
_10
const accountSid = process.env.TWILIO_ACCOUNT_SID;
_10
const authToken = process.env.TWILIO_AUTH_TOKEN;
_10
const client = require('twilio')(accountSid, authToken);
_10
_10
client.conversations.v1.conversations
_10
.create()
_10
.then(conversation => console.log(conversation.sid));

Output

_25
{
_25
"sid": "CHXXXXXXXXXXXXXXXXXXXXXXXXXXXXXXXX",
_25
"account_sid": "ACXXXXXXXXXXXXXXXXXXXXXXXXXXXXXXXX",
_25
"chat_service_sid": "ISXXXXXXXXXXXXXXXXXXXXXXXXXXXXXXXX",
_25
"messaging_service_sid": "MGXXXXXXXXXXXXXXXXXXXXXXXXXXXXXXXX",
_25
"friendly_name": "friendly_name",
_25
"unique_name": "unique_name",
_25
"attributes": {
_25
"topic": "feedback"
_25
},
_25
"date_created": "2015-12-16T22:18:37Z",
_25
"date_updated": "2015-12-16T22:18:38Z",
_25
"state": "inactive",
_25
"timers": {
_25
"date_inactive": "2015-12-16T22:19:38Z",
_25
"date_closed": "2015-12-16T22:28:38Z"
_25
},
_25
"bindings": {},
_25
"url": "https://conversations.twilio.com/v1/Conversations/CHXXXXXXXXXXXXXXXXXXXXXXXXXXXXXXXX",
_25
"links": {
_25
"participants": "https://conversations.twilio.com/v1/Conversations/CHXXXXXXXXXXXXXXXXXXXXXXXXXXXXXXXX/Participants",
_25
"messages": "https://conversations.twilio.com/v1/Conversations/CHXXXXXXXXXXXXXXXXXXXXXXXXXXXXXXXX/Messages",
_25
"webhooks": "https://conversations.twilio.com/v1/Conversations/CHXXXXXXXXXXXXXXXXXXXXXXXXXXXXXXXX/Webhooks"
_25
}
_25
}

Steps 2 and 3: Add two different WhatsApp Participants

steps-2-and-3-add-two-different-whatsapp-participants page anchor

Run this code twice, replacing YOUR_WHATSAPP_NUMBER with your phone number the first time and your friend's the second time

Node.js
Python
C#
Java
Go
PHP
Ruby
twilio-cli
curl

_14
// Download the helper library from https://www.twilio.com/docs/node/install
_14
// Find your Account SID and Auth Token at twilio.com/console
_14
// and set the environment variables. See http://twil.io/secure
_14
const accountSid = process.env.TWILIO_ACCOUNT_SID;
_14
const authToken = process.env.TWILIO_AUTH_TOKEN;
_14
const client = require('twilio')(accountSid, authToken);
_14
_14
client.conversations.v1.conversations('CHxxxx')
_14
.participants
_14
.create({
_14
'messagingBinding.address': 'whatsapp:YOUR_WHATSAPP_NUMBER',
_14
'messagingBinding.proxyAddress': 'whatsapp:TWI_WA_NUMBER'
_14
})
_14
.then(participant => console.log(participant.sid));

Output

_20
{
_20
"account_sid": "ACXXXXXXXXXXXXXXXXXXXXXXXXXXXXXXXX",
_20
"conversation_sid": "CHXXXXXXXXXXXXXXXXXXXXXXXXXXXXXXXX",
_20
"sid": "MBXXXXXXXXXXXXXXXXXXXXXXXXXXXXXXXX",
_20
"identity": null,
_20
"attributes": {
_20
"role": "driver"
_20
},
_20
"messaging_binding": {
_20
"type": "sms",
_20
"address": "+15558675310",
_20
"proxy_address": "+15017122661"
_20
},
_20
"role_sid": "RLXXXXXXXXXXXXXXXXXXXXXXXXXXXXXXXX",
_20
"date_created": "2015-12-16T22:18:37Z",
_20
"date_updated": "2015-12-16T22:18:38Z",
_20
"url": "https://conversations.twilio.com/v1/Conversations/CHXXXXXXXXXXXXXXXXXXXXXXXXXXXXXXXX/Participants/MBXXXXXXXXXXXXXXXXXXXXXXXXXXXXXXXX",
_20
"last_read_message_index": null,
_20
"last_read_timestamp": null
_20
}

Step 4: Send a message from one side

step-4-send-a-message-from-one-side page anchor

From your phone, send the first message in WhatsApp. Send the message to your TWI_WA_NUMBER (not directly to your friend's number.)

Step 5: Send a message from the other side

step-5-send-a-message-from-the-other-side page anchor

Have your good-natured friend send a message to your TWI_WA_NUMBER (not directly to your phone number).

Rider-Courier WhatsApp with Natural Opt-in.

Congratulations, it's working!

… Mostly. You may notice that after steps four and five, you have two different conversations ongoing. After this awkward introduction, everything proceeds as expected, but that's not the professional experience we want.

In this scenario, both WhatsApp-based parties must reply before the Twilio can send outbound messages to both parties. Receiving an incoming message from both Conversation participants kicks off the "24-hour session" in which Twilio can send outbound free-form WhatsApp messages.

Starting More Professionally: Using Template Messages

starting-more-professionally-using-template-messages page anchor
(warning)

Warning

WhatsApp templates need to be submitted and approved before they are effective. Before you proceed to below, learn how to create WhatsApp templates and submit them for approval. Once your templates are approved, use the appropriate body text in the steps below.

Please note: Without approved WhatsApp templates, these outbound messages will be swallowed by the system.

If you have followed the tutorial chronologically, you can complete the tutorial because you and your good-natured friend have opted into receiving WhatsApp messages for 24 hours. However, the screenshots will differ from what you see in the WhatsApp interface.

Let's carry the example above a little further, and use approved WhatsApp Template Messages to make it happen. We're going to pick two template messages that we've already gotten approved:

  • A templated message that our food courier will understand
  • A templated message that will invite the customer to opt into the contact.
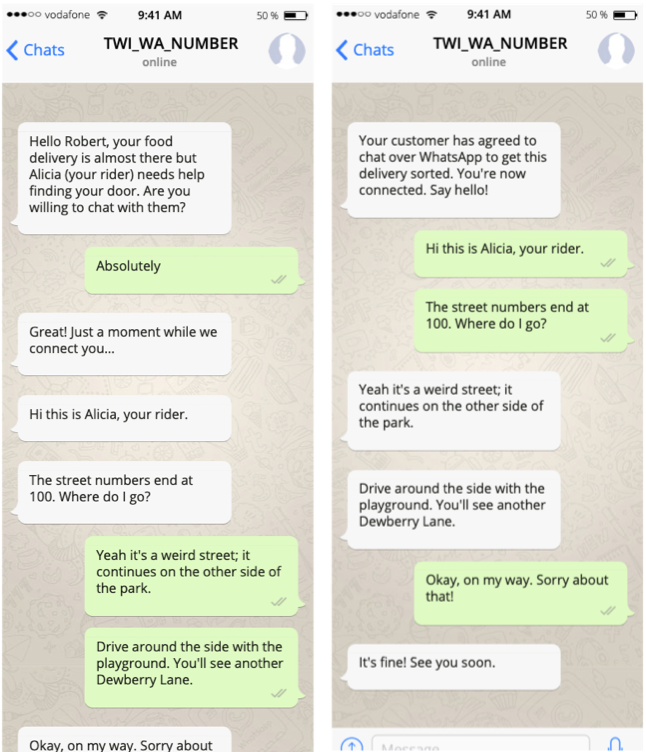
_10
TEMPLATE 1:
_10
Hello {{1}}, your food delivery is almost there but {{2}} (your rider) needs help finding your door. Are you willing to chat with them?
_10
_10
TEMPLATE 2:
_10
Your customer has agreed to chat over WhatsApp to get this delivery sorted. You're now connected. Say hello!

We'll send these messages one after another, waiting for a response from the first before sending the second.

Using templates to smooth out our customer experience, let's follow two more steps:

Step 6: Invite the Customer to Engage.

step-6-invite-the-customer-to-engage page anchor

Use the REST API to send the first message as though it were authored by the courier. Note the 'author' parameter.

Node.js
Python
C#
Java
Go
PHP
Ruby
twilio-cli
curl

_14
// Download the helper library from https://www.twilio.com/docs/node/install
_14
// Find your Account SID and Auth Token at twilio.com/console
_14
// and set the environment variables. See http://twil.io/secure
_14
const accountSid = process.env.TWILIO_ACCOUNT_SID;
_14
const authToken = process.env.TWILIO_AUTH_TOKEN;
_14
const client = require('twilio')(accountSid, authToken);
_14
_14
client.conversations.v1.conversations('CHxxxx')
_14
.messages
_14
.create({
_14
author: 'whatsapp:COURIER_WA_NUMBER',
_14
body: 'Hello Robert, your food delivery is almost there but Alicia (your rider) needs help finding your door. Are you willing to chat with them?'
_14
})
_14
.then(message => console.log(message.sid));

Output

_29
{
_29
"sid": "IMXXXXXXXXXXXXXXXXXXXXXXXXXXXXXXXX",
_29
"account_sid": "ACXXXXXXXXXXXXXXXXXXXXXXXXXXXXXXXX",
_29
"conversation_sid": "CHXXXXXXXXXXXXXXXXXXXXXXXXXXXXXXXX",
_29
"body": "Hello Robert, your food delivery is almost there but Alicia (your rider) needs help finding your door. Are you willing to chat with them?",
_29
"media": null,
_29
"author": "whatsapp:COURIER_WA_NUMBER",
_29
"participant_sid": "MBXXXXXXXXXXXXXXXXXXXXXXXXXXXXXXXX",
_29
"attributes": {
_29
"importance": "high"
_29
},
_29
"date_created": "2015-12-16T22:18:37Z",
_29
"date_updated": "2015-12-16T22:18:38Z",
_29
"index": 0,
_29
"delivery": {
_29
"total": 2,
_29
"sent": "all",
_29
"delivered": "some",
_29
"read": "some",
_29
"failed": "none",
_29
"undelivered": "none"
_29
},
_29
"content_sid": null,
_29
"url": "https://conversations.twilio.com/v1/Conversations/CHXXXXXXXXXXXXXXXXXXXXXXXXXXXXXXXX/Messages/IMXXXXXXXXXXXXXXXXXXXXXXXXXXXXXXXX",
_29
"links": {
_29
"delivery_receipts": "https://conversations.twilio.com/v1/Conversations/CHXXXXXXXXXXXXXXXXXXXXXXXXXXXXXXXX/Messages/IMXXXXXXXXXXXXXXXXXXXXXXXXXXXXXXXX/Receipts",
_29
"channel_metadata": "https://conversations.twilio.com/v1/Conversations/CHXXXXXXXXXXXXXXXXXXXXXXXXXXXXXXXX/Messages/IMXXXXXXXXXXXXXXXXXXXXXXXXXXXXXXXX/ChannelMetadata"
_29
}
_29
}

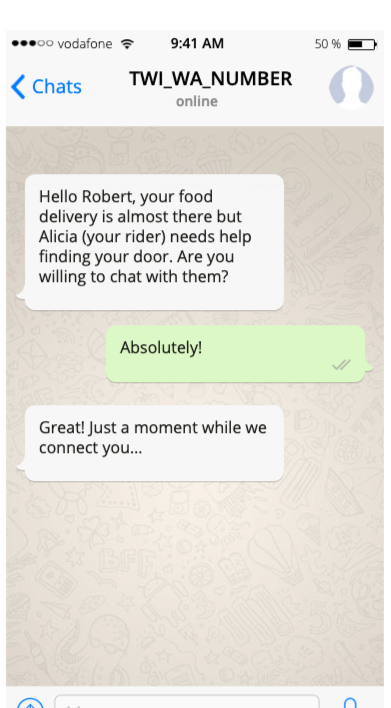
The following is what the customer will see after you send the first templated message as the courier/rider:

Inviting the customer, they opt-in and then we tell them to hang on.

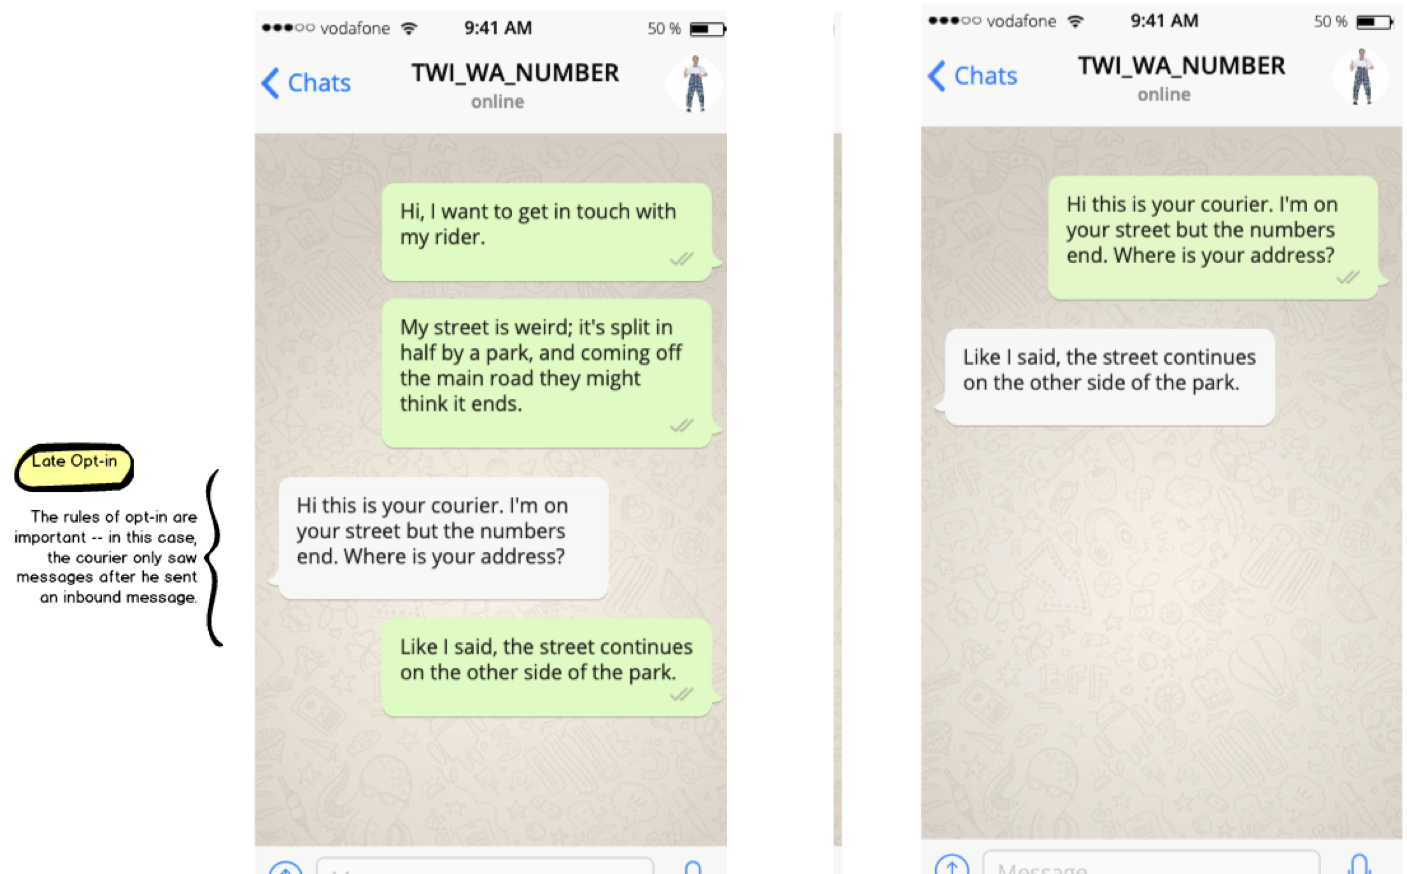
You'll notice when you do this that the customer receives a message, but the courier does not. We're using the rules of WhatsApp's 24-hour opt-in window in our favor: securing one participant's opt-in (from the customer) before we reach out to the other (the courier).

In the picture above, you notice that we included an automated reply: "Great! Just a moment…" This picture is a step ahead. To actually execute this — and at the same time to opt-in our courier — we're going to need a Twilio function and a Conversations webhook.

Create a Twilio Function to send the templates

create-a-twilio-function-to-send-the-templates page anchor

Let's start with the former.

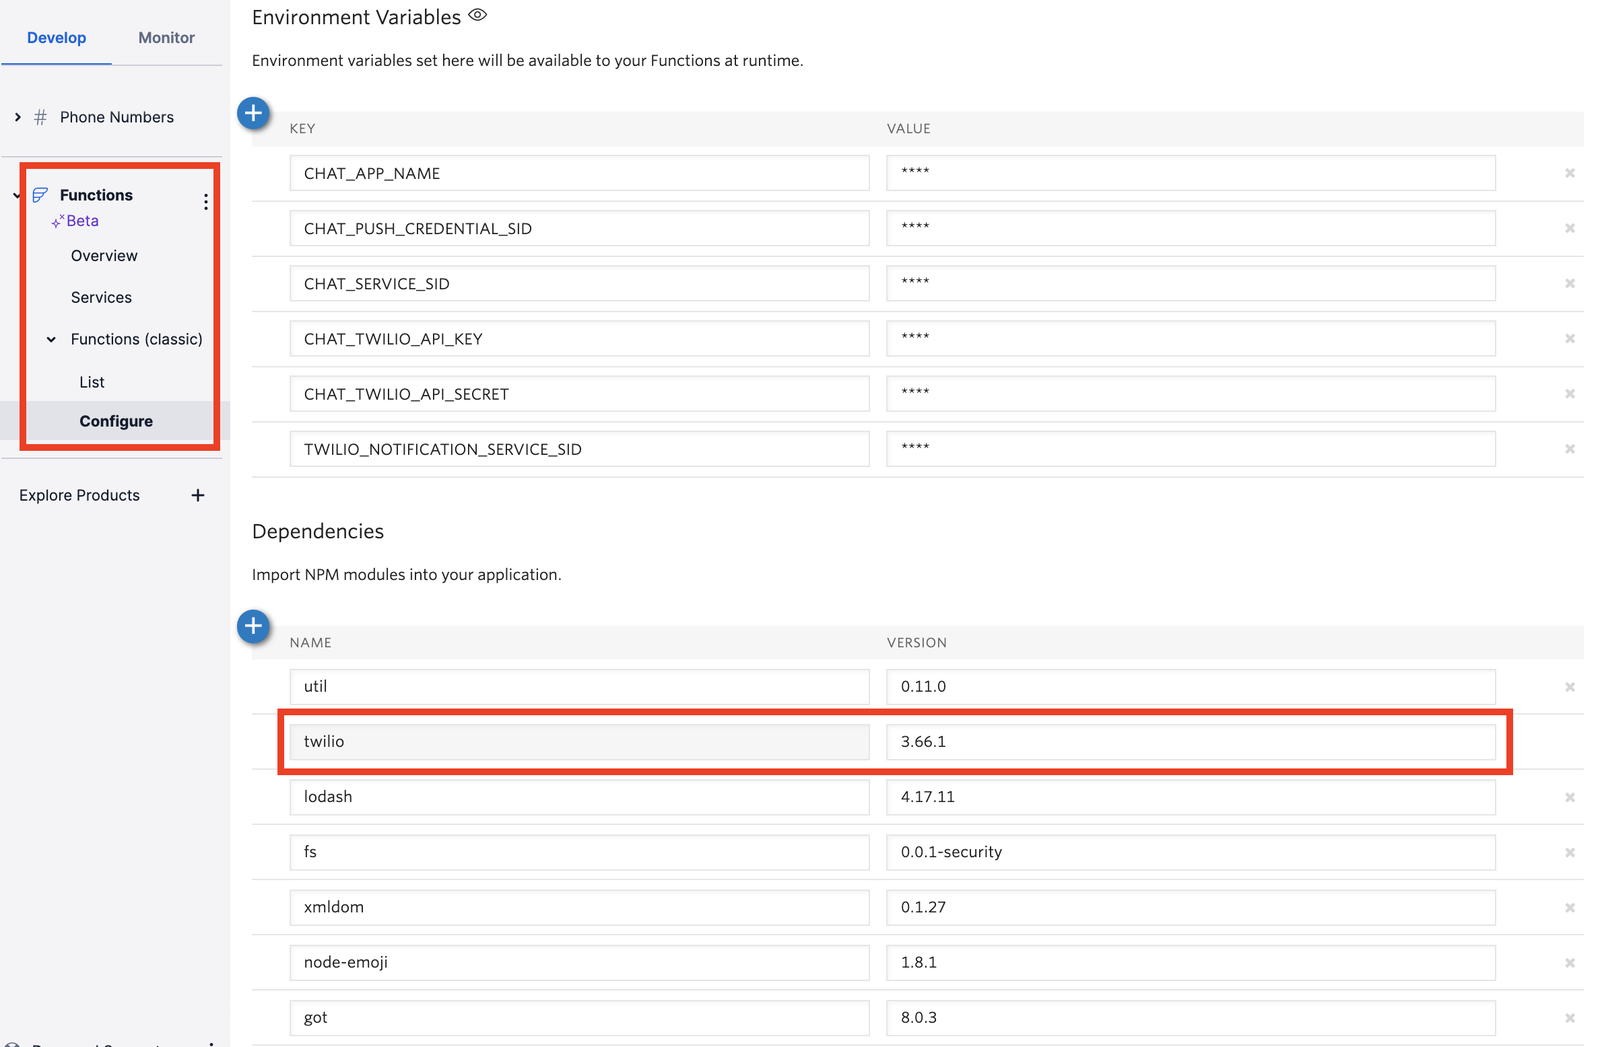
First, navigate to the Twilio Functions section of the Console(link takes you to an external page) and click on "Configure." Confirm that the version listed for the twilio NPM module is up-to-date(link takes you to an external page), such as 3.66.1 or higher.

Functions Twilio npm.

Next, create a Twilio Function in the console(link takes you to an external page) with the following code, which will set us up to capture the onMessageAdded event.


_23
exports.handler = function(context, event, callback) {
_23
const customer = event.Author;
_23
let thisConversation = context.getTwilioClient().conversations.v1.conversations.get(event.ConversationSid);
_23
_23
// This system message will reach the customer, but our rider
_23
// will still need to be opted-in.
_23
let justAMoment = thisConversation.messages.create({
_23
body: "Great! Just a moment while we connect you…"
_23
});
_23
_23
// Use Template #2 for the rider.
_23
let riderOptIn = thisConversation.messages.create({
_23
author: customer,
_23
body: "Your customer has agreed to chat over WhatsApp to get this delivery sorted. You're now connected. Say hello!"
_23
});
_23
_23
// Remove all scoped webhooks; we only want this once.
_23
let webhooks = [];
_23
thisConversation.webhooks.each(hook => webhooks.push(hook.remove()));
_23
_23
// Critically important: wait for the messages to resolve.
_23
Promise.all([justAMoment, riderOptIn, ...webhooks]).finally(() => callback(null));
_23
};

To power this, we'll add a Conversation Scoped webhook that we can remove later.

Step 7: Set up a Conversation Scoped Webhook to field the reply.

step-7-set-up-a-conversation-scoped-webhook-to-field-the-reply page anchor

Replace the configuration.url field with the address of your new Twilio Function.

Node.js
Python
C#
Java
Go
PHP
Ruby
twilio-cli
curl

_16
// Download the helper library from https://www.twilio.com/docs/node/install
_16
// Find your Account SID and Auth Token at twilio.com/console
_16
// and set the environment variables. See http://twil.io/secure
_16
const accountSid = process.env.TWILIO_ACCOUNT_SID;
_16
const authToken = process.env.TWILIO_AUTH_TOKEN;
_16
const client = require('twilio')(accountSid, authToken);
_16
_16
client.conversations.v1.conversations('CHxxxx')
_16
.webhooks
_16
.create({
_16
'configuration.url': 'http://funny-dunkin-3838.twil.io/customer-optin',
_16
'configuration.method': 'POST',
_16
'configuration.filters': ['onMessageAdded'],
_16
target: 'webhook'
_16
})
_16
.then(webhook => console.log(webhook.sid));

Output

_17
{
_17
"account_sid": "ACXXXXXXXXXXXXXXXXXXXXXXXXXXXXXXXX",
_17
"conversation_sid": "CHXXXXXXXXXXXXXXXXXXXXXXXXXXXXXXXX",
_17
"sid": "WHXXXXXXXXXXXXXXXXXXXXXXXXXXXXXXXX",
_17
"target": "webhook",
_17
"configuration": {
_17
"url": "https://example.com",
_17
"method": "get",
_17
"filters": [
_17
"onMessageSent",
_17
"onConversationDestroyed"
_17
]
_17
},
_17
"date_created": "2016-03-24T21:05:50Z",
_17
"date_updated": "2016-03-24T21:05:50Z",
_17
"url": "https://conversations.twilio.com/v1/Conversations/CHXXXXXXXXXXXXXXXXXXXXXXXXXXXXXXXX/Webhooks/WHXXXXXXXXXXXXXXXXXXXXXXXXXXXXXXXX"
_17
}

Now let's start again by sending the initial opt-in message to test the whole flow.

The customer and rider are opted-in separately. Once opted-in, the conversation flows naturally and automatically.

With all this setup, we've created the ideal experience for two-sided WhatsApp Conversations. Notice how system messaging manages expectations while we're still opting-in the second party. And after the initial setup, notice that we're not forwarding messages one-by-one among the parties: all of that happens automatically via Twilio Conversations platform. It only ends if/when you DELETE the conversation later on.

Note: Our templates fit neatly in WhatsApp's guidelines: they are not promotional, but rather they facilitate an active transaction. By following these patterns, your business could benefit from the same pattern.


Ready to learn more about Conversations and WhatsApp? Learn more with the following resources:


Rate this page: