Direct Standard and Low Volume Standard Registration Overview
This guide provides an overview for Direct customers who want to register their own business for A2P 10DLC messaging capabilities as a Standard or Low-Volume Standard Brand.
Please note that if you are a U.S. business with an EIN, a Canadian business with a Canadian Business Number, or are headquartered in any country outside of the U.S., Canada, EU, UK, or Australia you must register as a Standard Brand for A2P 10DLC purposes. The other option, a Sole Proprietor Brand, is available only for U.S. or Canadian customers who do not have an EIN or Canadian Business Number.
Following this process lets US Carriers know who you are and what types of messages you'll be sending to end-users. This is important so that end-users can trust that they are receiving legitimate SMS traffic and so that carriers do not filter your messages to your customers. Learn more about A2P regulations and registration options here.
If you are an Independent Software Vendor (ISV) and want to register your customers for A2P, see this overview.
Info
Not sure if you are an ISV? See this support article to understand what an ISV is.
Warning
If you are a government agency, non-profit, or 527 political organization, there are additional verification requirements and special use case campaigns that you can unlock. Make sure to see the document on additional steps for government and non-profit registration as you complete this process.
You will complete A2P 10DLC registration in the Twilio Console. The process involves the following steps:
- Create a Twilio Primary Business Profile in Twilio's Console
-
- A Brand verifies who you are with US carriers
-
Register a new Campaign use case and link to a Messaging Service with your 10DLC phone numbers
- A Campaign describes the messages you will be sending to users and how they can opt in or out of these messages
- Once you create a campaign, you will attach the campaign to a Messaging Service. Any 10DLC phone numbers in that messaging service will be registered for A2P 10DLC capabilities. If you have additional 10DLC phone numbers you'd like to use to send messages to the US, please add them to this Messaging Service as well.
Before you begin the registration process for A2P10DLC, collect the following information to ensure a smooth onboarding flow:
Info
If you have a US entity or an International Tax ID, use that TaxID to register your business profile and to avoid brand registration failures. DUNS numbers are not accepted. In order to complete Standard and Low-Volume Standard registration you need to have an EIN or (for non-US entities) another form of official Tax ID.
Business Information
- Business Name
- Physical Address (Street, City, State/Province/Region, Postal Code, Country)
- Business Identity (Direct Customer or ISV/Reseller/Partner)
- Business Type (Partnership/Corporation /Co-Operative/LLC/Non-Profit)
- Company Status (Private/Public)
- Stock Ticker & Exchange (if Public)
- Tax ID or Business Registration Number and Type (EIN for US-based companies, other Business License or Tax ID number for non-US companies). If you're using EIN, please locate your CP 575 letter which is the official record of your EIN sent by the IRS. If you cannot locate this letter, you may request a replacement from the IRS (called a 147c letter).
- Industry
- Website
- Regions of Operations
Point(s) of Contact
An email address for notifications. We recommend using distribution lists if you have multiple users who wish to be notified. One authorized representative with the following info:
- Name
- Business Title
- Phone Number
- Job Position (Director/VP/GM/General Counsel/CEO/CFO)
Providing a second authorized representative is optional.
Warning
Submit your business data properly. Your registration information should exactly match what you provided to the IRS in the EIN letter when registering your company. For example, use the Full Legal Name of your company, which is all information provided before the Legal Address of your company, the correct EIN number, and so on.
Info
For all information entered as part of this registration process, please note that The Campaign Registry (TCR) supports all "utf8mb4" supported characters. Please see the list for all Unicode 15.0 supported scripts and characters here: https://www.unicode.org/charts/
When you register an A2P Brand and Campaign, you will be assigned a Trust Score that will determine your messaging throughput to US networks as well as daily message limits for your mobile carrier. In order to obtain the best possible Trust Score, you should provide accurate, up-to-date information. See best practices here.
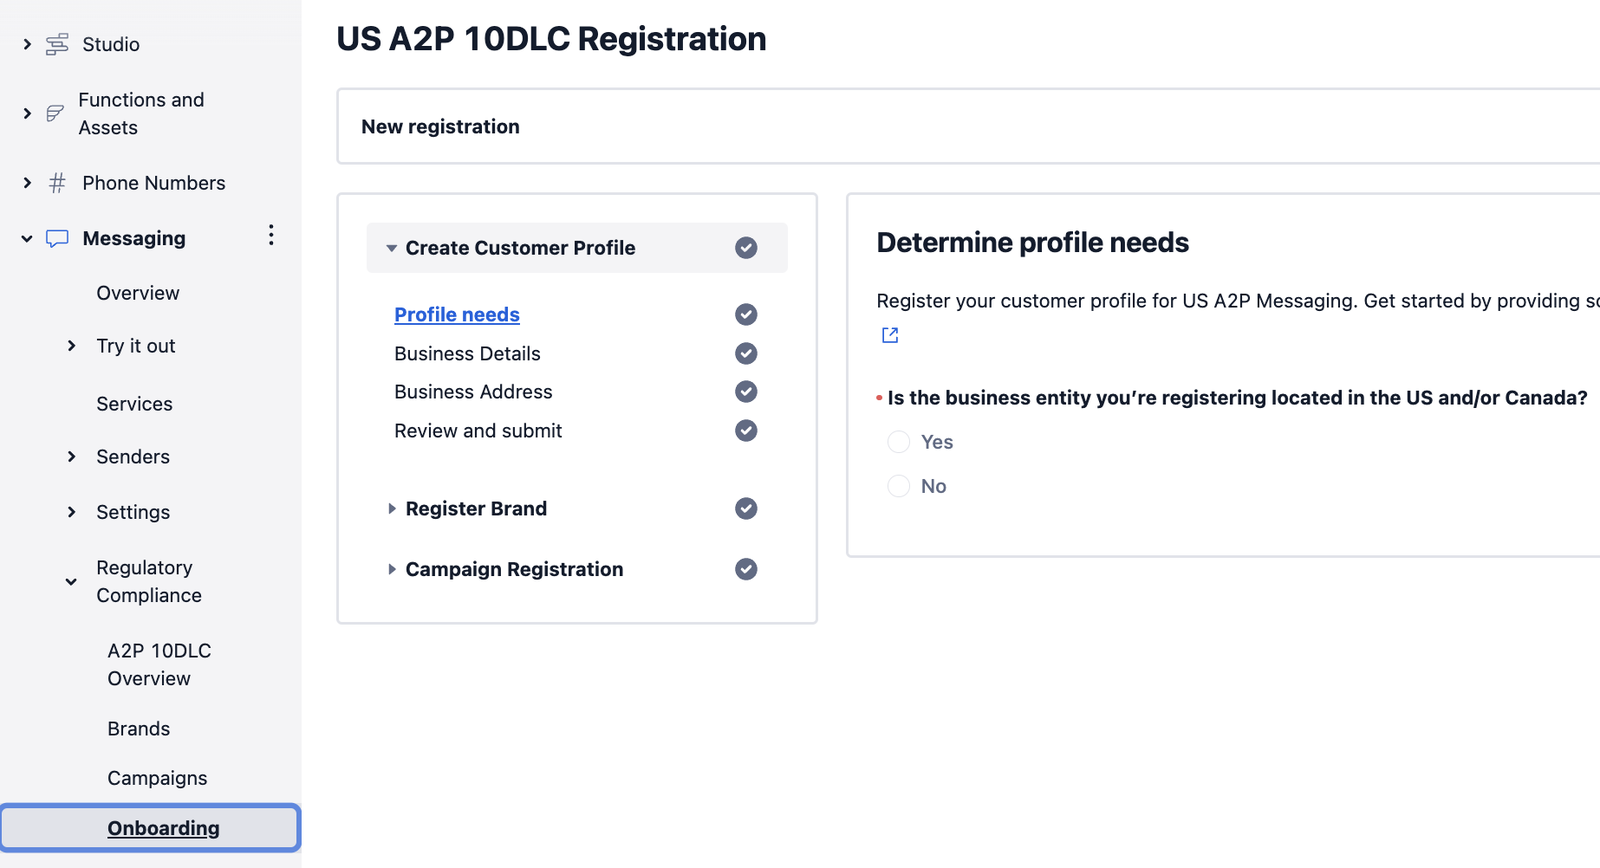
Navigate to the Twilio Console → Messaging → Regulatory Compliance → Onboarding page. The first step is to create your Twilio Business Profile. This step validates your business identity. You will only need to do this once.
Info
NOTE: If you've already created a Primary Customer Profile for use with another Twilio product, such as the Twilio Voice products SHAKEN/STIR Trusted Calling, Branded Calls, and CNAM Registration, this profile-creation step is not necessary because you will already have a Primary Customer Profile.
For this first Create customer profile step, you will begin by answering several questions. The first of these is whether the business you are registering is headquartered in the U.S. or Canada (vs any other country). For a Standard business profile, either answer is permissible (by contrast, Sole Proprietor Brands can only be registered if they are headquartered in the US or Canada). If you answer yes to this question, the initial page extends further, displaying a banner and an additional question:
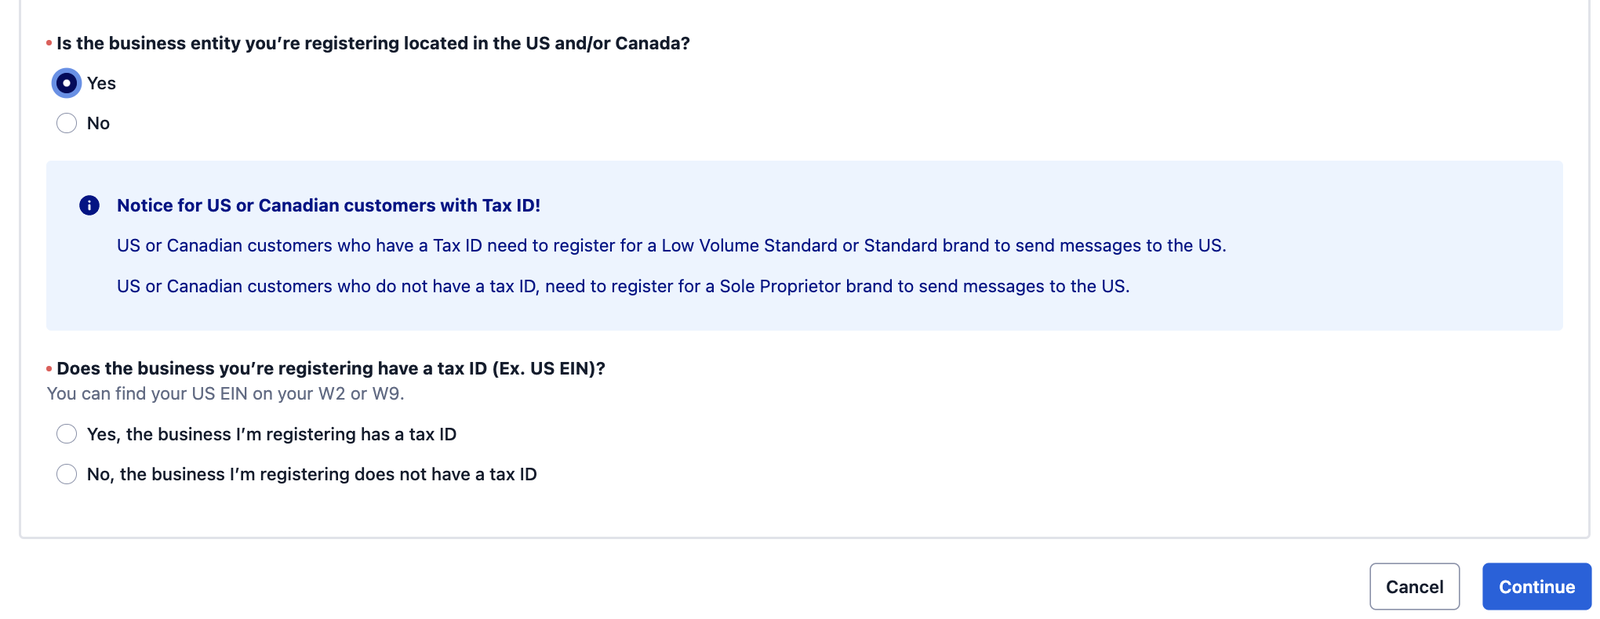
Here you are asked to indicate whether your business has an official Tax ID, i.e. an EIN (for filing business taxes in the US) or Canadian Business Number (for filing in Canada).
Info
Note for Canadian Businesses: As of July 27th, Twilio no longer accepts the Canadian Corporation Number as a form of Tax ID. Instead, please use your Canadian Business Number from the Canada Revenue Agency. This is.a 9-digit number which sometimes also has additional alphabetc characters, e.g.123456789RT0001. Please enter only the 9 numeric digits.
This information is critical, because US or Canada-based businesses that DO have such a Tax ID assigned to them are only eligible for Standard or Low-Volume Standard Brand registration, while US or Canada-based business that do NOT have such a number are eligible only for Sole Proprietor registration.
Since vetting for Sole Proprietor Brand and Campaign registration is generally faster and more streamlined, there is sometimes a temptation to choose this registration path even if you do in fact have an EIN or other Tax ID. Please understand, however, that it is fairly simple for The Campaign Registry to determine this during vetting from your other business information, and if you register for Sole Proprietor but are then found to have an associated Tax ID, your registration will be rejected and you will need to pay a further fee and face additional delays to re-register as Standard or LVS.
You will answer Yes to this question, then, at which point you will be presented with a new page confirming that you would like to register for a new Business Profile, and summarizing the applicable fees and the messaging volume and throughput that will apply for a Standard or Low-Volume Standard Brand. Note that if you answered NO to the initial US/Canada question (i.e. your company is headquartered in a 3rd country), then you will not be asked about your Tax ID but will be taken immediately to this profile confirmation page. At the bottom of this page you'll be asked to confirm that you'd like to register for this type of Profile, then you'll click the blue Continue button.
The next screen offers a US EIN number lookup:

This feature is offered for the convenience of customers who have a US EIN (as opposed to another country's official Tax ID) and would like to confirm that the number they have can be found in the 3rd-party database we use for lookup. If you do NOT have a US EIN -- i.e. you use a Canadian Business Number or 3rd-country Tax ID -- please use the "Skip this step..." link below the lookup. Also, note that if you do enter a US EIN in the lookup field, and the associated business entity cannot be found, this is not necessarily cause for concern as a valid EIN could be absent from the database for a variety of reasons (for example, a newly-issued EIN can take a month or longer to register in the database). In this case too you would simply continue manually with Customer Profile setup.
The next screen will ask you to input a set of details about the business you are registering. It's important to be careful here. As this screen's banner indicates, these details will determine your new Profile's trust score, which in turn will determine the messaging limits of your new Campaign. The business details entered here need to be accurate (in particular, conforming to the information registered with the IRS or your country's tax agency) as well as internally consistent. Your business details will include the following:
Legal business name is the name of the business entity you are registering, exactly as it appears on your tax form in association with your EIN or other Tax ID.

Warning
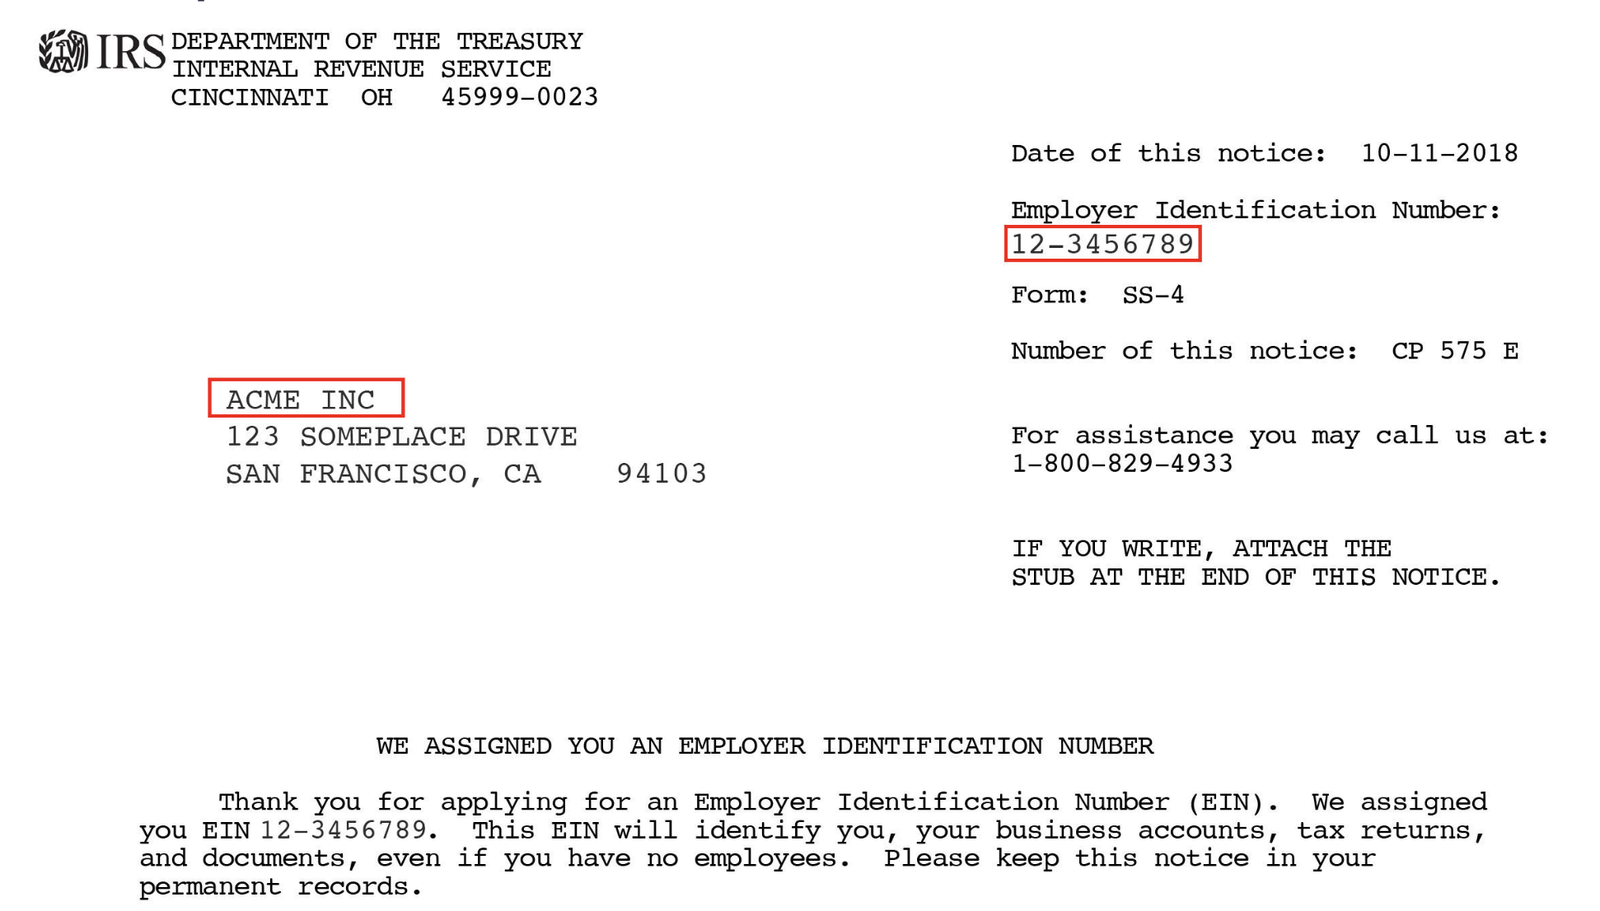
NOTE: If you're registering a US entity, please enter the exact legal business name as registered with the EIN, which can be found on the CP 575 EIN Confirmation Letter. An exact match between the legal business name and the EIN as displayed on CP 575 is required for the Brand to be successfully registered. Please do not use the legal business name found on the W2 or W9 forms as they may be different from what you have on the CP 575 notice. If you've misplaced your CP 575 notice, you may request a 147c letter from the IRS and use the information there for registration.
Please note that your full legal business name may span multiple lines on your CP 575 / 147c letter. If that is the case, you must input all the lines above the address line (which constitutes your full legal business name) instead of just using the first line. Please see the example CP 575 letter just below. In this case the listed business name is "ACME INC" -- all caps, no period after INC, etc. Note also that the business address to be entered on the next screen must also exactly match the business address as shown on your CP575 (or the official letter from a non-U.S. tax authority):
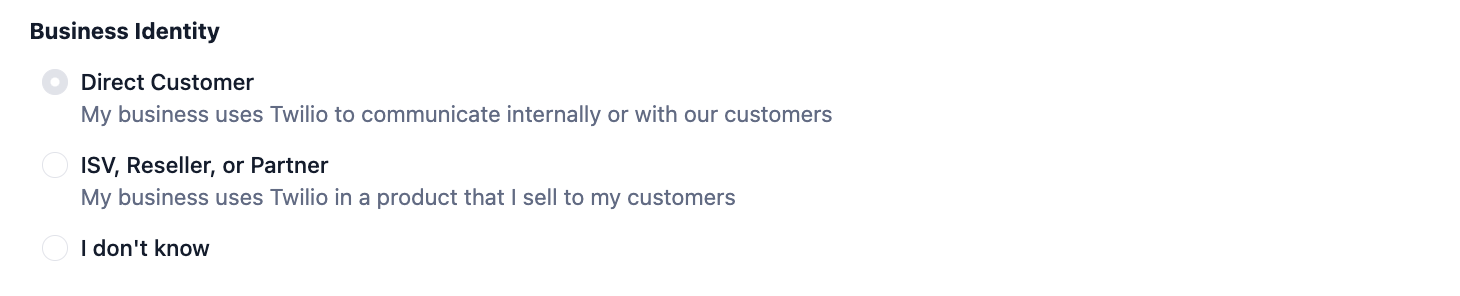
Business identity: select Direct Customer, if this is not already marked for you, as that is the use case for this document (ISVs would also create their own top-level business profile here in the Console, but that is a different use case).
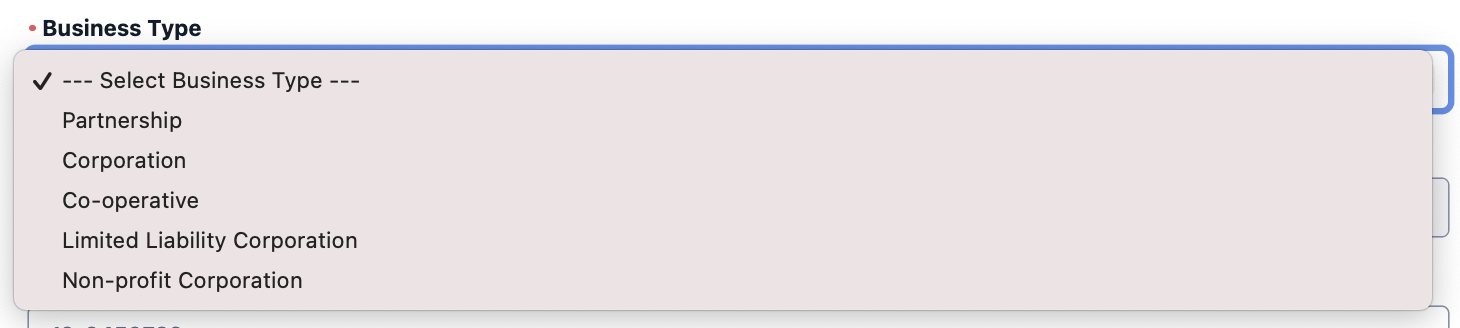
Business Type: from the dropdown, select the type that most closely matches the legal corporate status of your business entity. Because you've already indicated that you have an EIN or other national Tax ID, this means that you are legally registered as a corporate entity of some type: an LLC, Partnership, C-Corp Corporation, Co-operative or Non-profit. Note that for this reason, "Sole Proprietorship" is not a business type available in this dropdown. Although certain U.S. LLCs are recognized by the IRS as a "Sole Proprietorship" LLCs, from the standpoint of The Campaign Registry what matters is having an EIN, which comes with any LLC status. All LLC customers should choose "Limited Liability Corporation" here.
Business Registration ID Type: This is the country-specific Tax ID you will be using for this registration, to be entered in the following box. Each country's Tax ID has its own format.

Business Registration Number: your EIN or equivalent Tax ID -- must be exactly as shown in your Federal/National tax filing:

Business Industry: this is a drop down with a long list of industry categories; please review the full list to make sure you've chosen the category that best fits your business
Website URL: this must be a functional business website with a name that bears some clear relationship with your official business name. This should be the same website referenced in your Campaign submission (e.g. sample message identification and opt-in process).
- As part of our compliance review, we conduct automated checks on the URLs provided during campaign and brand registration. Our system captures a public-facing screenshot, and evaluates it against compliance rules, which can be found here . This compliance check is a mandatory step in our registration process. If you have any questions or concerns about the process, please contact our support team.
Business Regions of Operations: indicate your region(s) of operation -- Africa, Asia, Europe, Latin America, US/Canada
Once you are satisfied with all of the above entries, press the blue Save and Continue button.
On the next screen you will add your Business Address. First you will choose either Enter New Address or Select from Existing Addresses. The latter will only be pertinent if you have already used a particular mailing address for a different business's Profile/Brand, and wish to use it for this business as well. Selecting this option will bring up a list of addresses you have used for registering other Brands:
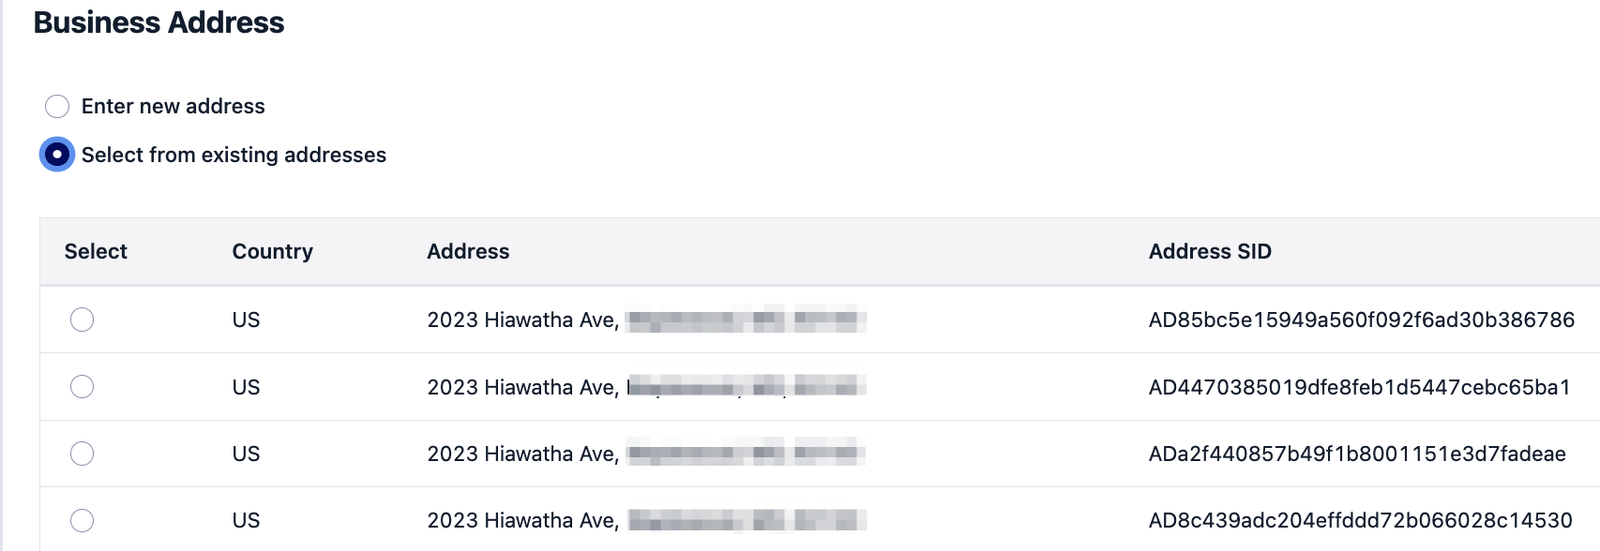
In this case, the same address has been used for four previous brand registrations. You would be able to select one of these, rather than entering identical information again, but ONLY if the addresses for the separate businesses in question were in fact identical in your tax records (and identical in every detail, including e.g. Suite Number). If there are any differences at all, or if for any other reason your national tax authority records a different address for the new business, you must instead Enter new address and use the address registered with the tax authority. Here you would choose a Country from the dropdown and then enter the Street Address, Street Address Line 2 (if applicable), City, State/Province/Region, and Postal Code, taking care to enter these exactly as they appear on your IRS or other national tax authority paperwork.
On the next screen, Contact Information, you will first enter an email address that Twilio will use to notify you of the status of this new profile, so it must be a valid address that you monitor reguarly. Twilio will not use this email address for any other purposes.
You will then enter information for an Authorized Representative at the business in question, and optionally a second Authorized Representative. This will be a person, affiliated with the business, who can be contacted to verify or rectify any of the business information you've entered above, if there are any issues with it. For each Authorized Representative you will enter
- First Name
- Last Name
- Business Title
- Country Code
- Phone Number
- Job Position
You may use your own name and contact information here, but it is good practice to name a separate authorized representative, both to ensure that inquiries from TCR are addressed in a timely fashion, and because you are registering a corporate entity which, in the great majority of cases, would be expected to have multiple officers. Remember that your overall goal here is to establish your new Brand as a legitimate enterprise for TCR.
You then will be asked if you'd like to specify a second authorized representative; if not, you'll be asked to confirm that your authorized representative has consented to be contacted by Twilio if necessary. Then you'll press Save and Continue.
The final screen in this first Business Profile section will summarize all of the information you've entered to this point, for your review. If it all looks appropriate, press the blue Submit for Review button at bottom right.
The submission of your Business Profile may take 72 hours or more for approval. However, you can still continue and register a US A2P Brand while your Business Profile is pending approval.
Next, register your Business Profile for A2P 10DLC capabilities by creating a US A2P brand. You can register as either a Low Volume Standard or a Standard Brand.
A Low-Volume Standard Brand skips secondary vetting. It is less expensive, but also results in lower throughput and is more suited for customers sending fewer than 6,000 message segments daily. Learn more about Low-Volume Standard vs. Standard brands here.
Registering your Brand for US A2P10DLC capabilities takes place on a single screen. You will need to include:
-
Your registered Business Profile (from Step 1)
- This will be automatically filled out for you after you create your customer profile, but you can switch profiles if you would like to register your Brand for a different customer profile you have created in your account
- Your Brand type : Low-Volume Standard or Standard (for the differences between Standard and Low-Volume Standard see this guide )
- Your Company Type and stock information (input boxes for the latter will appear only if you indicate Public Company)
- See the list of supported stock exchanges here
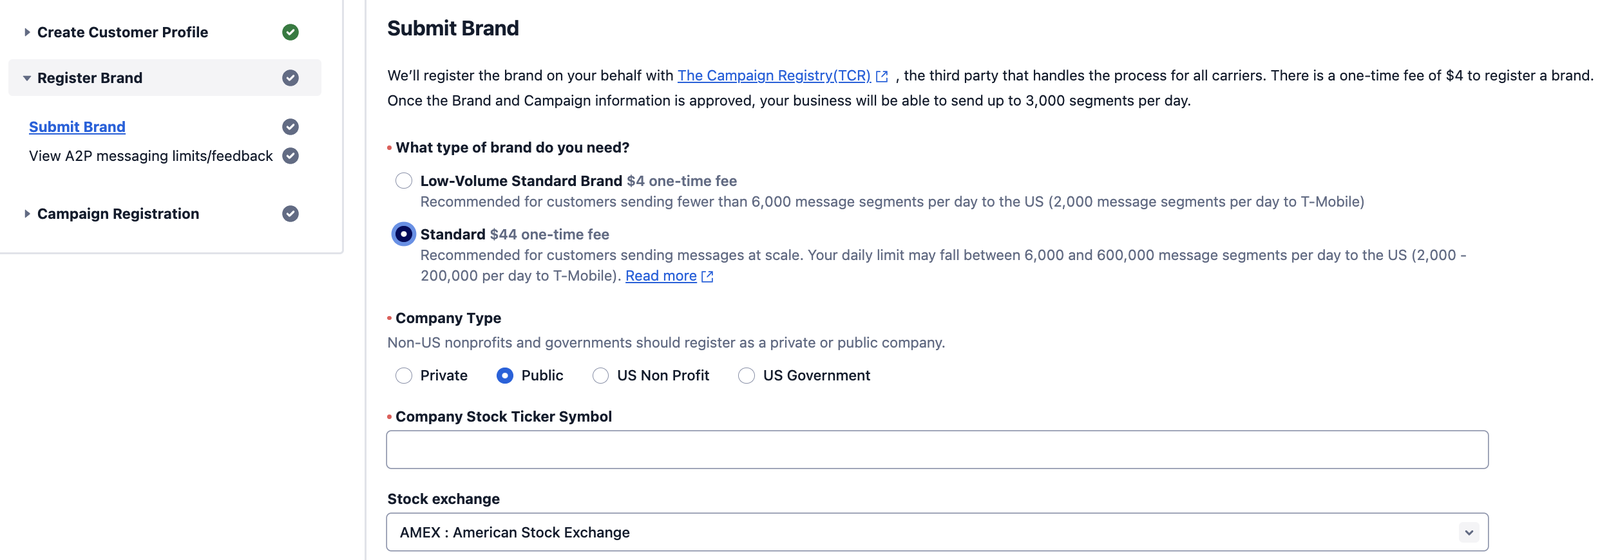
Before submitting this page you will also need to agree to the one-time Brand registration fee.
Once you hit the Register button, Twilio submits your application for approval. Approval typically occurs within a few minutes of submitting, though the process could take longer depending on how much vetting your Brand requires. You will receive an email and also see a message on the Console screen when your registration is complete.
Once the initial vetting process is complete, your Brand will have one of four possible statuses:
- "IN_REVIEW": your Brand registration has not yet been completed; your Brand information is under manual third-party review. Such a manual review takes seven business days or more. There is no action required from your side.
- "APPROVED" (Registered): your Brand registration was completed and verified. You can now register your campaigns.
- "FAILED": your Brand registration's information couldn't be verified. Typically the Brand Overview screen will display one or more failure reasons in this case.
- "SUSPENDED": in certain rare cases, your Brand is deemed to have potentially violated one or more rules for Brand registration established by the A2P ecosystem partners. This status will require Twilio Support assistance to address. Please see our Standard Brand Troubleshooting Guide for details on this status.
Here is Low-Volume Standard, Private-Company Brand that has been registered successfully:
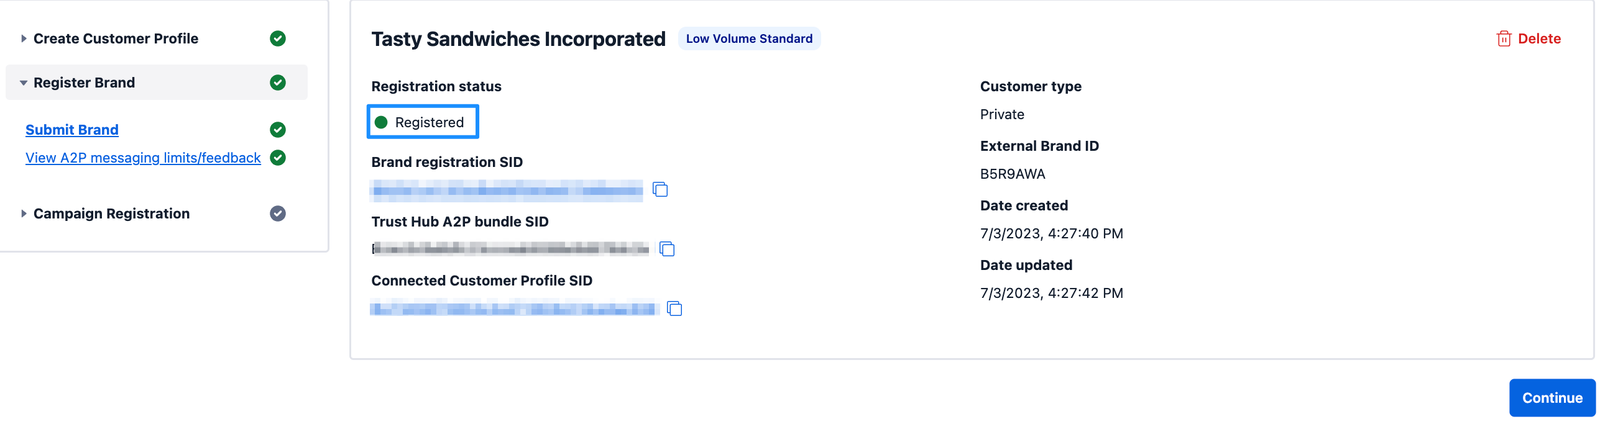
Once you have received notice in the console (or by email) that your Brand has been successfully registered, pressing the Continue button here will display a final page that lists your messaging limits, based on your TCR trust score. Pressing Continue on this final screen will take you directly to the Create New A2P Campaign screen, which you'll use in Part 3 below.
If you instead receive a notice that your Brand registration has FAILED, please see our Troubleshooting Guide for detailed information on troubleshooting Brand failures and how to correct & resubmit failed Brands.
Once you have created and registered your Business Profile and US A2P Brand, it's time to register a Campaign for sending messages over A2P 10DLC routes. Each Campaign is built around a single use case.
Examples of Campaign use cases include marketing messages and order confirmations. A specific US A2P Brand — like the one you created in Step 2 — may have one or more Campaigns associated with it, such as one for marketing notifications and another for order confirmations. A maximum of five campaigns can be associated with a single Brand, unless a clear and valid business reason is provided for exceeding this limit.
The registration process is the same for each Campaign that you create. However, you should check the pricing and other details before opting for specific use cases. For more information on campaign use cases, please see the Support Article on List of Campaign Types and the Support Article on Pricing for A2P 10DLC Service.
Info
NOTE: Before you register a Campaign around the OTP (One-Time Password) use case, or any other form of 2-Factor Authentication (2FA), you should investigate Twilio's Verify service to see if this is a better option for you. With Verify you do not need to worry about A2P registration or any other aspect of sender provisioning. Of course, if your Brand requires Campaigns to serve other, non-2FA use cases then you would still need to register these, and registering one for OTP/2FA might in that case only be marginally more expense and effort. But if an OTP/2FA use case is the only reason you'd be registering a Brand at all, Verify might be an excellent alternative to the whole A2P registration process.
Warning
Campaigns are charged a recurring monthly fee depending on their type. Be sure to carefully understand which campaign type(s) you are registering for and the associated fees.
Effective January 26, 2023, all Twilio US A2P 10DLC Campaign registrations (Standard, Low Volume Standard, and Sole Proprietor) are subject to a manual vetting process and will be charged a $15 campaign verification fee at the time of external vetting. If a campaign is denied by external vetting, additional charges may occur with re-submission.
A newly submitted Campaign is put in a "Pending" state until it has been approved in the manual vetting process. You can only send compliant messages via A2P once the Campaign is fully approved. Due to high volumes, this vetting process may take 2-3 weeks.
Once vetted and approved, any 10DLC phone number within the connected Messaging Service will be identified as A2P-registered with the associated Campaign, and you should see lower message filtering.
You'll need the following information for the Campaign creation process:
- The Messaging Service to be associated with the campaign (you can select an existing Messaging Service, or have Twilio create a new service after filling out your campaign details)
- The A2P use case type
- The Campaign description
- Two sample messages, each up to 1024 characters long
- The message flow : details around how a consumer opts-in to your campaign, therefore giving consent to receive your messages
- At least one Twilio Phone Number to add to the Messaging Service's Sender Pool. You can purchase a Twilio Phone Number ahead of time through the Console , REST API , or Twilio CLI .
All of this information will be entered on the Create new A2P Campaign screen. We will walk through the different sections of this screen below.
In the first section of the screen, the A2P Brand will already be specified and cannot be changed here, since to reach this screen you will need to have either just created a new Brand, or have chosen an existing one.
Available A2P Campaign use cases: your first choice here will be selecting a use case for this Campaign. Again, a given Standard or Low-Volume Standard Brand can have multiple associated Campaigns, but each Campaign can only have a single specified use case. You will. select one from the dropdown. Take your time here, and be sure to review all of the available use cases in the dropdown. These use cases are not only substantively different but have different associated fees, and those in the second half of the dropdown require additional vetting.
Messaging Service: Each Campaign also has one associated Messaging Service, and any given Messaging Service can only be associated with one A2P Campaign at a time. Therefore, here you will choose to either create a new Messaging Service, or to select an existing Messaging Service. If you select the latter option, a further dropdown will appear, displaying all Messaging Services you currently have in your account. This dropdown will also indicate whether each Service already has an associated Campaign; and if you select one that does, the workflow here will ask if you want to delete the existing Campaign so that the Messaging Service is freed up for the new Campaign. Some direct customers may have reason to do so -- for example if you are migrating from a Sole Proprietor Brand and Campaign to a Standard/LVS Brand and Campaign, and want to reuse your old Messaging Service. Most customers however will opt to create a new Messaging Service instead:

The next three sections of the form contain primarily text-entry boxes, and your entries here will be crucial to your Campaign being successfully approved by TCR.
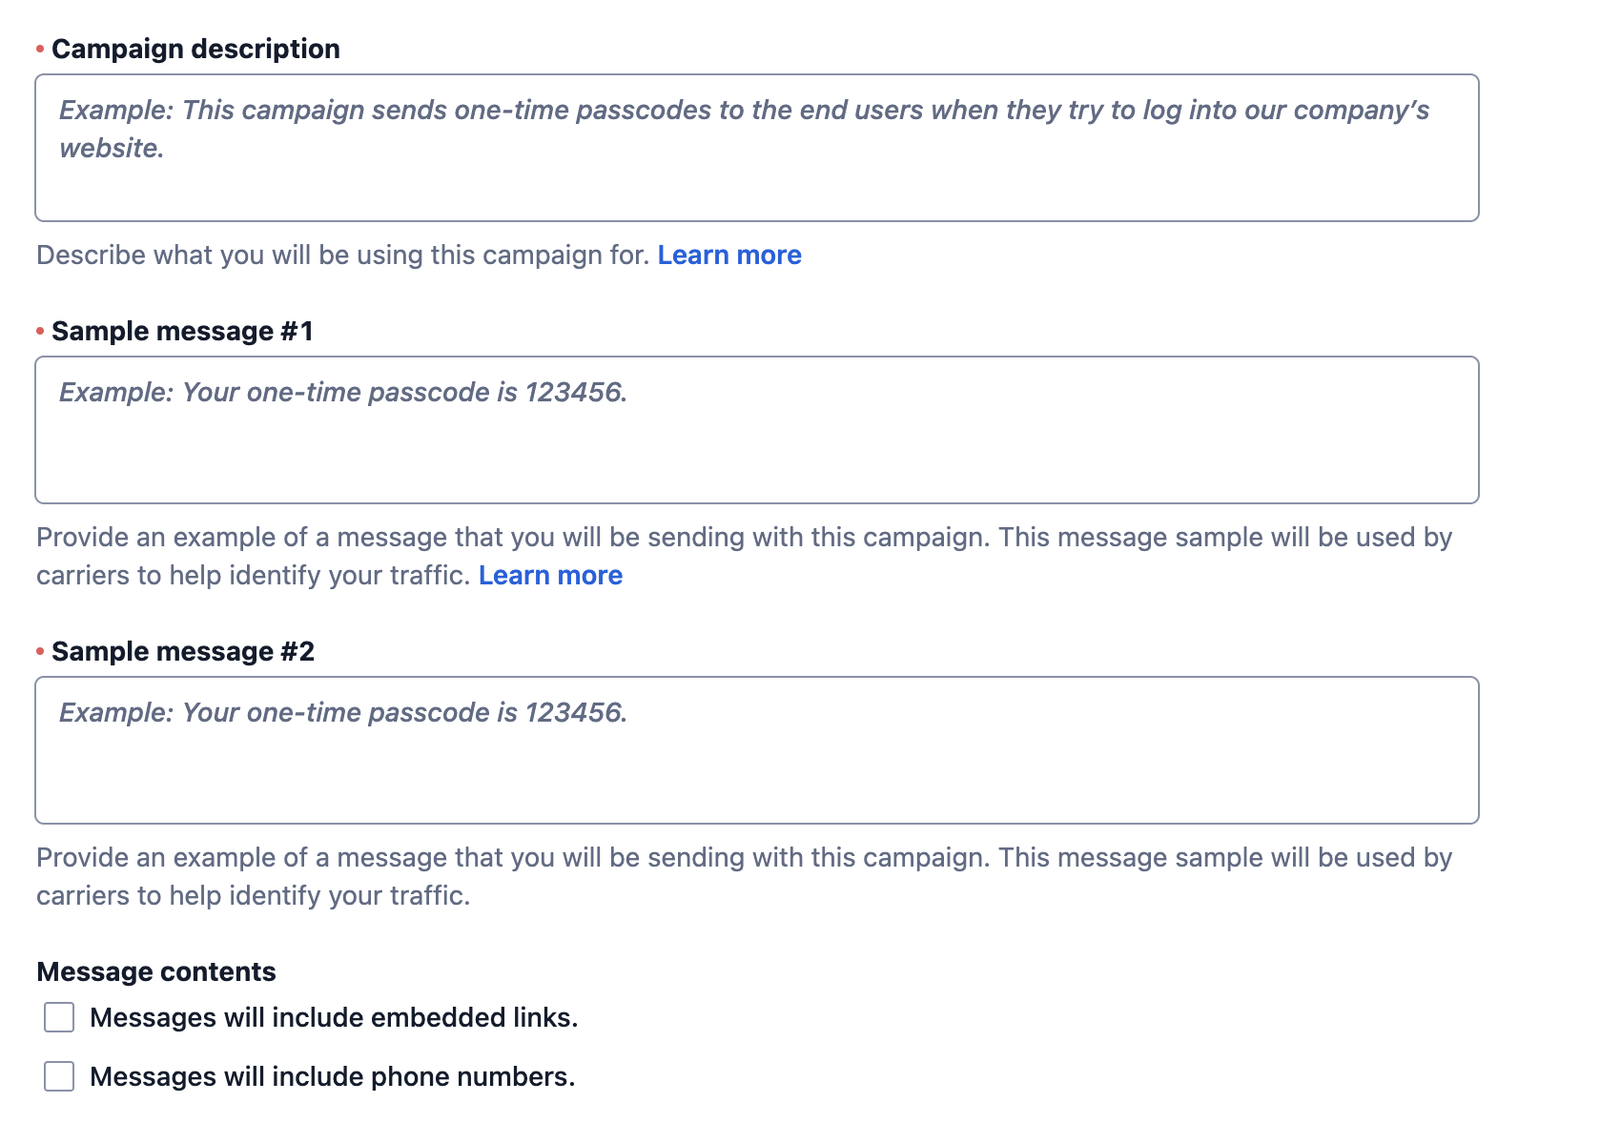
Campaign description: This should be a fairly detailed description of what purpose this campaign serves. This description should align with but expand upon the use case you selected above. The description should provide an explanation of the campaign's objective or purpose: who the sender is, who the recipient is, and why messages are being sent to the intended recipient.
- If you are a financial institution engaged in direct, first-party lending to your customers, please indicate "Direct Lending" in the Campaign description so that our review team can properly set this attribute before submitting the registration to TCR. Please indicate this even if your Campaign use case is not directly related to your offer of lending services (e.g. OTP).
Sample message #1: Give a concrete example of a message you would send in this Campaign. In the message, be sure to identify your Brand by name and/or website. Also, indicate with brackets [] any content that will be conditionalized. Example: "This is a message from the Acme Sandwich Company. Your order for [sandwich type, other item] will be delivered by [time] on [date]. If you have questions or would like to change your order schedule, please call 333-444-1212. If you would like to opt out of future notifications like this, text STOP in reply to this message."
Sample message #2: Depending on the use case, it might be easy to come up with a second, different sample message. If this is challenging, you may simply repeat the first sample message here. TCR requires two sample messages.
Message contents: Indicate whether your sample message(s) contain website links or a phone number (as in our example message above). Be aware that any such information will be verified by TCR.
Next in the form are two final sections concerning how the end-user provides their consent to be messaged, and the information you enter here is also crucial to the approval of your Campaign.
The first fields here describe how and when a consumer opts in to the Campaign, therefore giving consent to the sender to receive their messages:
-
How do end-users consent to receive messages?
- If there are multiple ways that users can consent to receive messages, you must include all of them.
- The call-to-action must be explicitly clear and inform end users of the Campaign. If multiple opt-in methods can be used, list them all.
- If a website is used for opting in, provide a link to the website. The website needs to have a privacy policy and terms of service. Privacy policies also need to include a statement of non-sharing for mobile numbers, message frequency, and "message and data rates may apply" disclosure. You need to provide a link to the policy. NOTE : if the opt-in page of your website is not publicly-accessible, provide a URL to a hosted screenshot of the relevant opt-in page.
-
If you indicate that users can opt-in through text message, provide the opt-in message and opt-in keywords in the fields below.
Example: "End users opt-in by visiting www.acmesandwich.com and adding their phone number. They then check a box agreeing to receive text messages from Acme Sandwiches. Additionally, end users can also opt-in by texting START to (111) 222-3333 to opt in. Term and Conditions at www.acmesandwich.com/tc . Privacy Policy at www.acmesandwich.com/privacy "
-
Opt-in keywords
- If end users can text in a keyword to start receiving messages from this campaign, those keywords must be provided. If you do not support opt-in keywords, these do not need to be provided.
-
Opt-in message
- If users can text in to start receiving messages, you must provide the automated message that end users will receive when they opt in to your campaign. Message must include brand, message frequency, opt-in confirmation, and information on how to opt-out.

End user opt-out and help options
Users must also have a way to opt out of campaigns and receive help. Most Twilio customers use default or advanced opt-out and will not need to provide these details. Twilio will complete this information for you with either the default opt-out and help messaging, or with the messaging you've configured as part of Advanced Opt-Out.
If you manage your own opt-out and help, you will see additional fields that you need to complete for your campaign:
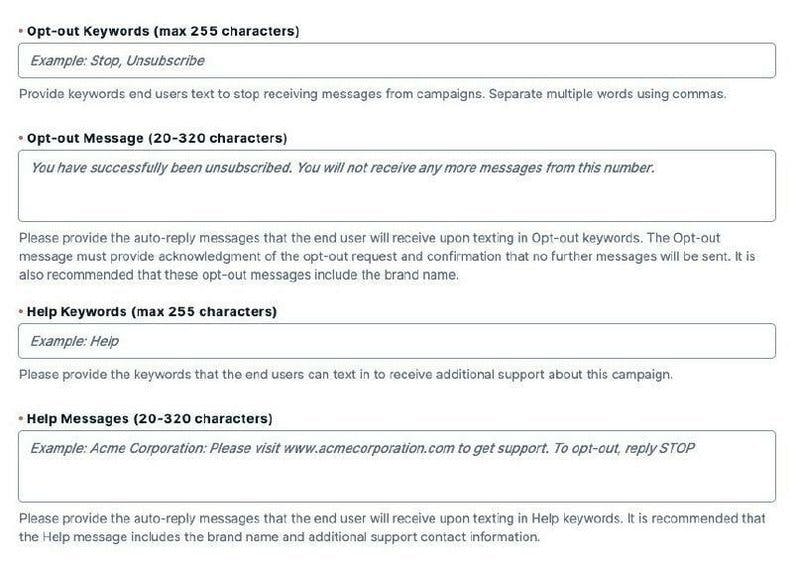
- Opt-out keywords: The keywords end users can text to stop receiving messages from this campaign
- Opt-out message: The automated message end users will receive when they text in one of the opt-out keywords
- Help keywords: The keywords end users can text to receive help
- Help message: The automated message end users will receive when they text in one of the help keywords
If you chose above to create a new Messaging Service, you will be able to configure the new Messaging Service in the next step.
Your phone numbers will need to be in a Messaging Service associated with your Campaign, but it is not necessary to send your Messaging Service SID in your API requests; you can instead specify an individual phone number itself as the Sender. However, you will need to add those phone numbers to a Messaging Service for US A2P Campaign registration purposes.
Click Register Campaign when you are ready to proceed. You will then see a window that asks you confirm the costs associated with Campaign registration and agree to the terms and conditions of registering the Campaign. Click Confirm to continue.
If you selected an Existing Messaging Service for this Campaign, you are now finished with the registration submission process. You can skip to adding additional senders to your Messaging Service.
If you chose to create a new Messaging Service for this Campaign, Twilio will create that Service for you automatically. The name of the new Messaging Service will be the name of the A2P Campaign Use Case that you selected earlier.
You will need to attach at least one phone number to the new service. You will see a list of available phone numbers in your account that you can register.

If you do not have any phone numbers, you should purchase one and then refresh the list. Once you've selected the phone number(s) to attach and agree to Twilio's Messaging Policy, click Add Phone Numbers to the Messaging Service.
After you have created a new Messaging Service and added a phone number, or selected an existing Messaging Service, you will see a review of the phone number(s) you have added to this service already. You can add additional senders to this Messaging Service now, or you can do so later in the Messaging Service section of the Console.
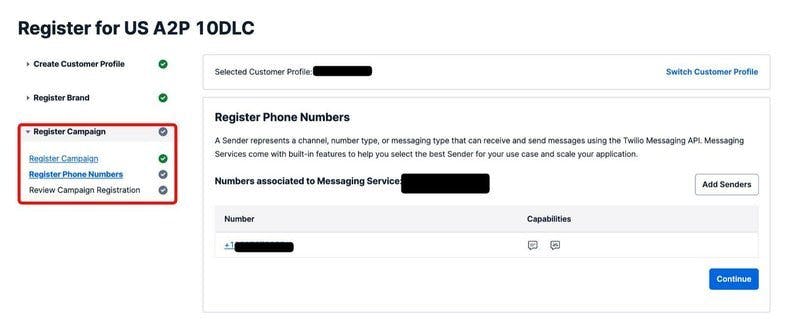
Click Continue when you have finished adding Senders to this service and are ready to finalize the campaign registration.
Due to the new manual vetting process, it is normal for your campaign to stay in the "In Progress" state for some days. The Twilio ops team will reach out to you if additional information is needed.
Once approved, you can register additional campaign use cases and view all of your registered US A2P brands.
Congratulations, you have successfully registered for US A2P Messaging capabilities by creating a Business Profile, submitting a US A2P brand, and registering a campaign use case associated with a Twilio Messaging Service!
Warning
Remember to add all 10DLC numbers that you plan to use to the Messaging Service! This will ensure that all traffic goes through A2P.
There are six Special Campaign Use Cases that require additional carrier review (post-approval) of all attempted registrations immediately following registration:
- Agents, franchise, local branches: brands that have multiple agents, franchises, or offices in the same brand vertical, but require individual localized numbers per agent/location/office.
- Proxy (formerly Conversational): peer-to-peer app-based group messaging with proxy/pooled numbers.
- Emergency: notification services designed to support public safety/health during natural disasters, armed conflicts, pandemics, and other national or regional emergencies.
- Social: communication between public figures/influencers and their communities.
- Sweepstakes: all gambling and sweepstakes messaging.
- K-12 Education : Messaging platforms for grades K-12 and schools. Note: Post-Secondary institutions should continue to use the "Higher Education" use case.
Post-approval for these special use cases is required before the phone numbers on the campaign are registered for A2P 10DLC and before unlocking associated pricing or throughput benefits available. Carrier review for post-approval campaigns takes an average of 7 days.
Campaigns requiring post-approval can either be approved or rejected by carriers. If approved, all SMS messages sent or received from the phone numbers in the Messaging Service you used to register the campaign will be routed as registered A2P messaging traffic. If rejected, you will not be able to send or receive A2P-registered SMS messages from the phone numbers in the Messaging Service until you re-register your campaign with an automatic approval use case.
During the "Register Campaign Use Case" section of the registration process, click the Available A2P campaign use cases dropdown menu. The campaign use cases types that require post-approval are categorized as Requires Carrier Review.
Select your A2P campaign use case and continue with the setup process for your Messaging Service.
After registering a campaign requiring post-approval, your campaign will be updated with a status of "In Progress" while the carriers review it. Your traffic will not be moved to registered A2P routes until approved by carriers. If you are already sending messages using the associated Messaging Service on unregistered SMS routes, this will continue to function as normal in this state.
You will receive an email from Twilio with the results of the carrier review after it is completed. Carrier review takes an average of 7 days.
You will either be approved or rejected by the carriers. This is separate from the manual vetting process mentioned previously.
If approved, your messaging traffic will be successfully registered on A2P routes in accordance with the pricing and throughput of the selected campaign type. Your campaign will be marked as "Verified" in the Console.
If rejected, you will have the opportunity to resubmit your campaign with a different use case that will be automatically approved by the carriers. Your campaign status will be marked as "Failed" in the Console.