Skip to contentSkip to navigationSkip to topbar
Rate this page:
On this page

Proxy Quickstart


With just a few lines of code, you can have a text and/or voice conversations between two cloaked participants.

In this Quickstart, you will learn how to:

  1. Purchase a Twilio phone number
  2. Gather your account information
  3. Set up your development environment
  4. Create a Proxy service
  5. Add a phone number to your service
  6. Create a session
  7. Create participants
  8. Send a text message
  9. Make a voice call

To test this quickstart, make sure you have two phone numbers you wish to connect ready to go (perhaps two cell phones?).


Purchase a Twilio phone number

purchase-a-twilio-phone-number page anchor

The first thing you need in order to set up a proxied session is a Twilio-powered phone number. You can grab one to use in the console here.

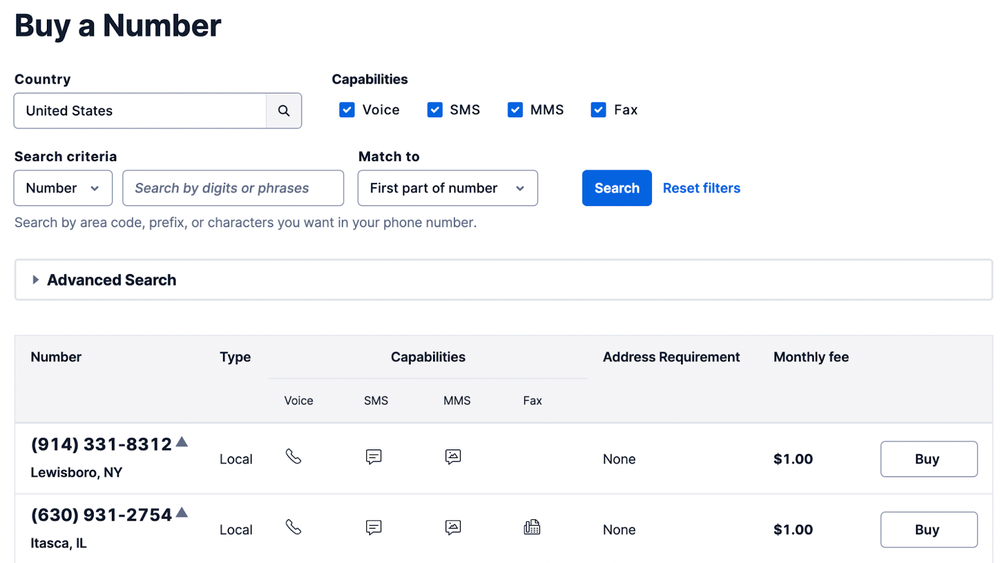
Make sure that it has SMS and/or Voice enabled for the purposes of this quickstart. Note that in many countries, numbers will only have either Voice or SMS capability; to test both features you will need both types in your number pool. US and Canadian numbers will have both capabilities.

A screenshot of the 'Buy a number' page in Twilio's Phone Numbers console. In the top right, we can see Voice and SMS capabilities are both selected.

You'll want at least two phone numbers in your Proxy pool.

Once you buy your preferred numbers, make a note of the Twilio string identifier (SID) of the number. You'll need it for this quickstart.
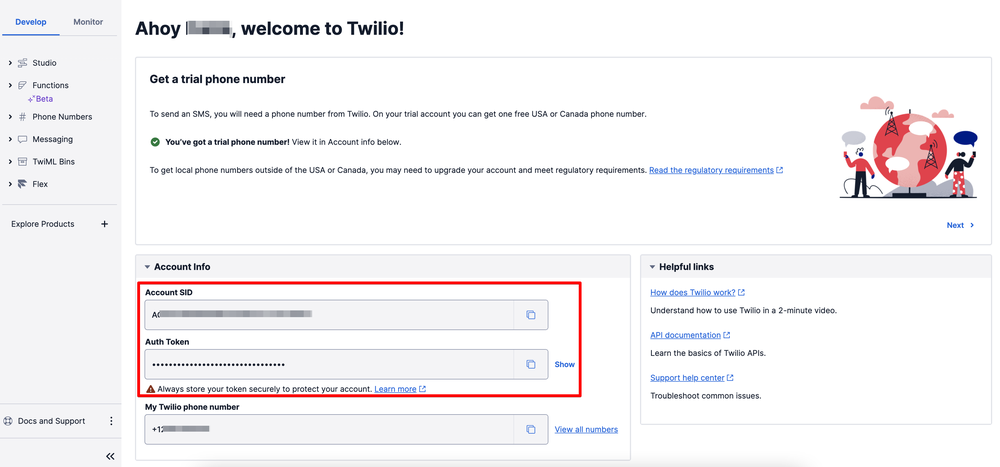

Gather your account information

gather-your-account-information page anchor

You can find these in the Twilio Console(link takes you to an external page).

  • Account SID - Used to authenticate REST API requests
  • Auth Token - Used to authenticate REST API requests
Find your Account SID and Auth Token in the Twilio Console: in the middle of this screenshot, a red box highlights 'Account Info', which lists Account SID and Auth Token (both obscured in this image). Each field has an icon for copying these values to the clipboard.

For all of our code snippets and curl examples, you will need to authenticate with the Account SID and Auth Token.


Set up your development environment

set-up-your-development-environment page anchor

The next steps will involve writing some code. We've provided examples in multiple languages, but you will need a working development environment in at least one of them. Here are some guides we've written to help you get your Twilio development environment up and running:

We also provide examples for the curl command(link takes you to an external page) line which should work from a Linux or macOS terminal.


Note: You can also create Services via the console for Proxy.(link takes you to an external page)
Let's create a service that will contain our sessions:

Create a Service

create-a-service-1 page anchor
Node.js
Python
C#
Java
Go
PHP
Ruby
twilio-cli
curl

_10
// Download the helper library from https://www.twilio.com/docs/node/install
_10
// Find your Account SID and Auth Token at twilio.com/console
_10
// and set the environment variables. See http://twil.io/secure
_10
const accountSid = process.env.TWILIO_ACCOUNT_SID;
_10
const authToken = process.env.TWILIO_AUTH_TOKEN;
_10
const client = require('twilio')(accountSid, authToken);
_10
_10
client.proxy.v1.services.create({uniqueName: 'unique_name'})
_10
.then(service => console.log(service.sid));

Output

_20
{
_20
"sid": "KSXXXXXXXXXXXXXXXXXXXXXXXXXXXXXXXX",
_20
"account_sid": "ACXXXXXXXXXXXXXXXXXXXXXXXXXXXXXXXX",
_20
"chat_instance_sid": "ISXXXXXXXXXXXXXXXXXXXXXXXXXXXXXXXX",
_20
"unique_name": "unique_name",
_20
"default_ttl": 3600,
_20
"callback_url": "http://www.example.com",
_20
"geo_match_level": "country",
_20
"number_selection_behavior": "prefer-sticky",
_20
"intercept_callback_url": "http://www.example.com",
_20
"out_of_session_callback_url": "http://www.example.com",
_20
"date_created": "2015-07-30T20:00:00Z",
_20
"date_updated": "2015-07-30T20:00:00Z",
_20
"url": "https://proxy.twilio.com/v1/Services/KSXXXXXXXXXXXXXXXXXXXXXXXXXXXXXXXX",
_20
"links": {
_20
"sessions": "https://proxy.twilio.com/v1/Services/KSXXXXXXXXXXXXXXXXXXXXXXXXXXXXXXXX/Sessions",
_20
"phone_numbers": "https://proxy.twilio.com/v1/Services/KSXXXXXXXXXXXXXXXXXXXXXXXXXXXXXXXX/PhoneNumbers",
_20
"short_codes": "https://proxy.twilio.com/v1/Services/KSXXXXXXXXXXXXXXXXXXXXXXXXXXXXXXXX/ShortCodes"
_20
}
_20
}

Take a note of the service SID (KSxxxx) that you get as a response.


Add a phone number to your service

add-a-phone-number-to-your-service page anchor

We need to associate the number(s) we bought with our newly created service. The phone numbers you add will be added to the anonymous number pool for your proxied communications.

Node.js
Python
C#
Java
Go
PHP
Ruby
twilio-cli
curl

_11
// Download the helper library from https://www.twilio.com/docs/node/install
_11
// Find your Account SID and Auth Token at twilio.com/console
_11
// and set the environment variables. See http://twil.io/secure
_11
const accountSid = process.env.TWILIO_ACCOUNT_SID;
_11
const authToken = process.env.TWILIO_AUTH_TOKEN;
_11
const client = require('twilio')(accountSid, authToken);
_11
_11
client.proxy.v1.services('KSXXXXXXXXXXXXXXXXXXXXXXXXXXXXXXXX')
_11
.phoneNumbers
_11
.create({sid: 'PNXXXXXXXXXXXXXXXXXXXXXXXXXXXXXXXX'})
_11
.then(phone_number => console.log(phone_number.sid));

Output

_17
{
_17
"sid": "PNXXXXXXXXXXXXXXXXXXXXXXXXXXXXXXXX",
_17
"account_sid": "ACXXXXXXXXXXXXXXXXXXXXXXXXXXXXXXXX",
_17
"service_sid": "KSXXXXXXXXXXXXXXXXXXXXXXXXXXXXXXXX",
_17
"date_created": "2015-07-30T20:00:00Z",
_17
"date_updated": "2015-07-30T20:00:00Z",
_17
"phone_number": "+1987654321",
_17
"friendly_name": "Friendly Name",
_17
"iso_country": "US",
_17
"capabilities": {
_17
"sms_outbound": true,
_17
"voice_inbound": false
_17
},
_17
"url": "https://proxy.twilio.com/v1/Services/KSXXXXXXXXXXXXXXXXXXXXXXXXXXXXXXXX/PhoneNumbers/PNXXXXXXXXXXXXXXXXXXXXXXXXXXXXXXXX",
_17
"is_reserved": false,
_17
"in_use": 0
_17
}

This adds a single number to the Proxy pool. Repeat for each of your Twilio phone numbers


A session is a conversation between two people. This code will create a new session in your Proxy service.

Node.js
Python
C#
Java
Go
PHP
Ruby
twilio-cli
curl

_11
// Download the helper library from https://www.twilio.com/docs/node/install
_11
// Find your Account SID and Auth Token at twilio.com/console
_11
// and set the environment variables. See http://twil.io/secure
_11
const accountSid = process.env.TWILIO_ACCOUNT_SID;
_11
const authToken = process.env.TWILIO_AUTH_TOKEN;
_11
const client = require('twilio')(accountSid, authToken);
_11
_11
client.proxy.v1.services('KSXXXXXXXXXXXXXXXXXXXXXXXXXXXXXXXX')
_11
.sessions
_11
.create({uniqueName: 'MyFirstSession'})
_11
.then(session => console.log(session.sid));

Output

_21
{
_21
"service_sid": "KSXXXXXXXXXXXXXXXXXXXXXXXXXXXXXXXX",
_21
"status": "open",
_21
"unique_name": "MyFirstSession",
_21
"date_started": "2015-07-30T20:00:00Z",
_21
"date_ended": "2015-07-30T20:00:00Z",
_21
"date_last_interaction": "2015-07-30T20:00:00Z",
_21
"date_expiry": "2015-07-30T20:00:00Z",
_21
"ttl": 3600,
_21
"mode": "voice-and-message",
_21
"closed_reason": "",
_21
"sid": "KCXXXXXXXXXXXXXXXXXXXXXXXXXXXXXXXX",
_21
"date_updated": "2015-07-30T20:00:00Z",
_21
"date_created": "2015-07-30T20:00:00Z",
_21
"account_sid": "ACXXXXXXXXXXXXXXXXXXXXXXXXXXXXXXXX",
_21
"url": "https://proxy.twilio.com/v1/Services/KSXXXXXXXXXXXXXXXXXXXXXXXXXXXXXXXX/Sessions/KCXXXXXXXXXXXXXXXXXXXXXXXXXXXXXXXX",
_21
"links": {
_21
"interactions": "https://proxy.twilio.com/v1/Services/KSXXXXXXXXXXXXXXXXXXXXXXXXXXXXXXXX/Sessions/KCXXXXXXXXXXXXXXXXXXXXXXXXXXXXXXXX/Interactions",
_21
"participants": "https://proxy.twilio.com/v1/Services/KSXXXXXXXXXXXXXXXXXXXXXXXXXXXXXXXX/Sessions/KCXXXXXXXXXXXXXXXXXXXXXXXXXXXXXXXX/Participants"
_21
}
_21
}

Note the session SID (KCxxxx) from the response you get.


You can't have a good conversation without participants, so let's add some.

Node.js
Python
C#
Java
Go
PHP
Ruby
twilio-cli
curl

_12
// Download the helper library from https://www.twilio.com/docs/node/install
_12
// Find your Account SID and Auth Token at twilio.com/console
_12
// and set the environment variables. See http://twil.io/secure
_12
const accountSid = process.env.TWILIO_ACCOUNT_SID;
_12
const authToken = process.env.TWILIO_AUTH_TOKEN;
_12
const client = require('twilio')(accountSid, authToken);
_12
_12
client.proxy.v1.services('KSXXXXXXXXXXXXXXXXXXXXXXXXXXXXXXXX')
_12
.sessions('KCXXXXXXXXXXXXXXXXXXXXXXXXXXXXXXXX')
_12
.participants
_12
.create({friendlyName: 'Alice', identifier: '+15558675310'})
_12
.then(participant => console.log(participant.proxyIdentifier));

Output

_17
{
_17
"sid": "KPXXXXXXXXXXXXXXXXXXXXXXXXXXXXXXXX",
_17
"session_sid": "KCXXXXXXXXXXXXXXXXXXXXXXXXXXXXXXXX",
_17
"service_sid": "KSXXXXXXXXXXXXXXXXXXXXXXXXXXXXXXXX",
_17
"account_sid": "ACXXXXXXXXXXXXXXXXXXXXXXXXXXXXXXXX",
_17
"identifier": "+15558675310",
_17
"proxy_identifier": "+14155559999",
_17
"proxy_identifier_sid": "PNXXXXXXXXXXXXXXXXXXXXXXXXXXXXXXXX",
_17
"friendly_name": "Alice",
_17
"date_deleted": "2015-07-30T20:00:00Z",
_17
"date_updated": "2015-07-30T20:00:00Z",
_17
"date_created": "2015-07-30T20:00:00Z",
_17
"url": "https://proxy.twilio.com/v1/Services/KSXXXXXXXXXXXXXXXXXXXXXXXXXXXXXXXX/Sessions/KCXXXXXXXXXXXXXXXXXXXXXXXXXXXXXXXX/Participants/KPXXXXXXXXXXXXXXXXXXXXXXXXXXXXXXXX",
_17
"links": {
_17
"message_interactions": "https://proxy.twilio.com/v1/Services/KSXXXXXXXXXXXXXXXXXXXXXXXXXXXXXXXX/Sessions/KCXXXXXXXXXXXXXXXXXXXXXXXXXXXXXXXX/Participants/KPXXXXXXXXXXXXXXXXXXXXXXXXXXXXXXXX/MessageInteractions"
_17
}
_17
}

Run it again with a second participant (a different phone number for another proxied user, and a different 'Friendly Name').

For each participant, you'll receive a response with the participant's assigned Proxy number, which will come from the pool of numbers you've added. Depending on the capabilities of the phone number, next either send a text message in the conversation or make a voice call.


If your number has text messaging capabilities, you're ready to roll! If you're looking at a voice proxy, skip to the next section.

Let's send a message from one of the assigned Proxy numbers to one of the participants. Execute the following for one of the participants (the participant you'd like to receive this initial message):

Send a Message to a Participant

send-a-message-to-a-participant page anchor
Node.js
Python
C#
Java
Go
PHP
Ruby
twilio-cli
curl

_13
// Download the helper library from https://www.twilio.com/docs/node/install
_13
// Find your Account SID and Auth Token at twilio.com/console
_13
// and set the environment variables. See http://twil.io/secure
_13
const accountSid = process.env.TWILIO_ACCOUNT_SID;
_13
const authToken = process.env.TWILIO_AUTH_TOKEN;
_13
const client = require('twilio')(accountSid, authToken);
_13
_13
client.proxy.v1.services('KSXXXXXXXXXXXXXXXXXXXXXXXXXXXXXXXX')
_13
.sessions('KCXXXXXXXXXXXXXXXXXXXXXXXXXXXXXXXX')
_13
.participants('KPXXXXXXXXXXXXXXXXXXXXXXXXXXXXXXXX')
_13
.messageInteractions
_13
.create({body: 'Reply to this message to chat!'})
_13
.then(message_interaction => console.log(message_interaction.sid));

Output

_24
{
_24
"service_sid": "KSXXXXXXXXXXXXXXXXXXXXXXXXXXXXXXXX",
_24
"data": {
_24
"body": "some message"
_24
},
_24
"date_created": "2015-07-30T20:00:00Z",
_24
"date_updated": "2015-07-30T20:00:00Z",
_24
"participant_sid": "KPXXXXXXXXXXXXXXXXXXXXXXXXXXXXXXXX",
_24
"inbound_participant_sid": null,
_24
"inbound_resource_sid": null,
_24
"inbound_resource_status": null,
_24
"inbound_resource_type": null,
_24
"inbound_resource_url": null,
_24
"outbound_participant_sid": "KPXXXXXXXXXXXXXXXXXXXXXXXXXXXXXXXX",
_24
"outbound_resource_sid": "SMXXXXXXXXXXXXXXXXXXXXXXXXXXXXXXXX",
_24
"outbound_resource_status": "sent",
_24
"outbound_resource_type": "Message",
_24
"outbound_resource_url": null,
_24
"sid": "KIXXXXXXXXXXXXXXXXXXXXXXXXXXXXXXXX",
_24
"type": "message",
_24
"url": "https://proxy.twilio.com/v1/Services/KSXXXXXXXXXXXXXXXXXXXXXXXXXXXXXXXX/Sessions/KCXXXXXXXXXXXXXXXXXXXXXXXXXXXXXXXX/Participants/KPXXXXXXXXXXXXXXXXXXXXXXXXXXXXXXXX/MessageInteractions/KIXXXXXXXXXXXXXXXXXXXXXXXXXXXXXXXX",
_24
"account_sid": "ACXXXXXXXXXXXXXXXXXXXXXXXXXXXXXXXX",
_24
"session_sid": "KCXXXXXXXXXXXXXXXXXXXXXXXXXXXXXXXX"
_24
}

And with that, the Proxy text conversation can continue!


If your Twilio Phone Numbers are voice capable, you're now ready for a proxied voice conversation. Following the names from the previous steps, get Alice to make a call to her Proxy Identifier number. Twilio's Proxy service will then make a call from Bob's Proxy Number to his real number and connect the two calls.

Now you're talking anonymously!

(warning)

Warning

If voicemail is enabled for your real number, your outgoing voicemail message may reveal your real number to people who call your proxied number.

Review your outgoing voicemail message to ensure that it does not include your real number. Remember that many default voicemail messages begin by stating the number that the person has reached.

You now know how to create text and/or voice conversations between two masked participants. To learn more about how Proxy works check out the guide to Phone Number Management or dive into the REST API reference.


Rate this page: