Integrate Flex with Glance Cobrowse
Glance Cobrowse gives agents the ability to instantly join customers in viewing your app or website. Agents can guide customer navigation, answer questions, and assist with completing transactions. You can launch a Glance Cobrowse session from the Twilio Flex platform with the click of a button — no need for the customer to download or install a screen sharing app.
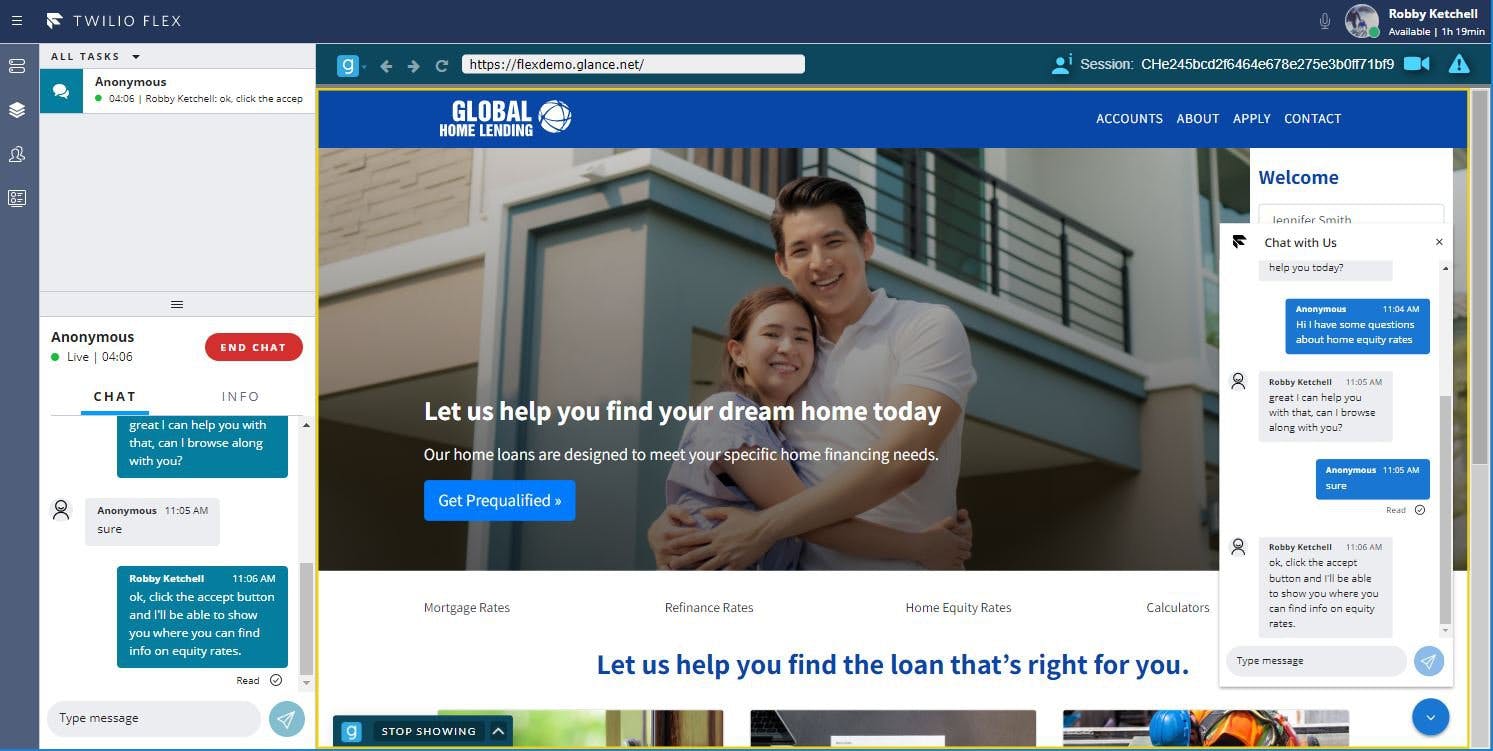
Through the Glance 1-Click Connect capability, agents receive alerts when customers are present on your website and can connect with just one click. You can also enable one-way agent video to personalize the Glance Cobrowse experience.
To integrate the Glance Cobrowse Component with Flex, you need the following:
- Twilio Account and Flex Project
-
Glance Account that has the Flex domain added to the allowlist.
To add the Flex domain to the allowlist:- Log in to your Glance Account .
- Go to Settings > Cobrowse Settings > CRM and Chat Integration .
-
Enter
flex.twilio.comto the domain and select Add .
-
Site that is configured with the Glance Cobrowse script tag.
Ensure that you:-
Set
data-presencetoapi. -
Set
data-cookiedomainto the URL for your website domain.
-
Set
Example of the Glance Cobrowse script tag:
_11<script id="glance-cobrowse" type="text/javascript"_11 src="https://[cdnname].glancecdn.net/cobrowse/CobrowseJS.ashx?group=[groupid]&site=[production|staging]"_11 data-groupid="[groupid]"_11 data-site="[production|staging]"_11 data-inputevents='{...}'_11 data-termsurl="[terms and conditions url]"_11 data-cookiedomain="[session cookie domain]"_11 data-cookietype="[normal|ls|dual|secure]"_11 charset="UTF-8"_11 data-presence="api">_11</script>
To integrate the Glance Cobrowse Component with Flex, you must:
- Set up authentication.
- Install the Glance Cobrowse Component from NPM.
- Add the Glance Cobrowse Component to the Flex interface.
- Install Flex WebChat and add Glance.
- (Optional) Enable Glance Agent Video.
In order to connect to Glance from Flex, you need to set up authentication. Glance uses the same user ID from the identity provider to call a Twilio Function to authenticate into Glance.
- You have configured SSO with an identity provider (such as Okta ) for Flex.
- You have a Glance Admin account.
- If you are setting up Glance Cobrowse for multiple agents, each agent has a Glance Account.
- You have set the Partner User ID (PUID) field in Glance to match the user ID in your identity provider. To set your user ID:
- Log in to your Glance account .
- Go to Portal > Edit Users .
-
For Parter UID, enter the user ID from your identity provider.
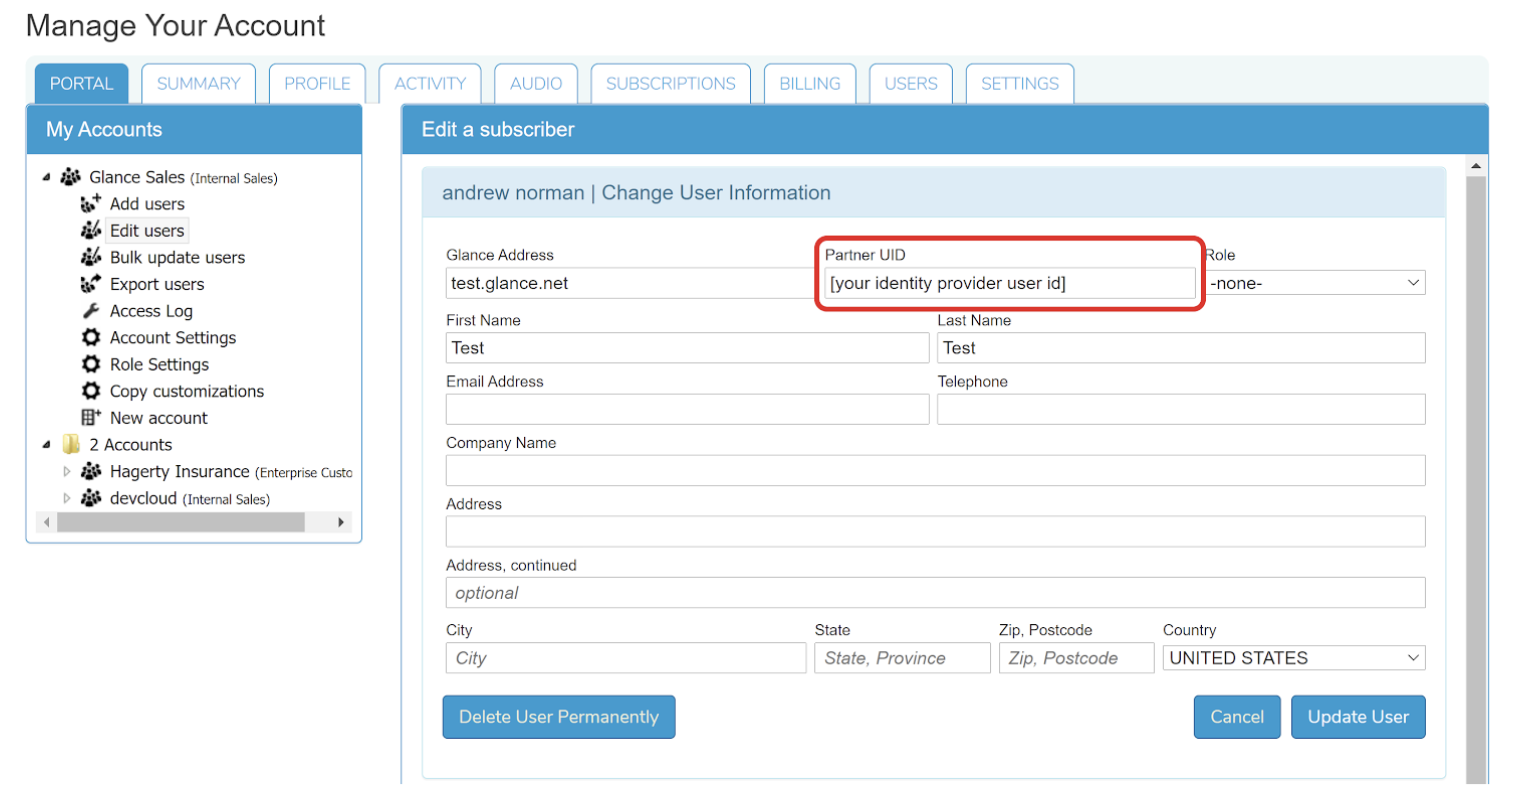
- Select Update User .
To set up authentication:
- From the Twilio Console > Functions > Services , select Create Service.
-
Enter a
Service Name
then select
Next
.
For example:yourcompanyname-glance. Note: Remember this Service Name to use it later when adding the Glance Cobrowse Component to Flex. -
Select
Add+
>
Add Function
.
A new field appears. -
Remove the default name
/path_1and inputgetloginkey. Click enter to generate the function. - Click the drop-down next to Protected to set the visibility to Public .
-
In the text editor on the right, paste the code below then select Save.
_34const TokenValidator = require('twilio-flex-token-validator').functionValidator;_34_34exports.handler = TokenValidator(function(context, event, callback) {_34const response = new Twilio.Response();_34_34response.appendHeader('Access-Control-Allow-Origin', '*');_34response.appendHeader('Access-Control-Allow-Methods', 'GET', 'POST');_34response.appendHeader('Access-Control-Allow-Headers', 'Content-Type');_34response.appendHeader('Content-Type', 'application/json');_34_34try {_34const version = 1;_34const expires = (Math.round((new Date()).valueOf() / 1000)) + parseInt(context.GLANCE_EXPIRATION, 10);_34const keystring = context.GLANCE_GROUP_ID + event.partneruserid + version + expires;_34const CryptoJS = require('crypto-js');_34const hmac = CryptoJS.HmacSHA256(keystring, context.GLANCE_API_KEY);_34const hmacb64 = hmac.toString(CryptoJS.enc.Base64)_34const loginkey = "$" + version + "$" + expires + "$" + hmacb64.substr(0, 43).replace(/\+/g, '-').replace(/\//g, '_');_34_34response.setBody({_34'loginKey': loginkey,_34'groupId': context.GLANCE_GROUP_ID,_34'expiration': expires,_34'apiKey': context.GLANCE_API_KEY_34});_34_34response.setStatusCode(200);_34callback(null, response);_34} catch(error) {_34response.setStatusCode(404);_34callback(null, response);_34}_34_34}); -
In Settings > Environment Variables, add the following Environment Variables:
-
Add
GLANCE_API_KEYand set the value to your Glance API Key. To find your Glance API Key, log in to your Glance account. Go to Settings > API Key . -
Add
GLANCE_EXPIRATIONand set the value to a length of time (in seconds) when you want the session to expire. We recommend3600 -
Add
GLANCE_GROUP_IDand set the value to the Glance group ID for your company. Note: The Glance group ID is a unique ID assigned to your company by Glance. You can find this in the Glance portal in the top-right corner of every page.
-
Add
-
In Settings > Dependencies, add the following dependencies without a version number:
-
twilio-flex-token-validator -
crypto-js
-
- Select Deploy All .
You must add the Glance Cobrowse Component to either an existing or a new Flex Plugin. In your terminal, run:
_10npm install @glance-networks/twilio-flex-component
If you are using Yarn, run the following instead:
_10yarn add @glance-networks/twilio-flex-component
For more information, see the ReadMe.
After installing the Glance Cobrowse Component, choose where you want the button to display inside Flex. Learn how to customize Flex UI Components.
Import the component inside your Flex project. In glanceplugin.js (note: the name of the plugin is autocreated when you make the file) or .jtx file, add the following to the first line:
_10import {TwilioFlexGlance} from @glance-networks/twilio-flex-component
Example of the Glance Cobrowse Component inside the task canvas header:
_13flex.TaskCanvasHeader.Content.add(_13 <TwilioFlexGlance_13 key={[yourkey]}_13 groupid={[yourgroupid]}_13 authurl={[yourauthurl]}_13 authtoken={flex.Manager.getInstance().user.token}_13 openlocation={'tab|window|flex'}_13 presence={true}_13 glancebaseurl={'beta|staging|production'}_13 puid={flex.Manager.getInstance().user.identity}_13 debugmode={true|false}_13 />, {options}_13);
Example of the Glance Component inside the CRM Container:
Note: If you are opening sessions inside the iframe, you must use the CRM Container. You should not use this option if you need this panel for other content, as it will fill the contents of the entire panel with the Glance Cobrowse session.
_13flex.CRMContainer.Content.replace(_13 <TwilioFlexGlance_13 key={[yourkey]}_13 groupid={[yourgroupid]}_13 authurl={[yourauthurl]}_13 authtoken={flex.Manager.getInstance().user.token}_13 openlocation={'tab|window|flex'}_13 presence={true}_13 glancebaseurl={'beta|staging|production'}_13 puid={flex.Manager.getInstance().user.identity}_13 debugmode={true|false}_13 />, {options}_13);
Important: In the cases above, AgentDesktopView.Panel2 is open or closed depending on how you set the default properties.
The following table describes the properties inside the component:
| Property | Type | Definition |
|---|---|---|
key | string | Required. React component key. User-defined unique string. |
groupid | integer | Required. Enter your Glance Group ID (unique ID assigned to your company by Glance). |
authurl | string | Required. Enter the URL to your login key function. This is the function you created above in the "Set Up Authentication" section: https://YOURCOMPANYNAME-glance-####/getloginkey |
opentype | string | Optional. If undefined, defaults to flex. Accepted values are:
Note: Selecting flex or leaving undefined takes over AgentDesktopView.Panel2. If you are already customizing this component in your Flex implementation, it is suggested that you set opentype to window or tab. |
presence | boolean | Optional. Determines if presence is enabled. If undefined, presence is set to off. If you are implementing Glance with Flex WebChat, you must set presence to true.
|
glancebaseurl | string | Required. Determines which Glance environment servers the session points to. Set to production unless explicitly directed otherwise by Glance Customer Success.
|
puid | Required. Set to: {flex.Manager.getInstance().user.identity} |
You must consume Flex WebChat from the CDN. Glance does not have a NPM package, which is necessary if deploying in a React application.
- Install Flex WebChat .
-
The following code example contains Flex WebChat and Glance Presence functionality. Update the code with your Account SID and Flex Flow SID:
_47<script>_47const appConfig = \{_47accountSid: "[YOUR_TWILIO_ACCOUNT_SID]",_47flexFlowSid: "[YOUR_FLEX_FLOW_SID]",_47context: \{_47friendlyName: "[YOUR_FIRENDLY_NAME]",_47\},_47startEngagementOnInit: true_47\};_47let sessionid = undefined;_47_47Twilio.FlexWebChat.createWebChat(appConfig)_47.then(webchat => \{_47const \{ manager \} = webchat;_47_47Twilio.FlexWebChat.Actions.on("afterSendMessage", () => \{_47const {channelSid} = manager.store.getState().flex.session;_47if (!sessionid || sessionid !== channelSid) \{_47manager_47.chatClient.getChannelBySid(channelSid)_47.then(channel => \{_47let visitor = new GLANCE.Presence.Visitor(\{_47groupid: document.getElementById("glance-cobrowse").getAttribute("data-groupid"),_47visitorid: channel.sid_47\});_47visitor.onerror = function (e) \{_47console.log("presence error:", e);_47\};_47visitor.presence(\{_47onsuccess: function () \{_47console.log("presence success");_47\}_47\});_47visitor.onsignal = function (msg) \{_47console.log("received signal:", msg);_47\};_47visitor.connect();_47_47\});_47sessionid = channelSid;_47\}_47\});_47_47webchat.init();_47_47\});_47</script> -
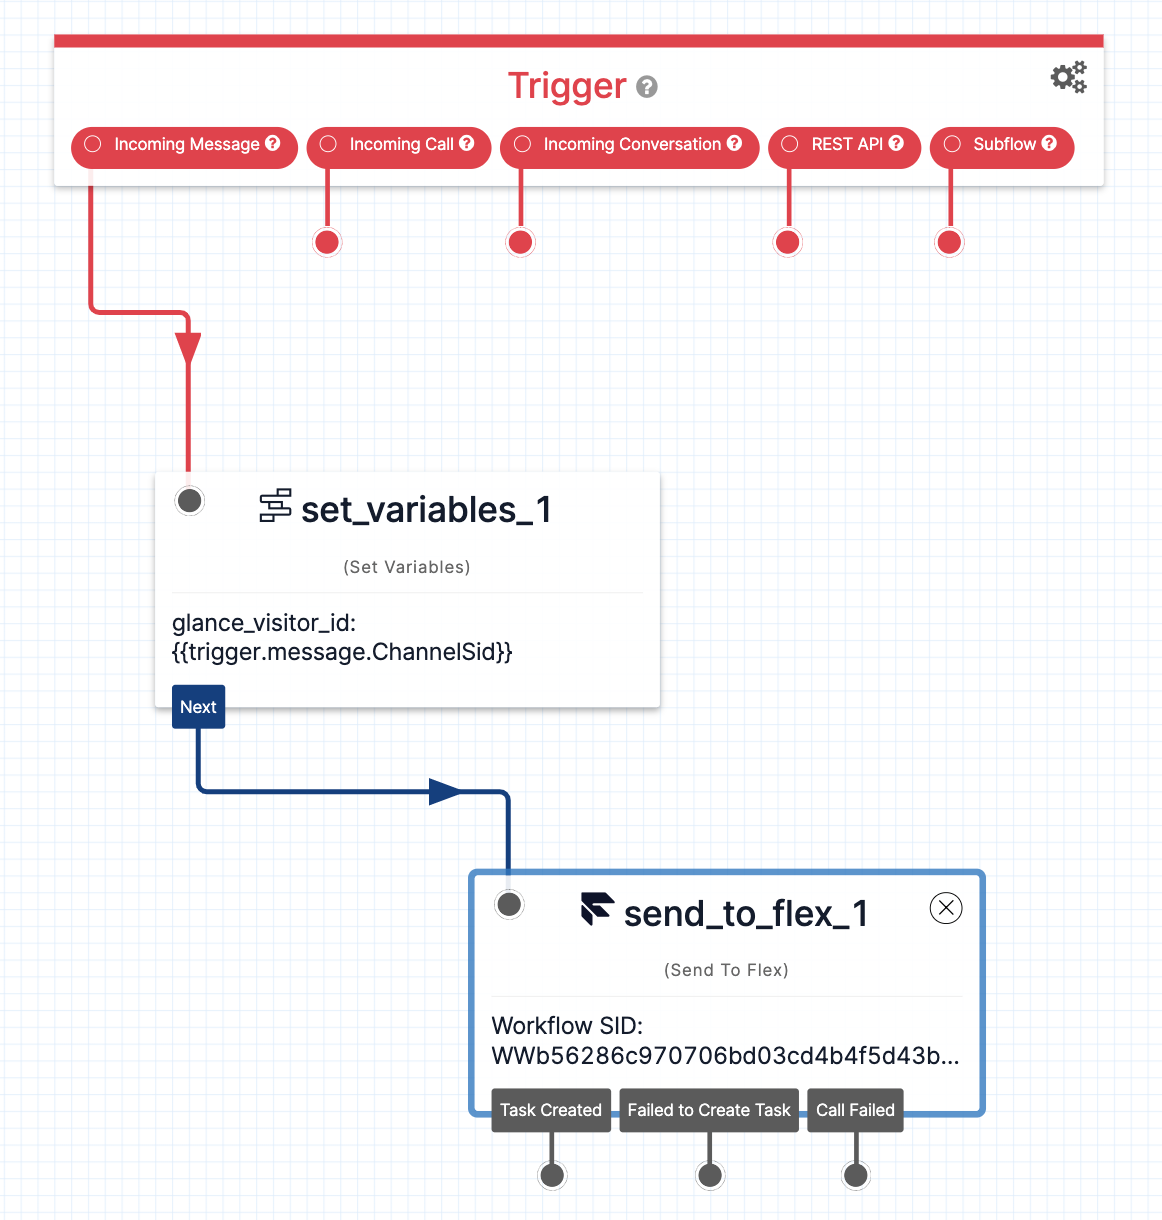
Set up a Flow for Flex WebChat:
- From the Twilio Console > Studio > Manage Flows , select Webchat Flow .
- In the Widget Library > Flow Control , select and drag Set Variables onto the canvas. Click the widget to edit.
- Click the plus sign on the right side of Variables.
-
For
Key
, input
glance_visitor_id. -
For
Value
, input
{{trigger.message.ChannelSid}}. - Save the variable.
- Save the widget.
- Wire the widget to the Incoming Message Trigger .
- In the Widget Library > Connect Other Products , select and drag Send to Flex onto the canvas. Click the widget to edit.
- For Workflow , select Assign to Anyone .
- For Channel , select Programmable Chat .
-
For
Attributes
, input
{"name": "{{trigger.message.ChannelAttributes.from}}", "channelType": "{{trigger.message.ChannelAttributes.channel_type}}", "channelSid": "{{trigger.message.ChannelSid}}", "glance_visitor_id": "{{flow.variables.glance_visitor_id}}"} - Save the widget.
- Wire the widget to the Set Variable Widget that you just created.
-
Select Publish.
Personalizing a Glance Cobrowse session with Glance Video lets your agents build trust, confidence, and credibility with customers. You can enable either one-way agent video, or multi-way video where the customer will be prompted to optionally share their video during the session.
- Log in to your Glance account .
-
From Settings, select one of the following options depending on the video experience you want:
- Add one-way video during screenshare or cobrowse sessions
- Add multi-participant video during cobrowse sessions
Once enabled, Glance Video starts with the Glance Cobrowse session. To pause Glance Video, click the Video button in the agent viewer.
Info
For more information on Glance Cobrowse sessions, see the Glance Cobrowse Guide.