Build an SMS-Equipped Twilio Weather Station with an ESP8266, Amazon AWS IoT and Lambda
Time to read: 16 minutes
November 07, 2017
Written by
Reviewed by

Today, we're going to look at how to build an ESP8266 weather station which uses Twilio Programmable SMS to send weather updates. Our station will reply to incoming SMS messages with weather reports as well as send daily scheduled outgoing SMS weather reports. We'll use AWS IoT as a persistent preference store and MQTT broker and a combination of AWS Lambda and API Gateway to send and receive messages with Twilio.
Prerequisites
We will cover each of these in more detail as we go along, but to build the whole station you'll need:
- Twilio Account
- AWS Account
- ESP8266 (Good options)
- DHT11 (or 22) Humidity Sensor (Like this)
- For a bare sensor, a 4.7k or 10k resistor is needed as well. (Included with the Adafruit product)
- BMP180 (or 085) Barometric Pressure Sensor (Like This)
- Male to Male Jumper Wires (Like these)
- Solderless Breadboard (Like this)
Depending on your choice of ESP8266 development board (or breakout), you may also need:
- 3.3v Serial TTL Adapter (1-2x, one option).
And of course, our code:
Why a Weather Station?
We've written four guides about using Twilio (and in two cases, an ESP8266) with the AWS ecosystem:
- Receive and Reply to SMS or MMS Messages with Lambda in Python
- Validate Twilio Webhook Requests on Lambda in Python
- Send SMS or MMS Messages from an ESP8266 with AWS Lambda and AWS IoT
- Receive and Reply to SMS or MMS Messages on an ESP8266 with AWS Lambda and AWS IoT
This tutorial wraps all of them up with an end-to-end application that does something useful - watches the weather wherever you want it to. Remote monitoring is a major IoT application, and hopefully this station gives you some ideas for your own product.
This build allows us to put something together which incorporates the requirements of many applications you might end up building next. We're going to look at receiving messages via Webhooks from Twilio, sending messages via the Twilio Python Helper Library and AWS Lambda, persisting device state with AWS IoT, and connecting everything over MQTT topics.
Weather Station Architecture
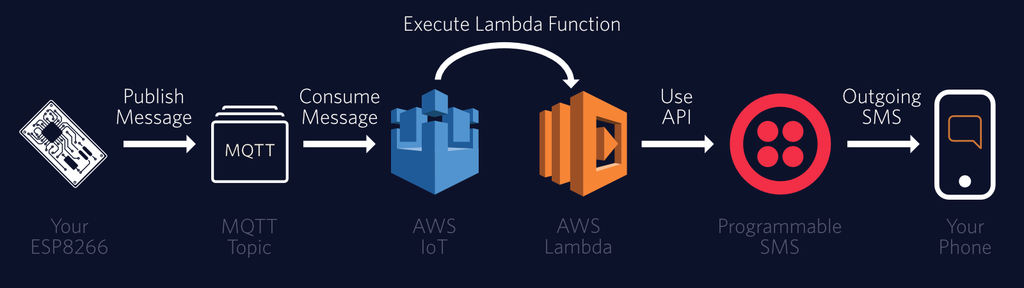
Our architecture is unchanged from our Receiving and Replying to MMS and SMS messages with a ESP8266 and AWS post.
Sending Messages:
Receiving Messages:
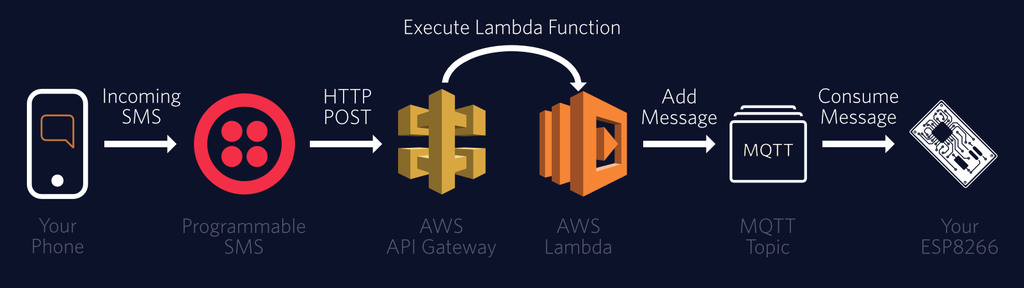
In addition, we'll be adding a handler for 'Help' and 'Set Preference' messages, which will come in over SMS. These will return TwiML to Twilio at the Lambda step in the above diagram. Any successful preference changes will happen in the background on the MQTT topic.
Sign Into a Twilio Account
Our weather station will communicate with you - or whomever you give the number - completely over SMS. We'll eventually have messages moving both ways - originating from the ESP8266 and pushed to you, as well as messages initiated by you to the 'weather station'.
Log into your Twilio account now - and if you don't have one here is a link to sign up for a free Twilio trial. Keep that browser tab handy - you will need to refer back to it later.
Find or Purchase a SMS Capable Number
For this demo, you'll require a SMS capable number you already own (or purchase now).
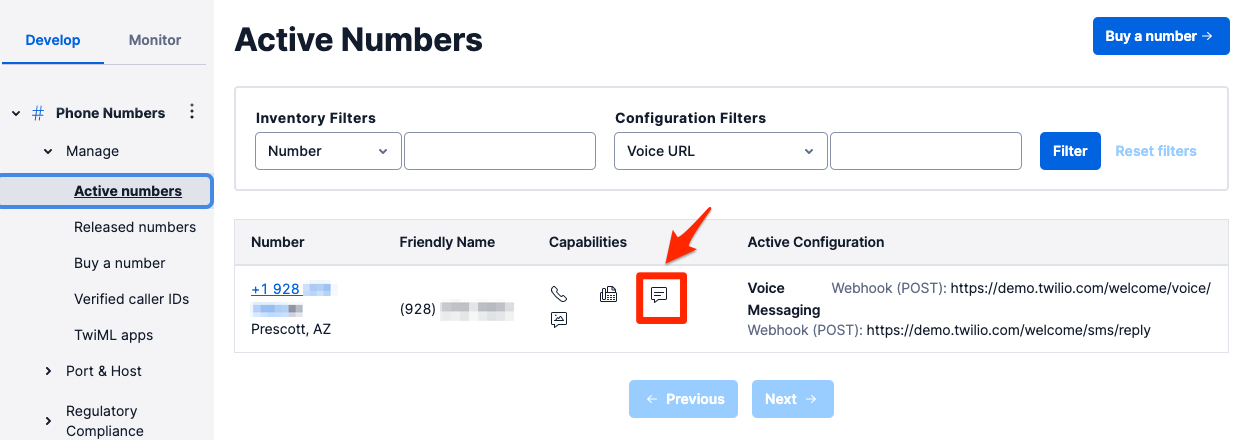
Go to the Twilio Console and select the hash tag/Phone Numbers ('#') section on the left side. Navigate to your currently active numbers.
Under capabilities, you'll want to look for one with SMS capabilities, as shown in the below image:
If you don't yet have a number with the SMS icon, you'll need to buy one. Navigate to the 'Buy a Number' link and click the SMS checkbox:
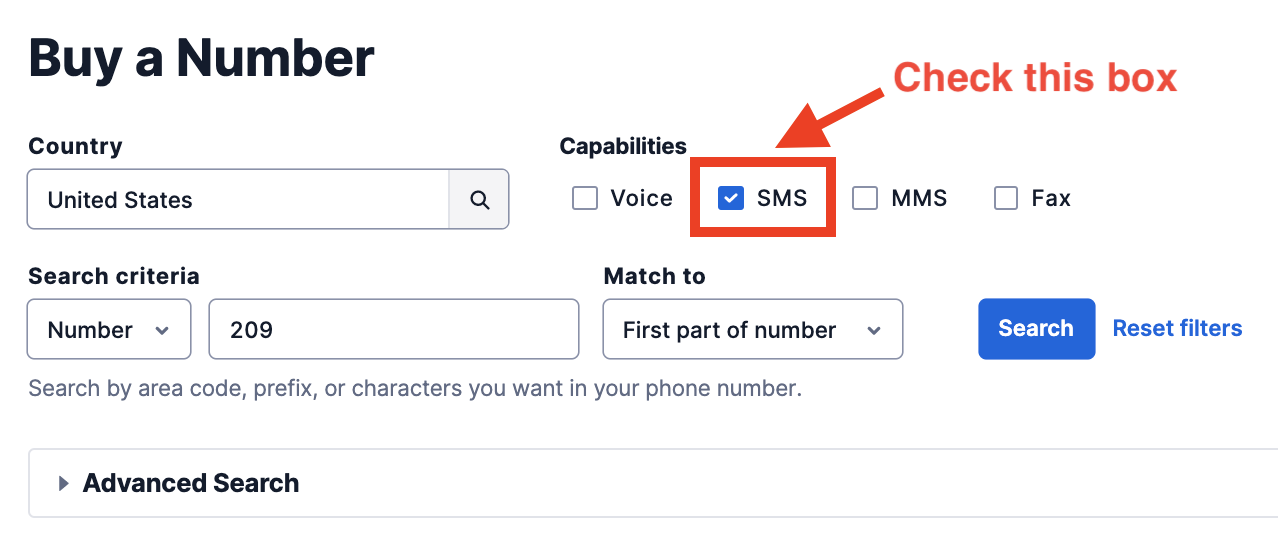
After purchasing, leave the Console tab open and you'll be ready to head to Amazon Web Services.
Log Into - or Sign Up For - Amazon Web Services
A lot of the weather station's infrastructure will use AWS products. AWS will handle passing messages to and from the ESP8266, persisting state in a power loss for the ESP, helping the end user change settings, and handling webhook requests from Twilio.
Mocking an API With API Gateway
In the last section, you set up a framework for the ESP8266 to stay connected to AWS. We also need a plan for the outside world to talk to our weather station.
When you send a text message to a Twilio number, Twilio forwards it to a webhook at a URI you define. In order to expose a resource with AWS, we use the API Gateway service.
We first went covered this process in our receiving and replying to SMS and MMS messages using Amazon Lambda guide, but we will describe it briefly here.
- From the API Gateway console, use the 'Create API' button.
- Name and describe your API a friendly name and description (for your own reference), then create it.
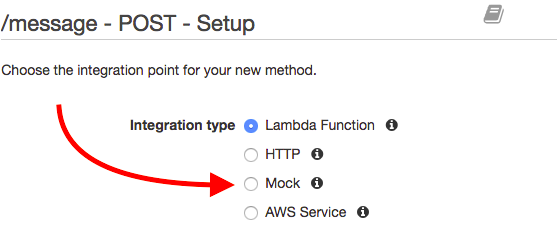
- Create a new resource 'message' (at '/message')
- Create a 'POST' method on
message. - Select 'Mock' as your 'Integration type'.
For now, that's it for API Gateway. We'll be returning later when Lambda is ready.
Highly Suggested - Set Up a New IAM User
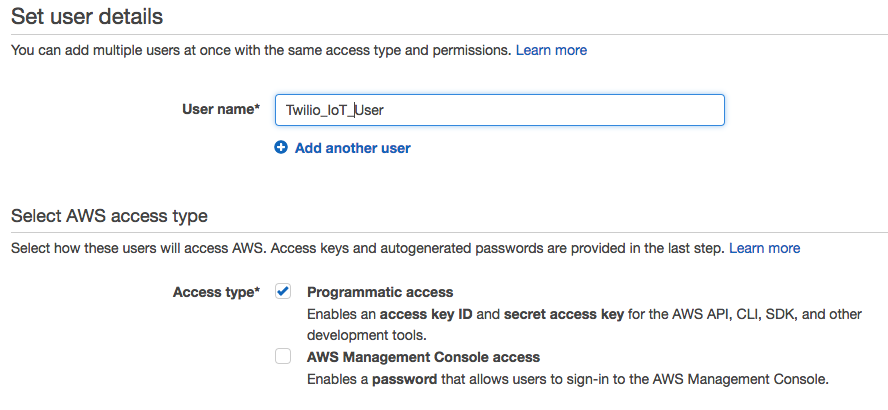
While you can use your main AWS account's credentials for the weather station, best practice with the ESP8266 is to create a new IAM user with IoT permissions. Go to the IAM console, select 'Users' in the left pane and click the blue 'Add User' button.
Name your user and click the box to add Programmatic Access:
Click through to the 'Permissions' step and select 'Attach Existing Policies Directly'. Add every IoT permission, as we did in this picture:
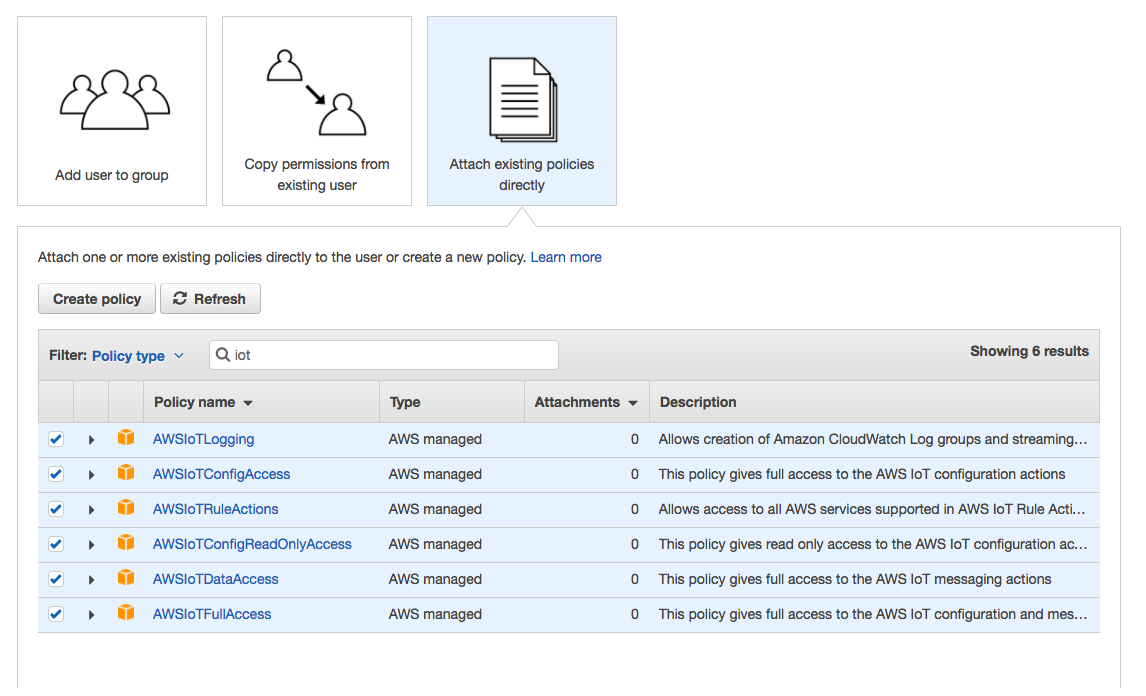
Download the CSV with the user credentials from the success screen. Those will be used in the settings at the top of the .ino file the ESP8266 uses.
Using Lambda To Send Outgoing Messages
While the ESP8266 does have the capability to use the Twilio API directly to send messages (with a few shortcuts, like verifying a certificate fingerprint), we're going to use the AWS infrastructure to send messages via a Lambda function. To demonstrate the flexibility of this approach, we're going to use the same setup as we did in the sending SMS and MMS Messages with the ESP8266 and Lambda article.
We'll discuss what you need to do briefly here, but for the full details of each step please visit that article.
Having Outgoing Messages Trigger Lambda
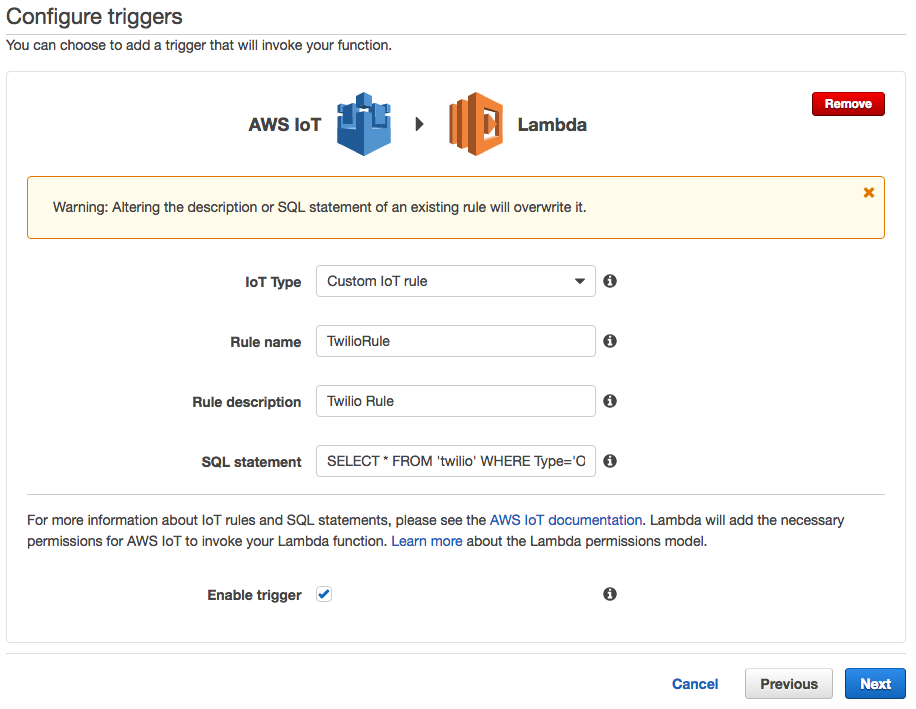
- Create a new Lambda function in the same region as you've set up AWS IoT (use the blank template). Configure it to use AWS IoT as a trigger.
- Check the box for 'Enable Trigger' and name it something memorable. 'IoT Type' should be 'Custom IoT Rule'.
- The SQL statement you should use to trigger Lambda is:
SELECT * FROM 'twilio' WHERE Type='Outgoing' - Here's how you do that from the configuration screen:
- Hit 'Next' to go to the function stage.
Leave a Blank Function
- Change the runtime to 'Python 2.7'.
- Set the 'Handler' field to 'twilio_functions.iot_handler' in preparation for our upcoming code upload.
- Name the function 'myTwilioSendMessage' and use whatever description you desire.
- Use 'Create new role from template(s)' using the AWS IoT Button Permissions, and naming the role something memorable.
You're now ready - create the blank function!
Change the SQL Version
Return to the AWS IoT console briefly (perhaps even in a new tab) - we've got to do one more step so AWS and the ESP8266 play nicely.
- Click the 'Rules' link in the left sidepane.
- You should then see the new rule you've created for the
sendLambda function; click it to see details. - In the 'Rule query statement' section, click the 'Edit' link, and change the 'Using SQL version' to '2015-10-08':
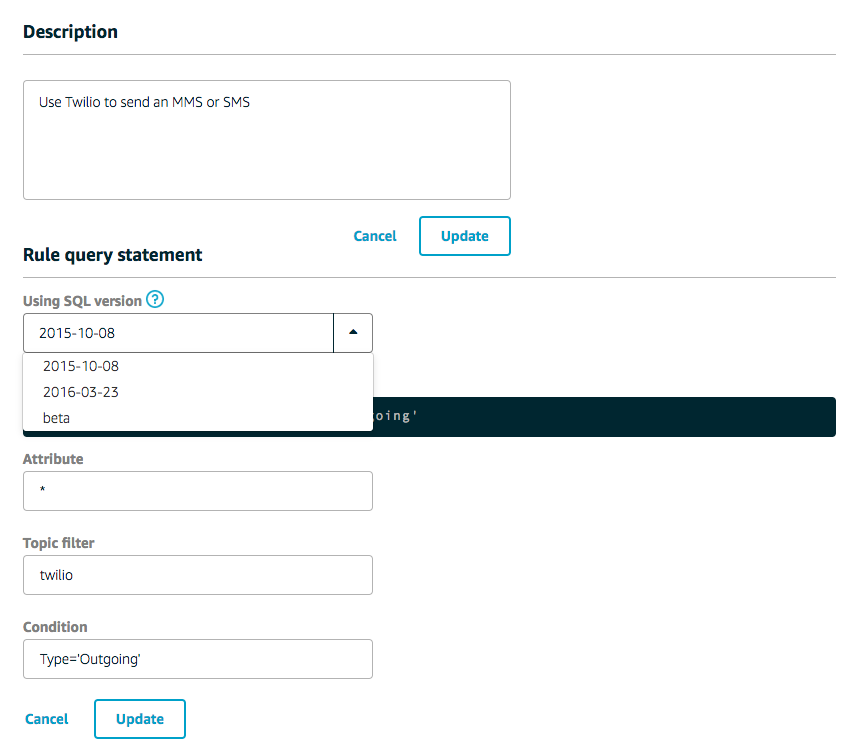
Hit the 'Update' button and your ESP8266 will be ready to fire your rule!
Add some Python Code to Lambda
It's time to add some code.
- On your computer, create a new folder and install the Twilio Python Library manually inside.
- From the GitHub repository, bring in everything from the 'Lambda Function Send SMS' directory (see our earlier guide for detailed help on adding external packages, and read the companion article if you want more details on that function). Zip the contents of that directory up.
- Inside Lambda, select 'Upload a .ZIP File' on the 'Code' tab. Using 'Upload', select the zip file you just created and upload it by saving.
- Double check you're using the Python 2.7 runtime, and that the Handler is set to 'twilio_functions.iot_handler'.
You won't be able to edit the code inline with the newest helper library, so if you have issues make your updates offline then upload again.
Set the Environmental Variables
In Lambda, Environmental Variables are set on the 'Code' tab. From the Twilio Console (you do have the tab still open, right?), find your authorization token and account ID to populate:
- AUTH_TOKEN
- ACCOUNT_SID
And with that, you should have the plumbing set to send messages from the weather station. You can double check the 'Triggers' tab to make sure that IoT is triggering this function based upon the SQL query we already entered.
If that checks out, we can move on...
Using Lambda to Build a SMS-Tree
We're going to model the user facing portion of the Weather Station as a SMS-Tree, much like the Phone Trees Twilio makes so easy to create. Philosophically, our SMS-Tree will be stateless and idempotent - that is, performing actions will not require multiple steps and running the same command multiple times will leave the device in the same state.
For authorization and security we are employing a few mechanisms:
- We use the Python Twilio Helper Library's assistance in to verify a Webhook originates from Twilio (see our detailed writeup).
- We use a 'Master Number' that is allowed to make changes to the settings (although other users can see status other than the
master_number).
Create a User Facing Lambda Function
Using similar steps, create a new blank Lambda function named 'twilioWeatherStation' with no trigger. The 'Handler' should be set to 'twilio_functions.twilio_webhook_handler', and create a zip file which contains the code in the 'Lambda Function Weather' directory and the Twilio Python Helper Library. For details on loading external libraries into Lambda, see this article.
This function needs five environmental variables:
- AUTH_TOKEN - Twilio Auth Token, from the Console
- AWS_TOPIC - 'twilio' without quotes
- THING_NAME - whatever you named the thing, we used 'Twilio_ESP8266_Weather_Station'
- AWS_IOT_REGION - the region of the Thing above
- REQUEST_URL - This will be the request URL of API Gateway, and will exactly match Twilio - so leave it blank for now.
Under role, select 'Create a New Role From Template', selecting 'AWS IoT Button permissions'. Give that role a descriptive name - such as 'twilio_weather' - and continue. Next we'll give that role some special permissions.
Allowing Lambda to Post to MQTT Topics and Update the Device Shadow
Since this Lambda function is both publishing to MQTT topics as well as updating and checking the Thing Shadow, it is going to need extra permissions. We're going to enable them through IAM using an inline policy.
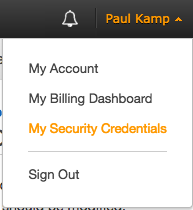
- Go to IAM by using the 'My Security Credentials' in your name pulldown:
- Click on the 'Roles' link in the left sidebar.
- Find the role you assigned to this Lambda function and click on it.
- Click on the 'Create Role Policy' button under 'Inline Policies':
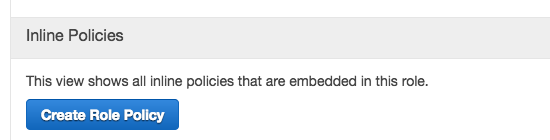
- add an inline policy which allows this function free reign in IoT:
{
    "Version": "2012-10-17",
    "Statement": [
        {
            "Effect": "Allow",
            "Action": [
                "iot:*"
            ],
            "Resource": [
                "*"
            ]
        }
    ]
}
Now your Lambda function can perform every action it needs to in IoT - and for this weather station, we'll be using quite a few.
Next let's do a bit of a deep dive and highlight some of the features of the Lambda server code.
What Are Our SMS-Tree Functions?
Our SMS-Tree will help the user, let the user change settings, and send the user a weather report.
Help
We build a number of 'Help' responses to guide our users when updating settings. There will be a general help message, individual help on each specific setting, and an overview of the currently set settings.
Both '?' and 'help' are used to retrieve help. Note that by default for a ten-digit phone number Twilio will handle any incoming SMS with a body of 'help'. 'help' messages with multiple words will still be passed through to Lambda.
Set
If the user is authorized, we allow her to change the settings which affect the behavior of the station. We have included some very basic input validity checks to ensure, for example, that settings which require numbers are only set to numbers.
Triggering Lambda from API Gateway
Go back to the API Gateway console, and navigate to the API we were building up before. We're going to use it now to trigger our new Lambda function.
The receiving and replying to SMS and MMS messages from Lambda article has the full steps you'll need to perform to have a working API for Twilio to call, but we'll summarize here.
- In 'Method Request', add
X-Twilio-SignatureHTTP Request Header to pass through to Lambda. - In 'Integration Request', remove any Body Mapping Templates and add one for
application/x-www-form-urlencodedwith a template of:
#set($httpPost = $input.path('$').split("&")) { "twilioSignature": "$input.params('X-Twilio-Signature')", #foreach( $kvPair in $httpPost ) #set($kvTokenised = $kvPair.split("=")) #if( $kvTokenised.size() > 1 ) "$kvTokenised[0]" : "$kvTokenised[1]"#if( $foreach.hasNext ),#end #else "$kvTokenised[0]" : ""#if( $foreach.hasNext ),#end #end #end } - In 'Integration Response', remove any Body Mapping Templates and add a new one in HTTP status code
200forapplication/xml. Use this two line template:
#set($inputRoot = $input.path('$')) $inputRoot - In 'Method Response', for HTTP Status 200 remove any existing response bodies and add one for
application/xml.
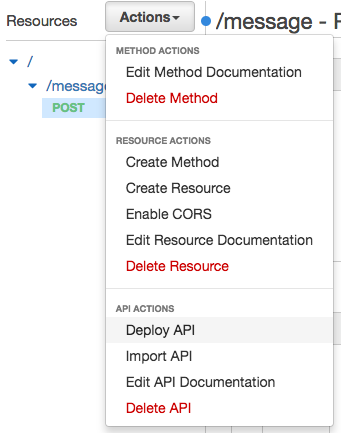
Now, from the 'Action' pulldown menu, 'Deploy API':
Create a new stage with a name of 'prod' and your choice of description.
When you deploy, Amazon will assign a URL to the new /message route. Copy the entire thing, including the /message. Back in the weather station Lambda function's 'Code' tab, paste the exact URL into the REQUEST_URL environmental variable.
Next, even though we haven't even added our hardware yet(!), we're going to plug everything together and test it with Twilio.
Configure Your Twilio Webhook URL
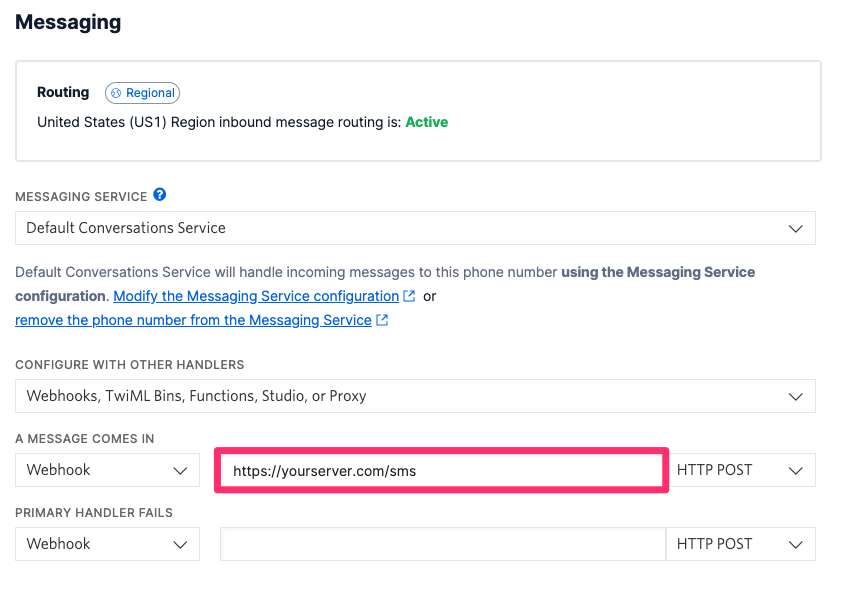
In the Twilio Console browser tab, navigate to the Numbers Section in the sidebar (#). Select the number you set up in the beginning of this tutorial.
Under 'Messaging' and in 'A Message Comes In', select 'Webhook' and paste the API Gateway URL into the text box (highlighted below). Ensure 'HTTP POST' is selected.
Backup Webhook URL
While in many applications you should plan for the failure of the first Webhook, for this weather station we're okay having a single point of failure.
Just be aware - when you are building a Twilio application and the primary Webhook fails (sends back a 5xx HTTP response or times out), Twilio will failver to the backup web hook. That extra piece of machinery is perfect for ensuring you maximize the number of 9s in your uptime.
Text Your Twilio Number for Help or Settings
As noted, we haven't added any hardware yet so the weather will have to wait... but we can try out the set/help machinery.
Try texting the number from your cell phone now, with a single question mark ('?') in the body.
If everything is working together, you should see the 'Hello, World!' of this application - a friendly (but terse, admittedly!) message from Lambda about the various help topics.
You can 'set' variables too, such as 'tz' for timezone (in minutes):
set tz -480
(Pacific Standard time: -8 hours * 60 minutes).set tz 540
(Japan standard time: +9 hours * 60 minutes).
Hopefully you get something back!
If not, trace back through the chain, starting with the Twilio Debugger. For each step in the chain, check the logs - after the debugger, check CloudWatch for any Lambda or API Gateway logs, and finally (for 'set' messages only), check for MQTT messages in the Test MQTT clients.
If it all works, most of the software is done - it's time to move to the board. It's time - let's build the actual station itself!
The ESP8266 Weather Station - Board and Software
At this point, we're ready to put together the ESP8266 part of the chain. If you haven't yet purchased a board, the repository for Arduino on ESP8266 has a nice list of tested boards. We'll be building the weather station on a solderless breadboard with pre-made jumper wires. That in mind, we'd suggest sticking with a full sized development board until it's working... after that you can decide if you'd like to miniaturize the setup.
To develop this guide, we used a Sparkfun Thing and Sparkfun's Basic FTDI breakout. The Sparkfun Thing overloads the DTR pin for ease of programming. This causes problems with the hardware serial port when monitoring from inside the Arduino IDE. We find it easier to use SoftwareSerial for simple text debugging, but have left the choice of serial port (or none) as a setting in the code - you can use the USE_SOFTWARE_SERIAL and USE_HARDWARE_SERIAL to tell the preprocessor how to compile serial support in the code.
Arduino IDE
For the greatest ease of use, we developed the ESP8266 code for this tutorial in the Arduino IDE. Help building the station using another toolchain is outside the scope of this tutorial. While we encourage you to try, please use Arduino to get a working setup first.
Adding ESP8266 Support to Arduino
If you haven't added new board support to Arduino before, we'll walk through that now - feel free to skip ahead if the ESP8266 is already added to your setup.
In your preferences, add a new URL to the 'Additional Board URLs' section: "http://arduino.esp8266.com/stable/package_esp8266com_index.json".
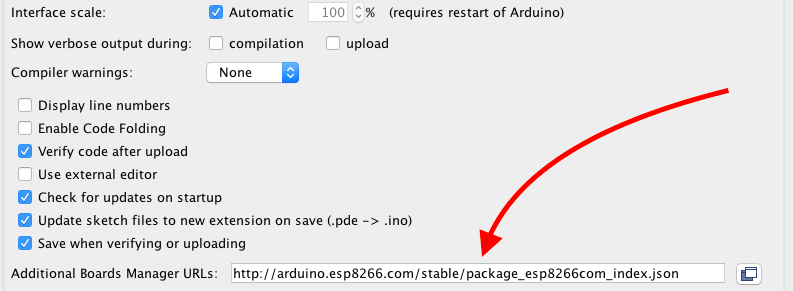
Next, in the 'Tools' menu, select 'Boards Manager'. It will automatically update - after a second, search for the ESP8266 and install the most recent version.
Adding Libraries to Arduino
We're relying on quite a few libraries for the guide today:
- Adafruit BMP085 Unified from Adafruit
- Adafruit Unified Sensor from Adafruit
- DHT Sensor Library from Adafruit
- NTPClient from Fabrice Weinberg
- aws-mqtt-websockets from GitHub user odelot
- Arduino WebSockets from Markus Sattler
- ArduinoJSON from Benoit Blanchon.
- AWS-SDK-Arduino from Sander van de Graaf forked from AWS Labs
- Eclipse Paho Embedded Client (for MQTT)
Using Arduino's Library Manager is possible for two of the libraries, but the others must be added manually. For a complete overview of library management on Arduino, see the official documentation.
Add Through Library Manager (Search)
- Adafruit BMP085 Unified
- Adafruit Unified Sensor
- DHT Sensor Library
- NTPClient
- ArduinoJSON
- WebSockets
Add Manually to Arduino
The easiest way to install these libraries in the Arduino IDE is to install from a downloaded zip file.
This can be done directly from the ZIP Library Installer in the Arduino IDE:
'Sketch' Menu -> 'Add .ZIP Library' -> select downloaded .zip file

Download links:
Compiling The Weather Station Code
We've bottled up much of the complexity of the weather station in the TwilioLambdaHelper (first seen in this article) and TwilioWeatherStation classes. In those classes, we manage a lot of the heartbeat functions which need to be fired off on certain timers. We also wrap up things like managing time and reading the sensors.
Both 's' and 'set' are used to perform a set command.
Report
If the message is not a 'Help' or a 'Set' message, we pass it through to the ESP8266. The logic there is simple - for any SMS or MMS it receives, it will send back the last weather report.
Try compiling - and with that, you're ready to build the hardware and flash the board!
The ESP8266 Weather Station - Hardware
This part might be a little tricky since we will all be using different boards. With the current setup, you will need to use I2C to connect the BMP Pressure sensor. If you need to move the DHT sensor, update the DHTPIN setting in the code.
| DHT11 Data Pin | ESP8266 GPIO0 |
| BMP180 SCL Pin | ESP8266 SCL Pin |
| BMP180 SCA Pin | ESP8266 SCA Pin |
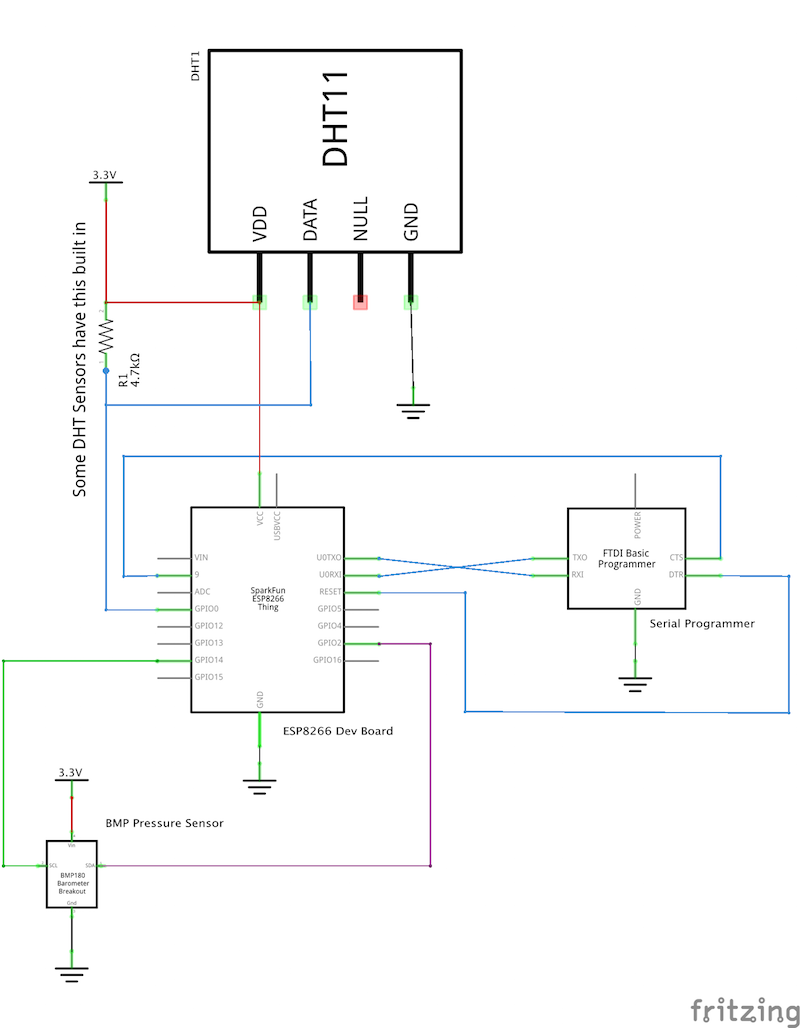
Depending on the DHT11 sensor you purchase, you will need to add a 4.7kΩ resistor between data and 3.3 volts. These resistors start with Yellow, Violet and Red in a 4-band resistor, and it is drawn on the schematic. Don't add a second one if it is already onboard.
Remember: Change the exact setup to fit the board and parts you useyou use, and change the pins in the code if you move them around. We drew up a schematic and a possible breadboard layout with Fritzing - but this is based on what we purchased!
Schematic:
Note: this schematic is for the SparkFun Thing development board. You might have to vary it for your own hardware! Boards which don't relabel the pins should have a final circuit something like our diagram.
One colleague has a NodeMCU board and was succesful with the following setup (GPIO pins are in parentheses; they are not labeled on the board):
- D1 (GPIO5): SCL
- D2 (GPIO4): SDA
- D3: DATA pin of the DHT11
One Possible Layout:
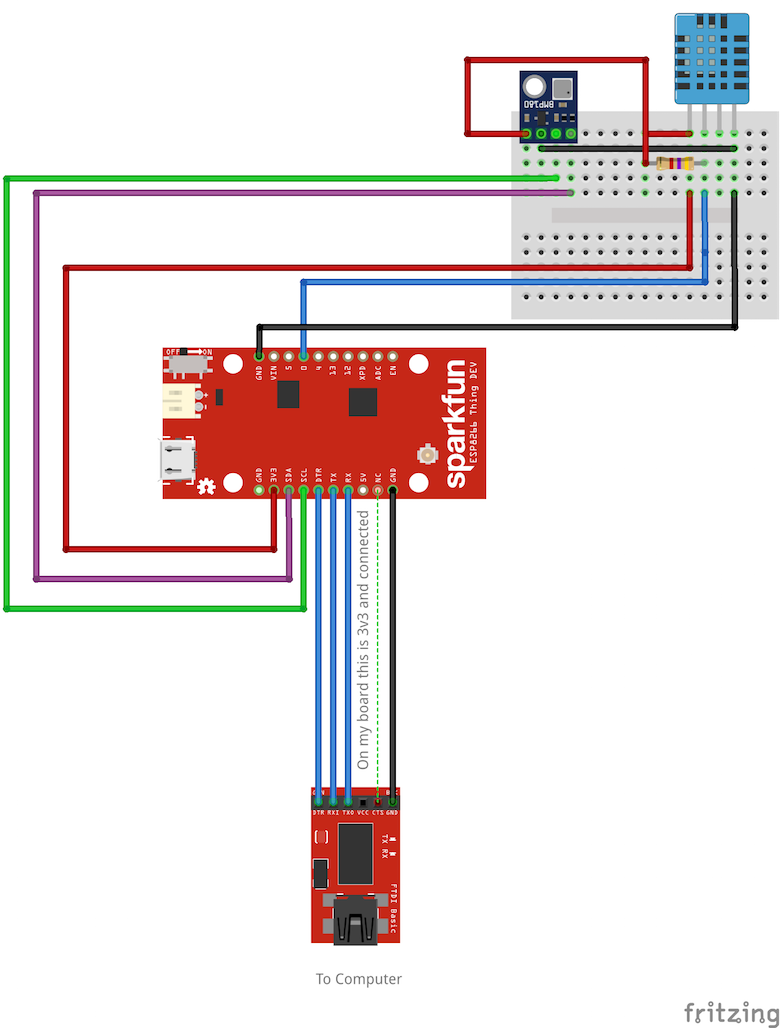
Plug it In and Upload Your Code
Triple check your connections, then plug everything in. If you don't let out any magic smoke, you're well on your way! (If you did, don't worry about it - it's a rite of passage with hardware - hopefully you've got extras.)
Use the 'Tools' menu in Arduino to select your ESP8266. We have had the most success keeping our station connected with a speed of 160 MHz. Choose the proper port and try a slower serial speed such as 115200 for uploading.
And with a compile and an upload hopefully everything just works the first time! You've now got a weather station which updates every 3 minutes with barometric pressure, humidity and temperature.
Changing Weather Station Settings
There are at least three avenues to change the settings on the station, and you should set the initial state depending on what seems easiest:
Through the Shadow State Directly
- From the IoT Console, select 'Things' then click the Weather Station, and go to 'Shadow' on the left side bar.
- Under 'Shadow Document', click the 'Edit' link.
- Modify the keys and values directly (there are six, as seen in the Lambda code).
- Upon 'save', the changes will be published to the various MQTT topics.
Through an SMS from the Master Cell Phone
- Text into the weather station 'set <param> <value>' or 's <key> <value?'.
- If authorized and making a valid request, the changes will be published to the various MQTT topics.
Publishing to the Shadow State Update Channel
- Send properly formatted JSON to the /update topic.
- If 'desired' is in the JSON object body as detailed here, the shadow state will update.
- On update, the changes will be published to the various MQTT topics.
Remote Monitoring: We've Got Weather Updates! What's Next?
This is where you come into play!
We've built this remote monitoring application together which will keep a close eye on the weather. The sky - whether blue or grey - is the limit, and the station is now yours to customize and make your own. Add voice, add MMS support with weather icons, even add video (got video working on an ESP8266? We're hiring...).
We've got a nice selection of Add-ons with some amazing partners as well. You'll really enjoy how easy the integration is - perhaps see if anything would work well for your application.
Whatever you build, we'd love to hear about it. Drop us a line on Twitter and show us what you've built!


Related Resources
Twilio Docs
From APIs to SDKs to sample apps
API reference documentation, SDKs, helper libraries, quickstarts, and tutorials for your language and platform.
Resource Center
The latest ebooks, industry reports, and webinars
Learn from customer engagement experts to improve your own communication.
Ahoy
Twilio's developer community hub
Best practices, code samples, and inspiration to build communications and digital engagement experiences.