Handle real-time data with Twilio Sync
Twilio Sync is a powerful tool that enables you to synchronize the state of your applications across platforms, with only milliseconds of delay. It's commonly used to establish chat services, power live dashboards for information like recent calls to a support agent, and integrates with Twilio Flex.
This guide will show how to combine Functions, Assets, and Sync into a web application that displays incoming text messages in real time. All without the need to run or maintain your own server 24/7.

A quick overview of the architecture and tools that will be used:
-
Assets
will host the app's static content, namely the
index.htmlfile that users will access - One Function will serve as an API endpoint for users to generate their Sync token. This will grant them access to view the messages
- A second Function will be a webhook that accepts incoming messages, and pushes their contents to a Sync List
- Sync stores the List of messages which will appear in the app, and sends message updates to the web app
To begin, follow the instructions below to create a Service and the first Function of this app.
In order to run any of the following examples, you will first need to create a Function into which you can paste the example code. You can create a Function using the Twilio Console or the Serverless Toolkit as explained below:
If you prefer a UI-driven approach, creating and deploying a Function can be done entirely using the Twilio Console and the following steps:
- Log in to the Twilio Console and navigate to the Functions tab . If you need an account, you can sign up for a free Twilio account here !
- Functions are contained within Services . Create a Service by clicking the Create Service button and providing a name such as test-function .
- Once you've been redirected to the new Service, click the Add + button and select Add Function from the dropdown.
- This will create a new Protected Function for you with the option to rename it. The name of the file will be path it is accessed from.
- Copy any one of the example code snippets from this page that you want to experiment with, and paste the code into your newly created Function. You can quickly switch examples by using the dropdown menu of the code rail.
- Click Save to save your Function's contents.
-
Click
Deploy All
to build and deploy the Function. After a short delay, your Function will be accessible from:
https://<service-name>-<random-characters>-<optional-domain-suffix>.twil.io/<function-path>
For example:test-function-3548.twil.io/hello-world.
Your Function is now ready to be invoked by HTTP requests, set as the webhook of a Twilio phone number, invoked by a Twilio Studio Run Function Widget, and more!
When a user visits the application, their browser will make a request to this Function for a Sync Access Token and the name of the Sync List the app will listen to. Name your first new Function access, and paste in the contents of the code sample below.
This code generates a Sync Token using secured Environment Variables, and returns a stringified version of the token along with the name of the Sync List used by the application.
_30const AccessToken = Twilio.jwt.AccessToken;_30const SyncGrant = AccessToken.SyncGrant;_30_30exports.handler = (context, event, callback) => {_30 // Create a Sync Grant for a particular Sync service, or use the default one_30 const syncGrant = new SyncGrant({_30 serviceSid: context.TWILIO_SYNC_SERVICE_SID || 'default',_30 });_30_30 // Create an access token which we will sign and return to the client,_30 // containing the grant we just created_30 // Use environment variables via `context` to keep your credentials secure_30 const token = new AccessToken(_30 context.ACCOUNT_SID,_30 context.TWILIO_API_KEY,_30 context.TWILIO_API_SECRET,_30 { identity: 'example' }_30 );_30_30 token.addGrant(syncGrant);_30_30 // Return two pieces of information: the name of the sync list so it can_30 // be referenced by the client, and the JWT form of the access token_30 const response = {_30 syncListName: context.SYNC_LIST_NAME || 'serverless-sync-demo',_30 token: token.toJwt(),_30 };_30_30 return callback(null, response);_30};
Info
The examples in this app leverage Environment Variables to share common strings, such as the Service SID and Sync List name, but the samples will work if you don't define your own.
However, you must define, at a minimum, an API Key and API Secret. Your Account SID should already be in your Environmental Variables by default, regardless of whether you're building in the Console or with the Serverless Toolkit.
The next important feature of this application is being able to push the contents of incoming texts to the Sync List, so they can render in real-time in the browser. To do this, create a new Function, and name it handle-sms. Type or copy the contents of the following code sample into the handle-sms Function, and save.
This Function works by leveraging the built-in Runtime.getSync method to bootstrap a Sync Client for you. It then verifies that the Sync List is available, appends the body of the incoming message (event.Body) to the list, and returns an SMS to the sender acknowledging receipt of their text.
_44exports.handler = async (context, event, callback) => {_44 // Make sure the necessary Sync names are defined._44 const syncServiceSid = context.TWILIO_SYNC_SERVICE_SID || 'default';_44 const syncListName = context.SYNC_LIST_NAME || 'serverless-sync-demo';_44 // You can quickly access a Twilio Sync client via Runtime.getSync()_44 const syncClient = Runtime.getSync({ serviceName: syncServiceSid });_44 const twiml = new Twilio.twiml.MessagingResponse();_44_44 // Destructure the incoming text message and rename it to `message`_44 const { Body: message } = event;_44_44 try {_44 // Ensure that the Sync List exists before we try to add a new message to it_44 await getOrCreateResource(syncClient.lists, syncListName);_44 // Append the incoming message to the list_44 await syncClient.lists(syncListName).syncListItems.create({_44 data: {_44 message,_44 },_44 });_44 // Send a response back to the user to let them know the message was received_44 twiml.message('SMS received and added to the list! 🚀');_44 return callback(null, twiml);_44 } catch (error) {_44 // Persist the error to your logs so you can debug_44 console.error(error);_44 // Send a response back to the user to let them know something went wrong_44 twiml.message('Something went wrong with adding your message 😔');_44 return callback(null, twiml);_44 }_44};_44_44// Helper method to simplify getting a Sync resource (Document, List, or Map)_44// that handles the case where it may not exist yet._44const getOrCreateResource = async (resource, name, options = {}) => {_44 try {_44 // Does this resource (Sync Document, List, or Map) exist already? Return it_44 return await resource(name).fetch();_44 } catch (err) {_44 // It doesn't exist, create a new one with the given name and return it_44 options.uniqueName = name;_44 return resource.create(options);_44 }_44};
With the necessary Functions in place, it's time to create the front-end of this web application.
If you're following this example in the Twilio Console:
-
Create a file named
index.htmlon your computer. -
Copy the following HTML example code into the new
index.htmlfile, and save the file. -
Upload
index.htmlas a public Asset. You can do so by clicking Add+ , selecting Upload File and findingindex.htmlin the upload prompt, setting the visibility as Public , and then finally clicking Upload .
_73<!DOCTYPE html>_73<html lang="en">_73 <head>_73 <meta charset="UTF-8" />_73 <meta name="viewport" content="width=device-width, initial-scale=1.0" />_73 <meta http-equiv="X-UA-Compatible" content="ie=edge" />_73 <title>Runtime + Sync = 🚀!</title>_73 </head>_73 <body>_73 <main>_73 <h1>Ahoy there!</h1>_73 <p>This is an example of a simple web app hosted by Twilio Runtime.</p>_73 <p>_73 It fetches a Sync access token from a serverless Twilio Function,_73 renders any existing messages from a Sync List, and displays incoming_73 messages as you text them to your Twilio phone number._73 </p>_73 <h2>Messages:</h2>_73 <div id="loading-message">Loading Messages...</div>_73 <ul id="messages-list" />_73 </main>_73 <footer>_73 <p>_73 Made with 💖 by your friends at_73 <a href="https://www.twilio.com">Twilio</a>_73 </p>_73 </footer>_73 </body>_73 <script_73 type="text/javascript"_73 src="//media.twiliocdn.com/sdk/js/sync/v3.0/twilio-sync.min.js"_73 ></script>_73 <script>_73 window.addEventListener('load', async () => {_73 const messagesList = document.getElementById('messages-list');_73 const loadingMessage = document.getElementById('loading-message');_73_73 try {_73 // Get the Sync access token and list name from the serverless function_73 const { syncListName, token } = await fetch('/access').then((res) =>_73 res.json()_73 );_73 const syncClient = new Twilio.Sync.Client(token);_73 // Fetch a reference to the messages Sync List_73 const syncList = await syncClient.list(syncListName);_73 // Get the most recent messages (if any) in the List_73 const existingMessageItems = await syncList.getItems({ order: 'desc' });_73 // Hide the loading message_73 loadingMessage.style.display = 'none';_73 // Render any existing messages to the page, remember to reverse the order_73 // since they're fetched in descending order in this case_73 messagesList.innerHTML = existingMessageItems.items_73 .reverse()_73 .map((item) => `<li>${item.data.message}</li>`)_73 .join('');_73 // Add an event listener to the List so that incoming messages can_73 // be displayed in real-time_73 syncList.on('itemAdded', ({ item }) => {_73 console.log('Item added:', item);_73 // Add the new message to the list by adding a new <li> element_73 // containing the incoming message's text_73 const newListItem = document.createElement('li');_73 messagesList.appendChild(newListItem).innerText = item.data.message;_73 });_73 } catch (error) {_73 console.error(error);_73 loadingMessage.innerText = 'Unable to load messages 😭';_73 loadingMessage.style.color = 'red';_73 loadingMessage.style.fontWeight = 'bold';_73 }_73 });_73 </script>_73</html>
The magic here is primarily concentrated in the ul element and accompanying JavaScript. Once the window finishes loading, the script requests the Sync List name and Access Token from the access Function. Once the script has that token, it uses that token with the twilio-sync library to create a local Sync Client. With that Sync Client, the script then gets the latest messages, injects them into the ul as more list items, and sets up an event handler that appends new messages as soon as they come in.
Now is a good time to save and deploy this Service. Save all file changes, and click Deploy All if you're working from the Twilio Console, or run twilio serverless:deploy from your project's CLI if you're following along with the Serverless Toolkit.
Once you have deployed your code, you could visit the web page, but, sadly, there will be no messages to show yet. We'll address that issue in the next section.
To complete this app, you will need to connect the handle-sms Function to one of your Twilio Phone Numbers as a webhook. Follow the directions below, and configure handle-sms as the webhook for incoming messages to your Twilio Phone Number of choice.
In order for your Function to react to incoming SMS and/or voice calls, it must be set as a webhook for your Twilio number. There are a variety of methods to set a Function as a webhook, as detailed below:
You can use the Twilio Console UI as a straightforward way of connecting your Function as a webhook:
- Log in to the Twilio Console's Phone Numbers page .
- Click on the phone number you'd like to have connected to your Function.
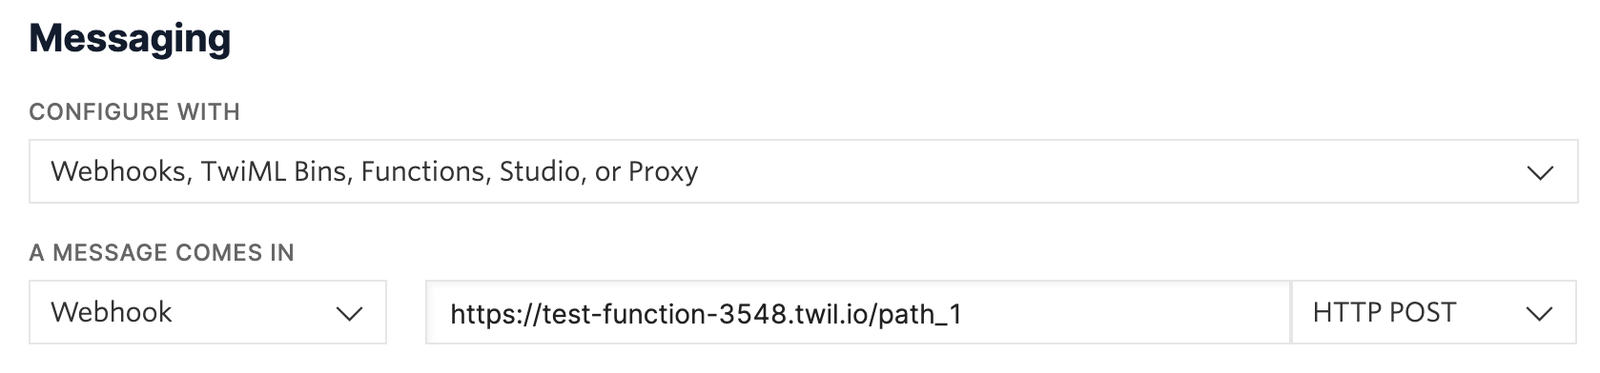
- If you want the Function to respond to incoming SMS, find the A Message Comes In option under Messaging . If you want the Function to respond to Voice, find the A Call Comes In option under Voice & Fax .
- Select Function from the A Message Comes In or A Call Comes In dropdown.
-
Select the
Service
that you are using, then the
Environment
(this will default to
uiunless you have created custom domains ), and finally Function Path of your Function from the respective dropdown menus.
-
Alternatively, you could select
Webhook
instead of Function, and directly paste in the full URL of the Function.
- Click the Save button.
All the pieces are now in place, so now is a great time to test out this application! Open up your app's web page by visiting its URL. This will be your service name, followed by index.html, for example:
_10https://sync-6475.twil.io/index.html
It should display no messages initially. However, if you send any text messages, they should pop into the messages list almost immediately. If you refresh the page, any previous messages should pop into view first, and new messages will continue adding to the end of the initial list.
This app is functional, but its appearance is a little bare bone. It also doesn't handle the inevitable occurrence when the current user's Sync Token will expire after some time. To make this app look cleaner and more resilient to token expiration, add the following, highlighted updates to index.html.
Includes some styling and token refresh logic
_115<!DOCTYPE html>_115<html lang="en">_115 <head>_115 <meta charset="UTF-8" />_115 <meta name="viewport" content="width=device-width, initial-scale=1.0" />_115 <meta http-equiv="X-UA-Compatible" content="ie=edge" />_115 <title>Runtime + Sync = 🚀!</title>_115 <style>_115 body {_115 font-family: -apple-system, system-ui, BlinkMacSystemFont, 'Segoe UI',_115 Roboto, 'Helvetica Neue', Arial, sans-serif;_115 color: #0d122b;_115 border-top: 5px solid #f22f46;_115 }_115 main {_115 max-width: 800px;_115 margin: 0 auto;_115 }_115 a {_115 color: #008cff;_115 }_115 footer {_115 margin: 0 auto;_115 max-width: 800px;_115 text-align: center;_115 }_115 footer p {_115 border-top: 1px solid rgba(148, 151, 155, 0.2);_115 padding-top: 2em;_115 margin: 0 2em;_115 }_115 </style>_115 </head>_115 <body>_115 <main>_115 <h1>Ahoy there!</h1>_115 <p>This is an example of a simple web app hosted by Twilio Runtime.</p>_115 <p>_115 It fetches a Sync access token from a serverless Twilio Function,_115 renders any existing messages from a Sync List, and displays incoming_115 messages as you text them to your Twilio phone number._115 </p>_115 <h2>Messages:</h2>_115 <div id="loading-message">Loading Messages...</div>_115 <ul id="messages-list" />_115 </main>_115 <footer>_115 <p>_115 Made with 💖 by your friends at_115 <a href="https://www.twilio.com">Twilio</a>_115 </p>_115 </footer>_115 </body>_115 <script_115 type="text/javascript"_115 src="//media.twiliocdn.com/sdk/js/sync/v3.0/twilio-sync.min.js"_115 ></script>_115 <script>_115 window.addEventListener('load', async () => {_115 const messagesList = document.getElementById('messages-list');_115 const loadingMessage = document.getElementById('loading-message');_115_115 try {_115 // Get the Sync access token and list name from the serverless function_115 const { syncListName, token } = await fetch('/access').then((res) =>_115 res.json()_115 );_115 const syncClient = new Twilio.Sync.Client(token);_115 // Fetch a reference to the messages Sync List_115 const syncList = await syncClient.list(syncListName);_115 // Get the most recent messages (if any) in the List_115 const existingMessageItems = await syncList.getItems({ order: 'desc' });_115 // Hide the loading message_115 loadingMessage.style.display = 'none';_115 // Render any existing messages to the page, remember to reverse the order_115 // since they're fetched in descending order in this case_115 messagesList.innerHTML = existingMessageItems.items_115 .reverse()_115 .map((item) => `<li>${item.data.message}</li>`)_115 .join('');_115 // Add an event listener to the List so that incoming messages can_115 // be displayed in real-time_115 syncList.on('itemAdded', ({ item }) => {_115 console.log('Item added:', item);_115 // Add the new message to the list by adding a new <li> element_115 // containing the incoming message's text_115 const newListItem = document.createElement('li');_115 messagesList.appendChild(newListItem).innerText = item.data.message;_115 });_115_115 // Make sure to refresh the access token before it expires for an uninterrupted experience! _115 syncClient.on('tokenAboutToExpire', async () => {_115 try {_115 // Refresh the access token and update the Sync client_115 const refreshAccess = await fetch('/access').then((res) =>_115 res.json()_115 );_115 syncClient.updateToken(refreshAccess.token);_115 } catch (error) {_115 console.error(error);_115 loadingMessage.innerText =_115 'Unable to refresh access to messages 😭, try reloading your page!';_115 loadingMessage.style.color = 'red';_115 loadingMessage.style.fontWeight = 'bold';_115 }_115 });_115 } catch (error) {_115 console.error(error);_115 loadingMessage.innerText = 'Unable to load messages 😭';_115 loadingMessage.style.color = 'red';_115 loadingMessage.style.fontWeight = 'bold';_115 }_115 });_115 </script>_115</html>
Info
If you want the ability for users to visit the app at the root URL instead of needing to specify /index.html at the end, such as just https://sync-6475.twil.io/, host index.html as a Root Asset and re-deploy!