Skip to contentSkip to navigationSkip to topbar
Rate this page:
On this page

Twilio Connect PHP Quickstart


Overview

overview page anchor

Twilio Connect is an easy way for developers to obtain authorization to make calls, send text messages, purchase phone numbers, read access logs and perform other API functions on behalf of another Twilio account holder.

As an example, imagine you want to access the Twilio account of a user of your web application to provide in-depth analytics of their Twilio account activity. In this quickstart we'll solve this problem by creating your first Twilio Connect App, placing the "Connect" button on your website so users can authorize your app to access their Twilio account data and make API requests against their account.


Creating Your First Twilio Connect App

creating-your-first-twilio-connect-app page anchor

Let's jump right in and create our first Connect app. Log in to your Twilio account dashboard, select "Apps" and click the "Create Connect App" button. Fill in the top section with the name of your application and your company information.

Next, assign an Authorize URL to your Connect application. The Authorize URL is the URL that Twilio will redirect the user's browser to after they have authorized your application to access their Twilio account. Later on in the quickstart we'll demonstrate how the Authorize URL is used.

Lastly, select the access rights your Connect app requires on the user's account. For this example, we'll only be accessing call logs for analytics so we'll choose "Read all account data".

Here's what our sample Connect application looks like:

Rossum Twilio Connect App.

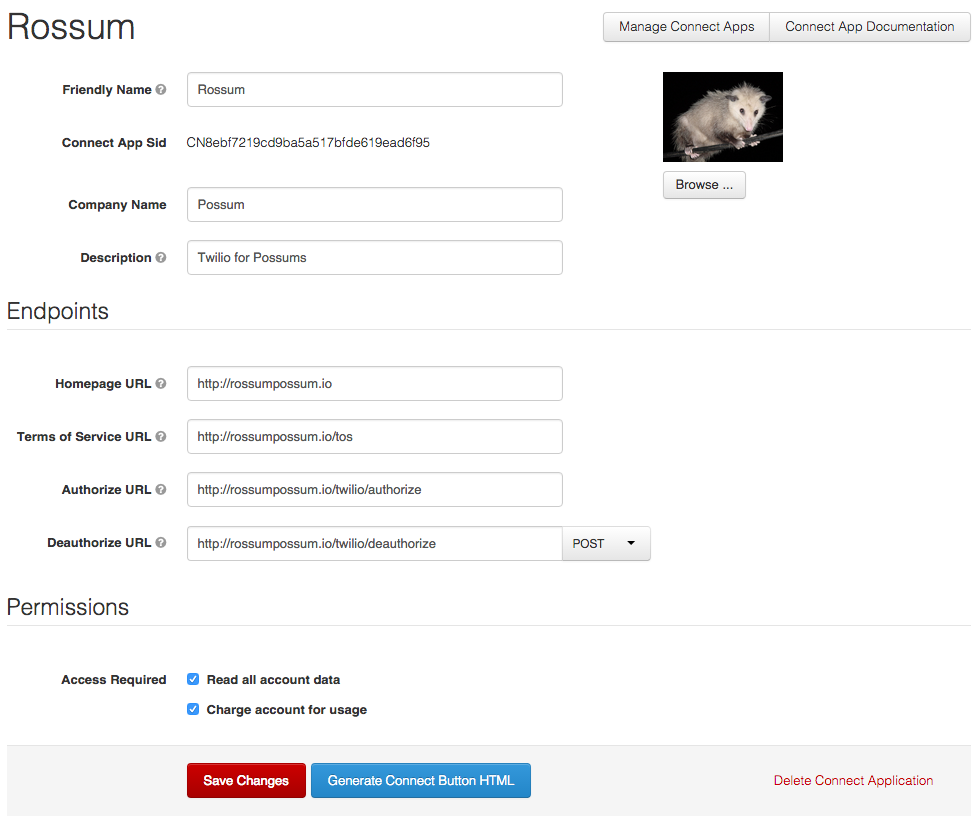
Click 'Save Changes' and you're done!


Placing the Connect Button on Your Website

placing-the-connect-button-on-your-website page anchor
Twilio Connect.

The Connect button is where your customers will start the process of authorizing your Connect App to access their Twilio account. We've made it easy to create the code needed to place this button on your website with the Twilio Connect button HTML generator.

After saving your application you will see a bit of HTML code in a popup. Copy the generated code and paste it into the HTML of your website where you would like the button to appear. If you ever need to generate this HTML again, you can scroll to the bottom of your Connect App's details page and click "Generate Connect Button HTML".


Testing the Authorization Workflow

testing-the-authorization-workflow page anchor

With the Twilio Connect button now on your website, browse to the page where you placed the HTML and click the Connect button. Verify that the information displayed on the authorization screen is correct.

After completing the app authorization process, you are redirected to the Authorize URL you specified when creating your Connect App. Appended to that URL is an AccountSid URL parameter with a value that looks like this:


_10
http://www.example.com/twilio/authorize?AccountSid=AC12345
_10
Your Connect App's Authorize URL Customer's SID

Your application should extract the Account SID value from the URL and associate it with the user's account within your application. After extracting the Account SID, we recommend that you redirect the user to another page within your app so the Account SID isn't hanging around. For example, in PHP this is the code required to access the Account SID value and redirect to a new location:

quickstart/connect/authorize-callback.php

quickstartconnectauthorize-callbackphp page anchor

_10
<?php
_10
_10
$accountSid = $_GET['AccountSid'];
_10
// store $accountSid value in database
_10
// associated with a user in your application
_10
// redirect back to my app when done
_10
header("Location: http://www.example.com/myapp");


Making an Authorized Request

making-an-authorized-request page anchor

With the user's Account SID in hand, you can now request data from their account via the Twilio REST API. A request to retrieve data from a user's account is nearly identical to a request made against your own account, with one key difference. Instead of authenticating with your own Account SID, you authenticate with the Account SID retrieved during the authorization process and your account's Auth Token.

Here is a simple request to retrieve call logs from an account using the PHP helper library. Pay special attention to line 4 where the customer's Account SID is specified instead of your own:

quickstart/connect/authorized-request.php

quickstartconnectauthorized-requestphp page anchor

_15
<?php
_15
_15
require "Services/Twilio.php";
_15
_15
$sid = "ACXXXXXX"; // The customer's AccountSid
_15
$token = "YYYYYY"; // Your account's AuthToken
_15
_15
// create a new instance of the Twilio REST client
_15
$client = new Services_Twilio($sid, $token);
_15
_15
// request the call logs for the customer's account
_15
// and write them out
_15
foreach($client->account->calls as $call) {
_15
echo "Call {$call->sid}: {$call->duration} seconds\n";
_15
}


You're Done! Now What?

youre-done-now-what page anchor

Retrieving call logs on behalf of your customers is just the start of what you can accomplish with Twilio Connect. Visit the complete Connect documentation and best practices to learn more about how to integrate Connect's additional capabilities into your applications.


Rate this page: