Account Verification with Authy, Java and Servlets
(warning)
Warning
As of November 2022, Twilio no longer provides support for Authy SMS/Voice-only customers. Customers who were also using Authy TOTP or Push prior to March 1, 2023 are still supported. The Authy API is now closed to new customers and will be fully deprecated in the future.
For new development, we encourage you to use the Verify v2 API.
Existing customers will not be impacted at this time until Authy API has reached End of Life. For more information about migration, see Migrating from Authy to Verify for SMS.
Ready to implement user account verification in your application? Here's how it works at a high level:
The users begin the registration process by entering their data, including a phone number, into a signup form.
The authentication system sends a one-time password to the user's mobile phone to verify the possession of that phone number.
The user enters the one-time password into a form before completing registration.
The user opens a success page and receives an SMS indicating that their account has been created.
Building Blocks
To get this done, you'll be working with the following Twilio-powered APIs:
Authy REST API
Authy Docs
: Find quick starts, documentation, and all about the helper libraries.
Twilio REST API
Messages Resource
: We will use Twilio directly to send our user a confirmation message after they create an account.
The User Model for this use-case is pretty straightforward and JPA offers us some tools to make it even simpler. If you have already read through the 2FA tutorial this one probably looks very similar. We need to make sure that our User model contains a phone number, country code so that the user can be verified with Authy.
public User(String name, String email, String password, String countryCode, String phoneNumber, int authyId) {
_128
this.name = name;
_128
this.email = email;
_128
this.password = password;
_128
this.countryCode = countryCode;
_128
this.phoneNumber = phoneNumber;
_128
this.authyId = authyId;
_128
this.verified = false;
_128
this.date = new Date();
_128
}
_128
_128
public int getId() {
_128
return id;
_128
}
_128
_128
public void setId(int id) {
_128
this.id = id;
_128
}
_128
_128
public String getName() {
_128
return name;
_128
}
_128
_128
public void setName(String name) {
_128
this.name = name;
_128
}
_128
_128
public String getEmail() {
_128
return email;
_128
}
_128
_128
public void setEmail(String email) {
_128
this.email = email;
_128
}
_128
_128
public String getPassword() {
_128
return password;
_128
}
_128
_128
public void setPassword(String password) {
_128
this.password = password;
_128
}
_128
_128
public String getCountryCode() {
_128
return countryCode;
_128
}
_128
_128
public void setCountryCode(String countryCode) {
_128
this.countryCode = countryCode;
_128
}
_128
_128
public String getPhoneNumber() {
_128
return phoneNumber;
_128
}
_128
_128
public void setPhoneNumber(String phoneNumber) {
_128
this.phoneNumber = phoneNumber;
_128
}
_128
_128
public String getFullPhoneNumber() {
_128
return countryCode + phoneNumber;
_128
}
_128
_128
public int getAuthyId() {
_128
return authyId;
_128
}
_128
_128
public void setAuthyId(int authyId) {
_128
this.authyId = authyId;
_128
}
_128
_128
public boolean isVerified() {
_128
return verified;
_128
}
_128
_128
public void setVerified(boolean verified) {
_128
this.verified = verified;
_128
}
_128
_128
public Date getDate() {
_128
return date;
_128
}
_128
_128
public void setDate(Date date) {
_128
this.date = date;
_128
}
_128
}
Next we will see how to handle the new user form.
New User Form
When we create a new user, we ask for a name, email address, and a password. In order to validate a new account we also ask the user for a mobile number with a country code. We will use Authy to send a one-time password via SMS to this phone number.
It is now the servlet's responsibility to verify that the user provides the necessary information to create a new user. If the user is created successfully, they will be logged into the system automatically.
Now the user is logged in but not verified. In the next steps we'll learn how to verify the user using Authy.
Configuring Authy
In .environment we list configuration parameters for the application. These are pulled from system environment variables, which is a helpful way to access sensitive values (like API keys). This prevents us from accidentally checking them into source control. We use the System.getenv method to load the key and inject the AuthyApiClient into the RegistrationServlet class.
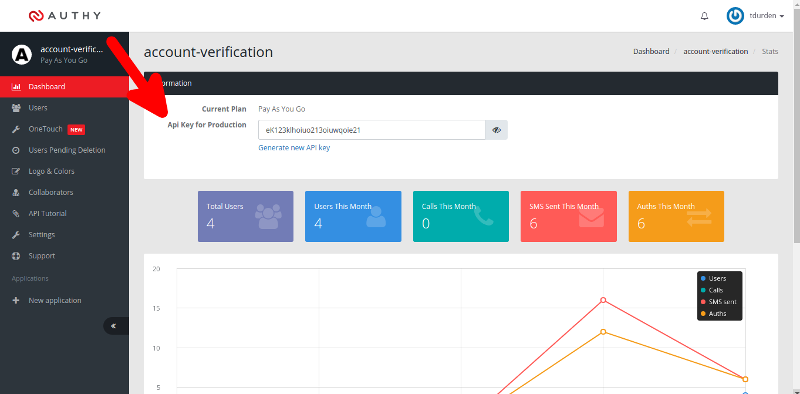
Now we need our Authy production key (sign up for Authy here). When you create an Authy application the production key is found on the dashboard.
Register your AuthyAPIClient with your Authy API key
When the code is sent we redirect to another page where the user can enter the token they received, therefore completing the verification process.
Verifying the Code
This servlet method handles the submission form. It needs to:
Get the current user.
Verify the code that was entered by the user.
If the code entered was valid, flip a boolean flag on the user model to indicate the account was verified.
Verify an Authy code
The Authy client provides us with a verify() method that allows us to pass a user id and a token. In this case we just need to check that the API request was successful and, if so, set the User's verified field to true.
RequestParametersValidator validator = new RequestParametersValidator(request);
_81
_81
return validator.validatePresence("code");
_81
}
_81
}
That's all for token verification! However, our verification form wouldn't be very usable if there wasn't a way to resend a verification code if the message didn't arrive at the end user's handset.
Re-sending the Code
Since the form for re-sending the code is very simple, we're going to skip that for this tutorial. Let's just look at the servlet.
This method loads the user associated with the request and then uses the same Authy API method we used earlier to resend the code.
Instantly collect structured data from your users with a survey conducted over a voice call or SMS text messages.
Did this help?
Thanks for checking out this tutorial! If you have any feedback to share with us, we'd love to hear it. Reach out to us on Twitter and let us know what you build!