Add a Realtime Viewer Count to your Twilio Live Stream
Time to read: 9 minutes
November 19, 2021
Written by
Reviewed by

An important aspect of running a Twilio Live streaming experience is to track your viewership. But how do you do that? There are many different ways to do it, and the best method to use will depend on your needs and your technology stack.
Are you ready to learn how to count your livestream viewers? In this article I’ll show you a few possible implementations with varying levels of complexity and flexibility.
Requirements
This article does not have any requirements beyond having some familiarity with the Twilio Live product. If you haven’t worked with Twilio Live before, I recommend that you follow an introductory tutorial first. My colleague Mia Adjei wrote a Twilio Live tutorial using Express.js, and I have also written one using the Twilio serverless platform, both of which show you how to build a complete livestreaming project step by step.
To apply what you learn in this article, you will need your own livestreaming application. If you followed one of the tutorials I recommended above, you already have a complete project that you can use to experiment with adding viewership counts. For the examples shown in this article, I’m going to modify Mia Adjei’s project.
To state the obvious, you will also need a Twilio account. If you are new to Twilio click here to create a free account now and receive $10 credit when you upgrade to a paid account. You can review the features and limitations of a free Twilio account.
Displaying viewership counts
The easiest part of this project is to display the viewer counts, as this is just an exercise in front and back end development.
Starting from Mia Adjei’s livestreaming project, a new route that returns the current viewer count can be added to the server. In server.js insert this new route:
This route returns a hardcoded 123 number that can be displayed for now. The logic that actually counts the livestream's viewers will be added later.
In the streamer application, an interval timer can be added to display this number at regular intervals. First add a variable to hold the timer at the top of public/streamer.js:
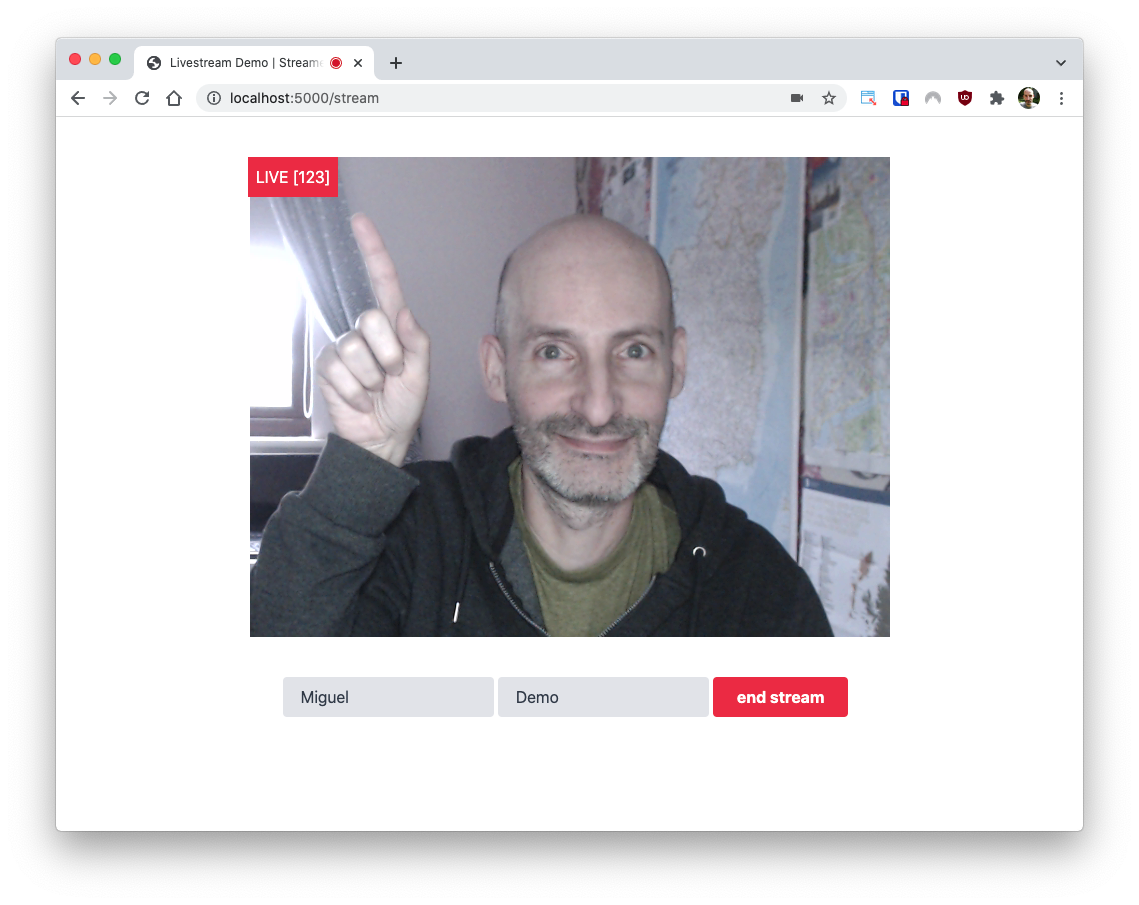
In the startStream() function, the LIVE indicator can be expanded to also show the viewer count. Right after the liveNotification element is inserted into the DOM, the interval timer function can be added to query the /audienceCount endpoint defined above and update the element’s innerText with the count every five seconds:
Finally, the interval timer needs to be stopped in the endStream() function:
The changes above can be reviewed as a git diff as a reference. You can run the livestreaming application as follows:
Then in your browser, visit http://localhost:5000 and start a new livestream. Once the livestream starts, the (currently faked) viewer count will appear in the top-left corner, together with the “LIVE” indicator:
Adding the viewer count to the audience page would work in the same way, so I’ll leave it as an exercise for you. Something important to keep in mind is that you do not want your server flooded with requests to get viewer counts from clients watching the livestream. Updating the count every five seconds is reasonable for the streamer, but for the audience I would suggest a longer interval of at least one or two minutes.
Storage options for the counter
This may seem like a trivial task, but how to store a counter in a web application does deserve some thought, in particular regarding choosing an implementation that is compatible with the concurrency model used by your back end.
Using a global variable counter
The most straightforward way to implement a counter is to use a global variable in the process space of your server. The big advantage of this method is that it is very easy to implement, but on the other hand, it limits your scalability, as this solution only works when you have a single server process.
Depending on the programming language and the concurrency model used by your application, you may also have to do some additional work to prevent race conditions if two or more request handlers try to modify the counter global variable at the same time. When this is necessary, a Mutex or Lock should be sufficient to increment and decrement the counter atomically.
Using a database counter
If a global variable isn’t an appropriate solution for your server configuration, then a database-stored counter is often used. A counter that is stored in a database makes it possible to scale the server horizontally, so this is the preferred method for larger server deployments.
What kind of database is best for maintaining a counter? My personal preference is to use Redis, which provides atomic counting primitives such as INCR and DECR.
Other options
You may be in a situation where a global variable can’t work, and you also cannot add Redis or another database. This is often the case with serverless deployment platforms such as AWS Lambda or Twilio Functions. What can you do when working with these platforms?
The solution for these restricted platforms is to use a “database as a service”. For AWS, DynamoDB is a convenient option that is often paired with Lambda. On the Twilio serverless platform, Twilio Sync is the service of choice. And if neither works, then a hosted deployment of Redis or your favorite database can work too.
An option that is specific to the Twilio serverless platform is to store the counter in an environment variable. This is possible because serverless functions have access to the Twilio client library and can create or update environment variables with it. Changes to environment variables take effect immediately and are applied to future invocations of the service, so this makes it possible to implement a rudimentary counter. This is an option that I would only recommend for low-traffic applications, or cases where having an accurate count is less important, because modifying a variable through the Twilio API is not an atomic operation, and as such it is subject to race conditions when there are concurrent requests.
Example: Adding a Redis counter
Out of all the options reviewed, Redis is my favorite, so I’m going to add a Redis counter to the Twilio Live example application and replace that hardcoded 123 count I added above.
First of all, start a Redis server on your computer. There are a few ways to do this, so find what works best for you in the documentation. If you have Docker installed, a quick way to get a Redis instance up is to use this command:
To use Redis from the JavaScript back end, the redis package needs to be added to the project:
In the imports part of server.js, add redis. Because the Redis functions in this package are callback-based, also import the promisify function from Node:
Then right below the Twilio client instantiation, create a Redis client instance, and create promise versions of the get(), set(), incr() and decr() operations that are needed in this project:
In the /start route, still in server.js, initialize the counter to 0 using the redisSet() function, right before a response is returned to the client:
Now the hardcoded 123 count in the /audienceCount route can be replaced with a get() call to Redis:
Note how thanks to the promisify wrapper the set() and get() functions from Redis can be awaited.
View the git diff page for the changes introduced in this section if you need a reference. If you run the application with these changes, the count is now going to be 0, because there is no logic to increment the counter yet. In the next section we will start counting actual clients.
Counting users when they connect
After you’ve decided how to store your counter, it is time to think about the counting strategy. Here the simplest option is to count users at the time they connect to the livestream.
Every livestream client will have to request an access token before it can connect to the stream with the Twilio Player SDK, so this is the perfect place to count user connections.
To add this counting strategy to the example application, locate the /audienceToken route in server.js, and right before a response is returned add the redisIncr() function as follows:
Review the git diff page for this change if you need to see the exact place I’ve put these lines.
To test this version of the application you will need to connect one or more livestream clients. For this you can use one or more additional browser tabs. If you prefer to connect external clients, then you can provision a temporary public URL for the application using ngrok. The “Run your application on ngrok” section of the base tutorial explains how this works.
As you open more clients, you will see the viewer count in the streamer page go up, and at the end of the stream, the value held by the counter will indicate the total number of participating clients.
This method of counting is useful in some cases, but you have to keep in mind that it provides a cumulative number of livestream connections and not a real-time count of viewers. A characteristic of this solution is that the counter only goes up and might include some duplicates. A client that connects to the stream, leaves, and laters returns, will be counted twice.
Counting users when they connect and disconnect
The most interesting way to implement the counter is to increment it when a viewer joins the stream (as done in the previous section), but also to decrement the counter when a viewer leaves. This provides a dynamic, constantly updating count of viewers.
Let’s start by implementing a new endpoint that handles a viewer that is leaving the livestream. This is currently handled entirely by the client, so a new server-side endpoint needs to be added. Add the /audienceLeave route to server.js:
The audience front end can now invoke this endpoint to help the server update the viewer count when a user goes away, but unfortunately, knowing when a user leaves requires some additional effort.
The most direct use case that needs to be handled is when the user clicks the "leave stream" button on the page. This is handled by the leaveStream() function in the file public/audience.js. The logic in this function is entirely client-side at this time, so the request to the /audienceLeave endpoint needs to be added.
To be able to await the fetch() I had to convert the leaveStream() function from sync to async. This also required adding an await when this function is called in the watchOrLeaveStream() function. In the body of leaveStream(), I have added a check for the watchingStream variable, to make sure that the /audienceLeave endpoint is not called by mistake when the user isn’t connected to the livestream.
While this solution covers some user disconnections, the reality is that most users will not bother clicking the “leave stream” button. Instead, they are going to close the browser tab or window, or worse, hit the back button to escape the livestream. What can be done to detect these cases?
The browser defines a beforeunload event on the window object that is commonly used to warn users of unsaved changes. A handler on this event can be used to ensure that the leaveStream() function is called before the user navigates away from the page, either forward or back. Add a listener for this event at the bottom of public/audience.js:
Feel free to review the git diff with the last set of changes. When you try the application after these changes, you will notice that the viewer count now goes up and down as users join and leave the stream.
For your reference, the complete project with all the changes is on my express-live-stream-with-counts repository on GitHub.
Is this a perfect solution? Unfortunately it isn't. The beforeunload event appears to work reliably in controlled tests, but according to the documentation there are browsers that do not implement it, and browsers that in certain situations may decide to not trigger the event, so I recommend that you test this solution to make sure that it works well with your application.
Next steps
If the beforeunload event cannot be used reliably to detect disconnections, what other options are there to have an accurate viewership count?
I can suggest two other possibilities, both involving a fair amount of complexity.
One option is to create a WebSocket or Socket.IO connection from each audience member to the server, at the same time the connection to the livestream is started. Having a dedicated socket instance for each viewer is very useful, because the application can listen to connection and disconnection events and update the viewer count accordingly.
As an added benefit, if you have a socket connection for each audience member, you can push any livestream metadata you’d like to your viewers at regular intervals, including the viewer count itself.
A second option is to rely on “ping” messages from clients, to know that they are still connected. This solution would work as follows:
- The audience application creates an interval timer that calls a ping endpoint in the server at a fixed interval, for example once per minute. The server increments the viewer counter each time it receives a ping.
- At the same interval, the streamer application retrieves the ping counter, and immediately resets it back to zero, so that it starts a new count. The value of the counter obtained at the end of a period is used as the current viewer count until the next period (of one minute, in this example) is complete and a new count is available.
This solution is interesting because all audience members are counted from scratch in each counting period. If you have a large audience, however, you will need to make sure that you have sufficient resources in your server infrastructure to handle the constant pings.
I’d love to hear how these or other advanced solutions work for you if you decide to implement them!
Miguel Grinberg is a Principal Software Engineer for Technical Content at Twilio. Reach out to him at mgrinberg [at] twilio [dot] com if you have a cool project you’d like to share on this blog!


Related Resources
Twilio Docs
From APIs to SDKs to sample apps
API reference documentation, SDKs, helper libraries, quickstarts, and tutorials for your language and platform.
Resource Center
The latest ebooks, industry reports, and webinars
Learn from customer engagement experts to improve your own communication.
Ahoy
Twilio's developer community hub
Best practices, code samples, and inspiration to build communications and digital engagement experiences.