Pioneer NB-IoT with Twilio’s Alfa Development Kit
Time to read: 6 minutes
December 26, 2018
Written by

**Updated** Please note that the Narrowband IoT Dev Kit described here is no longer available
NB-IoT, also known as Narrowband-IoT, is a new cellular technology that promises low cost, low power consumption, wide area coverage and long battery life. These characteristics help make “smart devices” a reality.
T-Mobile has deployed NB-IoT coverage in the United States and Twilio is the first company to provide a NB-IoT developer kit. Twilio’sAlfa Developer Kit features a development board created in collaboration with Seeed Studio. The development board can access the T-Mobile NB-IoT network using a Twilio Narrowband SIM (which comes in the kit). Once on the network, developers can exchange data between multiple NB-IoT kits using the Twilio Breakout SDK.
This post demonstrates how to connect to T-Mobile’s NB-IoT network using Twilio’s Developer Kit. Once connected, we’ll send a “hello world” message over the network using the Breakout SDK. You can also find the the completed project on GitHub under TwilioIoT.
Ready to say “hello?”. Let’s connect!
Prerequisites to Connecting to Narrowband
Before you begin, you’ll need to either create a new Twilio account or log in to an existing account. You can sign up for a new account for free.
Beyond a Twilio account, here is all of the hardware and software you’ll need to put in place to get connected.
Hardware Requirements
- Twilio Developer Kit for T-Mobile Narrowband
- Twilio Narrowband SIM
- LTE Antenna
- Micro USB cable
- Lithium battery
Software Requirements
Explore the Developer Kit
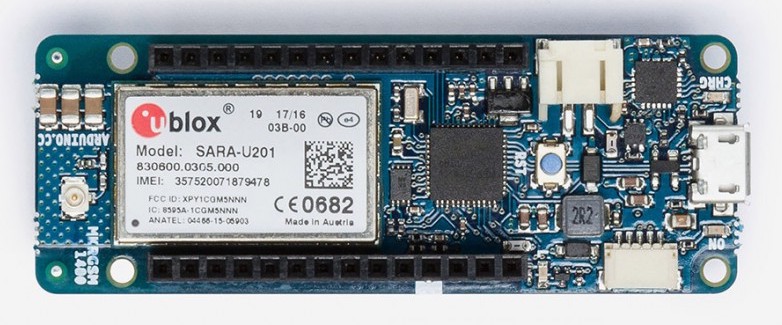
The Developer Kit ships with a development board that is specifically designed for connecting to T-Mobile’s NB-IoT network. Also included are several hardware attachments by Seeed Studio that can be used to develop a NB-IoT “smart device”.
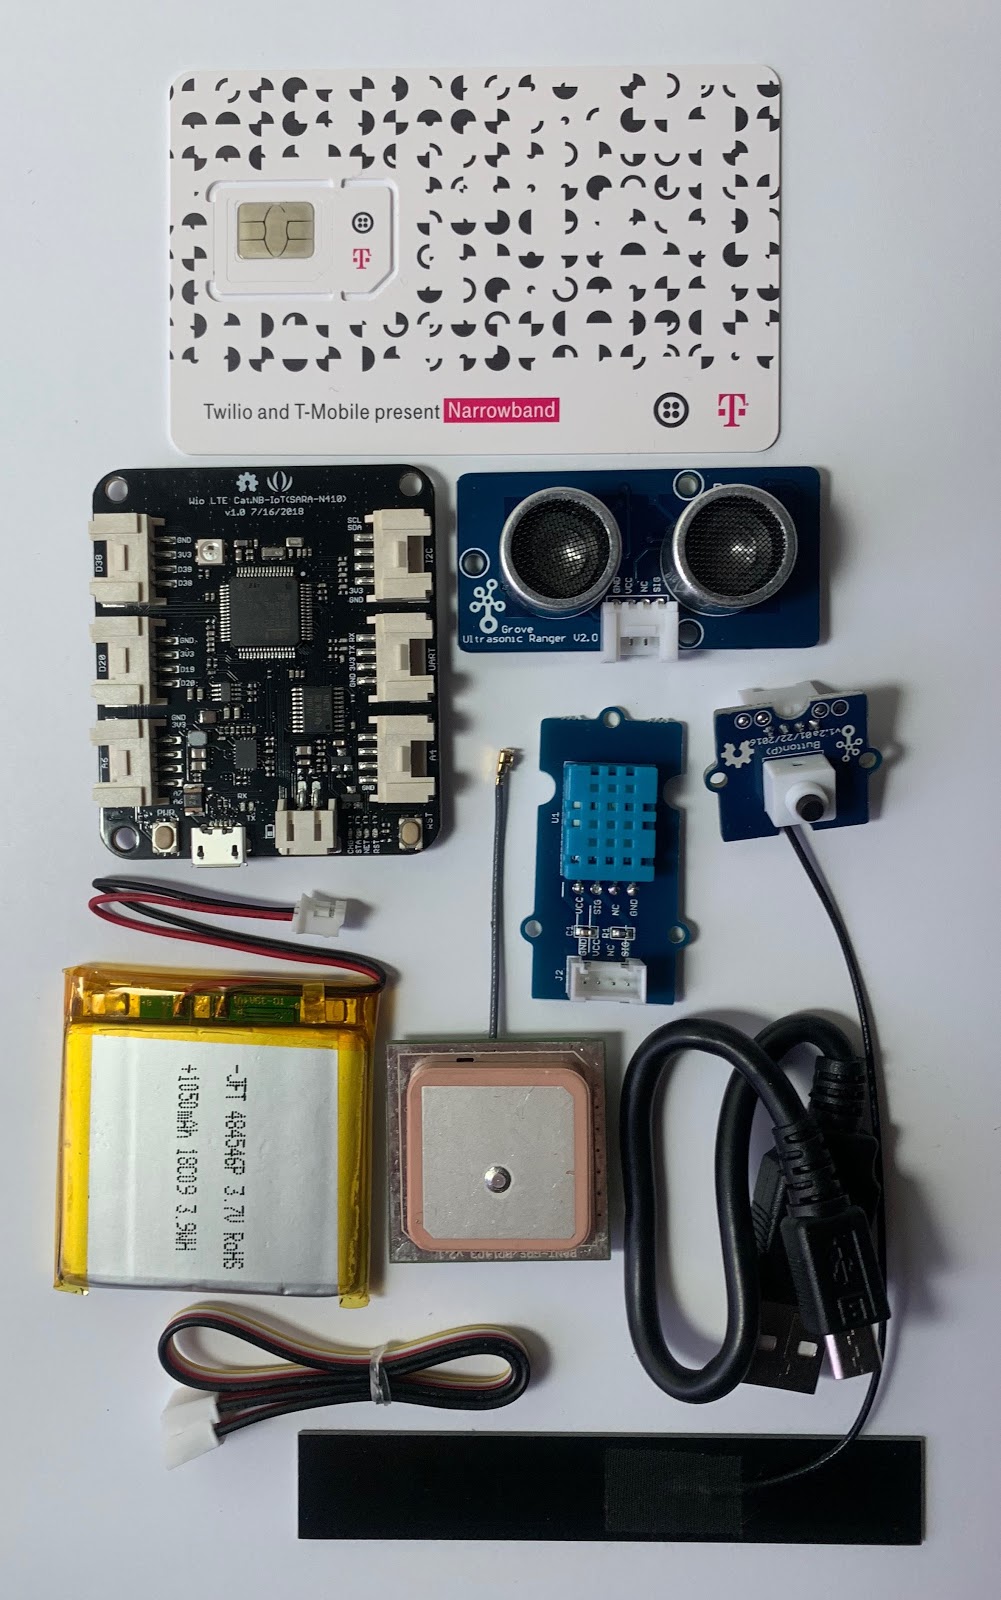
Open the Developer Kit box. The kit contains:
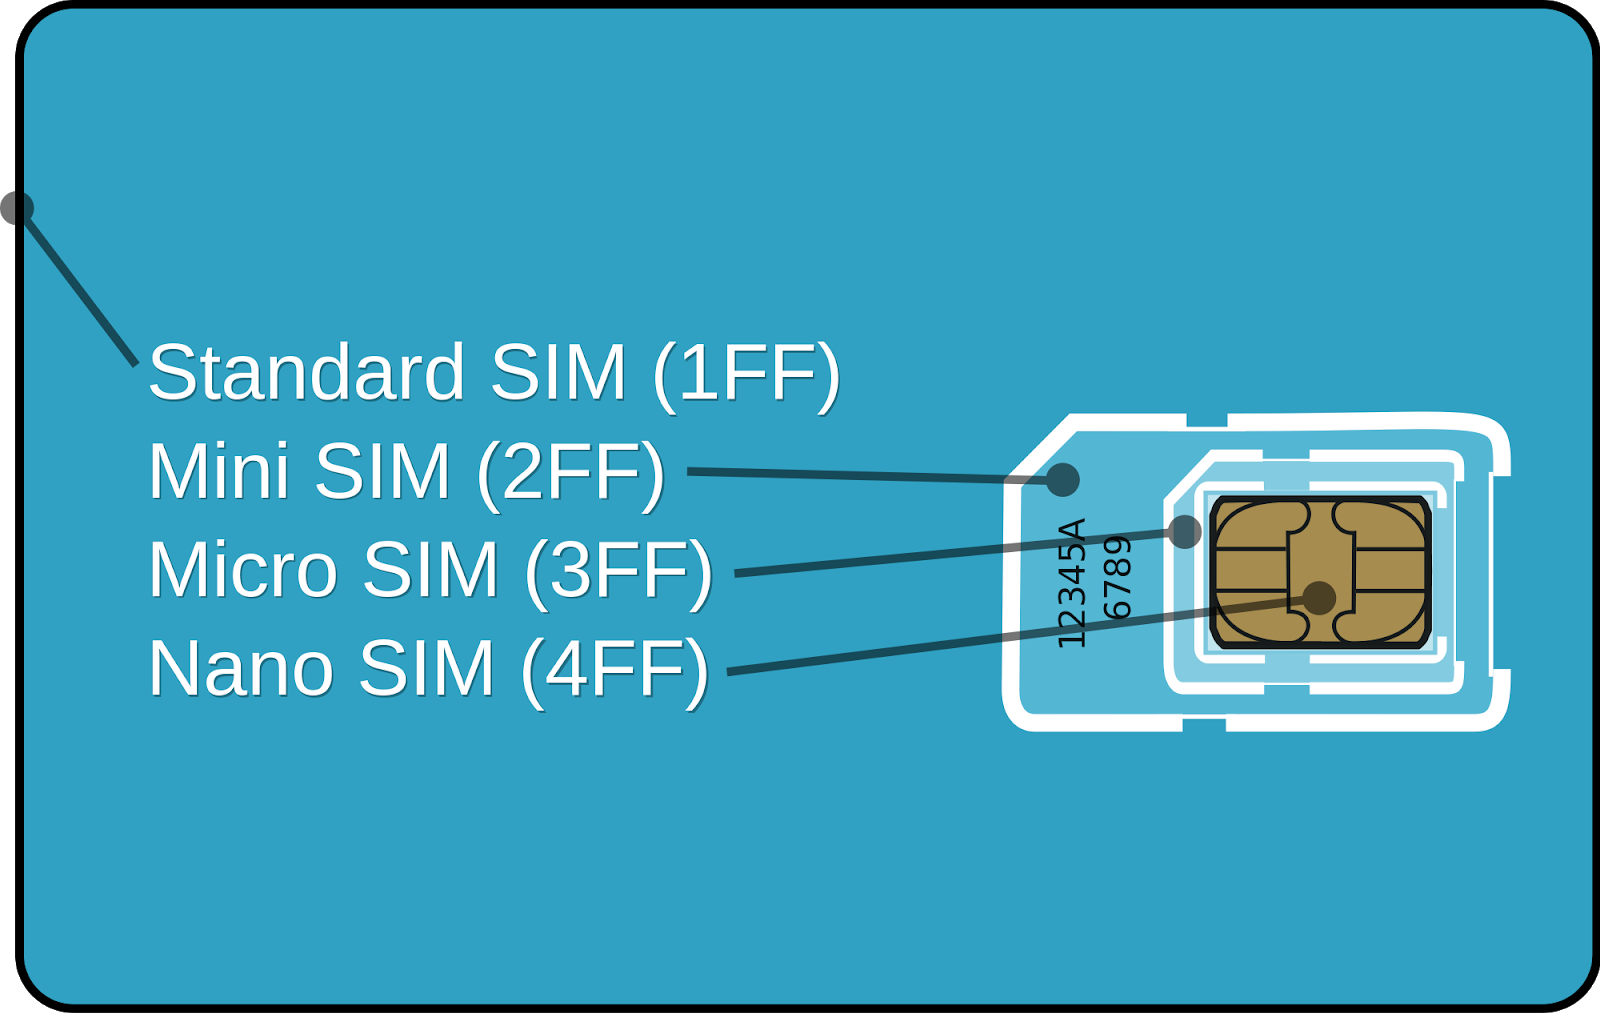
- Twilio Narrowband SIM (full size, mini, micro, and nano)
- Development board
- LTE antenna
- GPS antenna
- Set of Grove sensors
- Pushbutton
- Ultrasonic
- Temperature/Humidity
- Lithium battery
- Micro-USB cable
- Additional cabling

Remove the Twilio Narrowband SIM from the Developer Kit. Next, register and activate your Narrowband SIM in the Twilio Console. The process for the Narrowband SIM follows the same procedure as the Twilio Programmable Wireless SIM.
Connecting the pieces
Break out the Nano SIM (smallest size) from the Twilio SIM card.
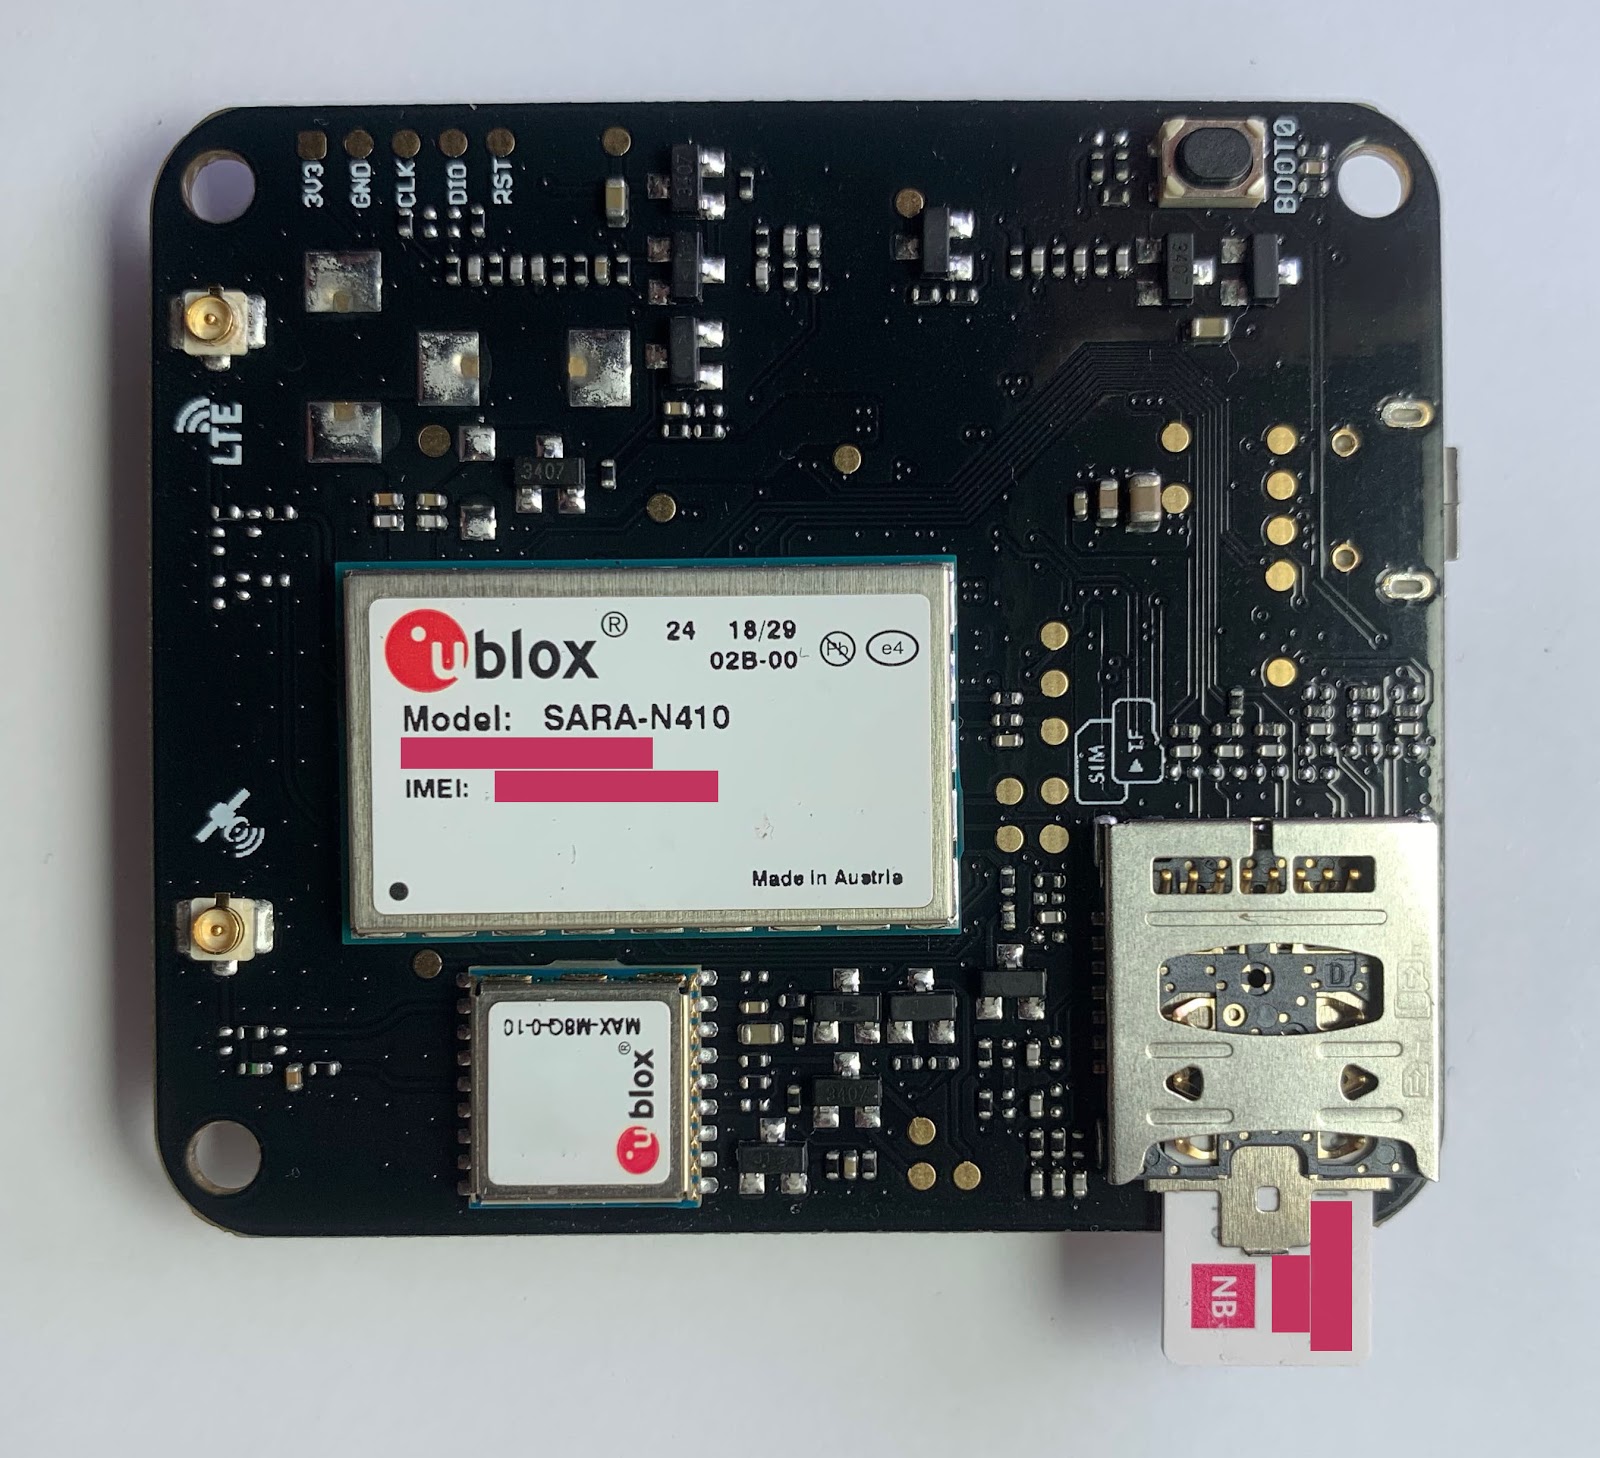
Remove the development board from the Developer Kit.
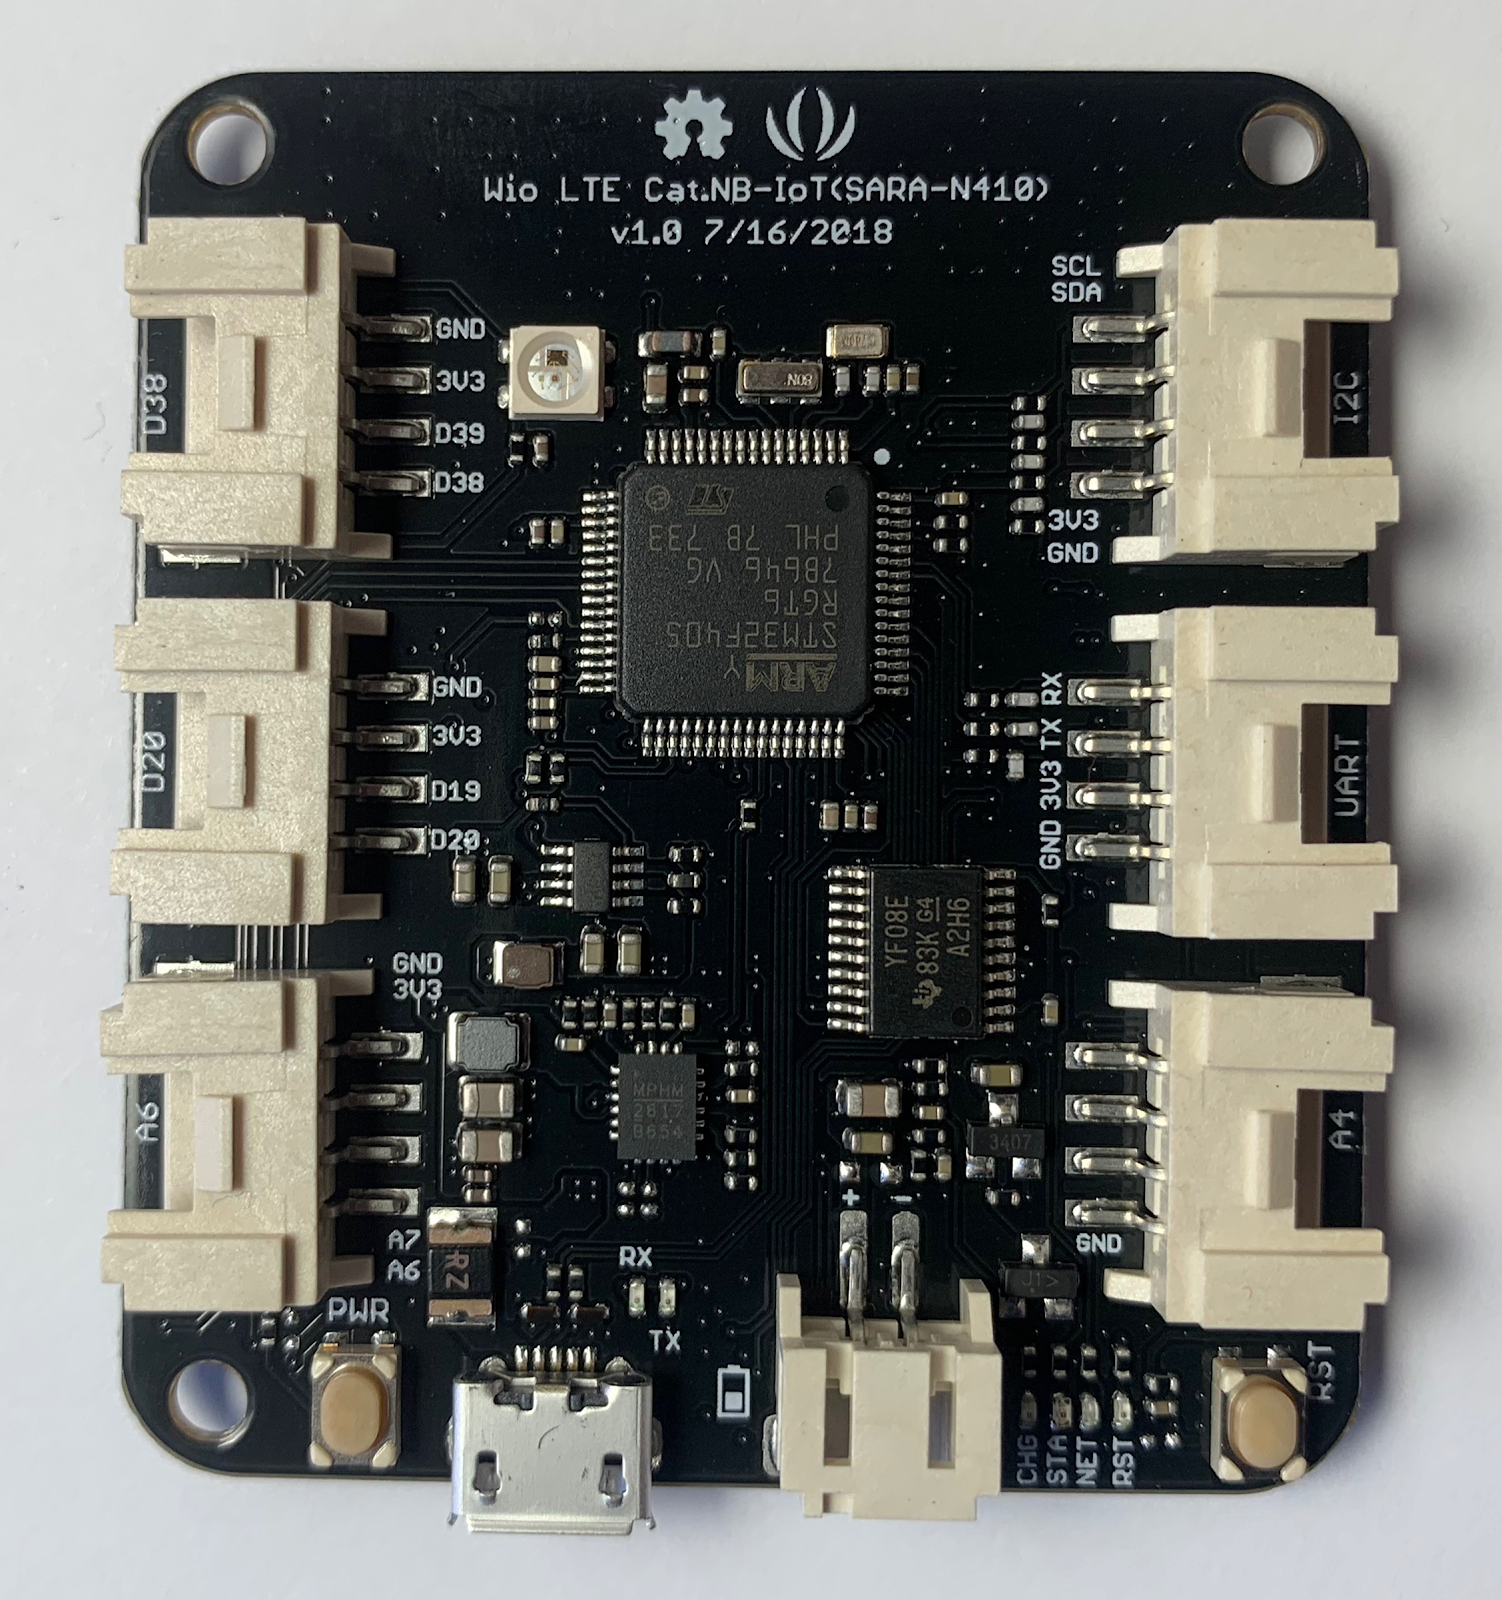
Insert the Twilio Narrowband SIM into the SIM slot underneath the board.
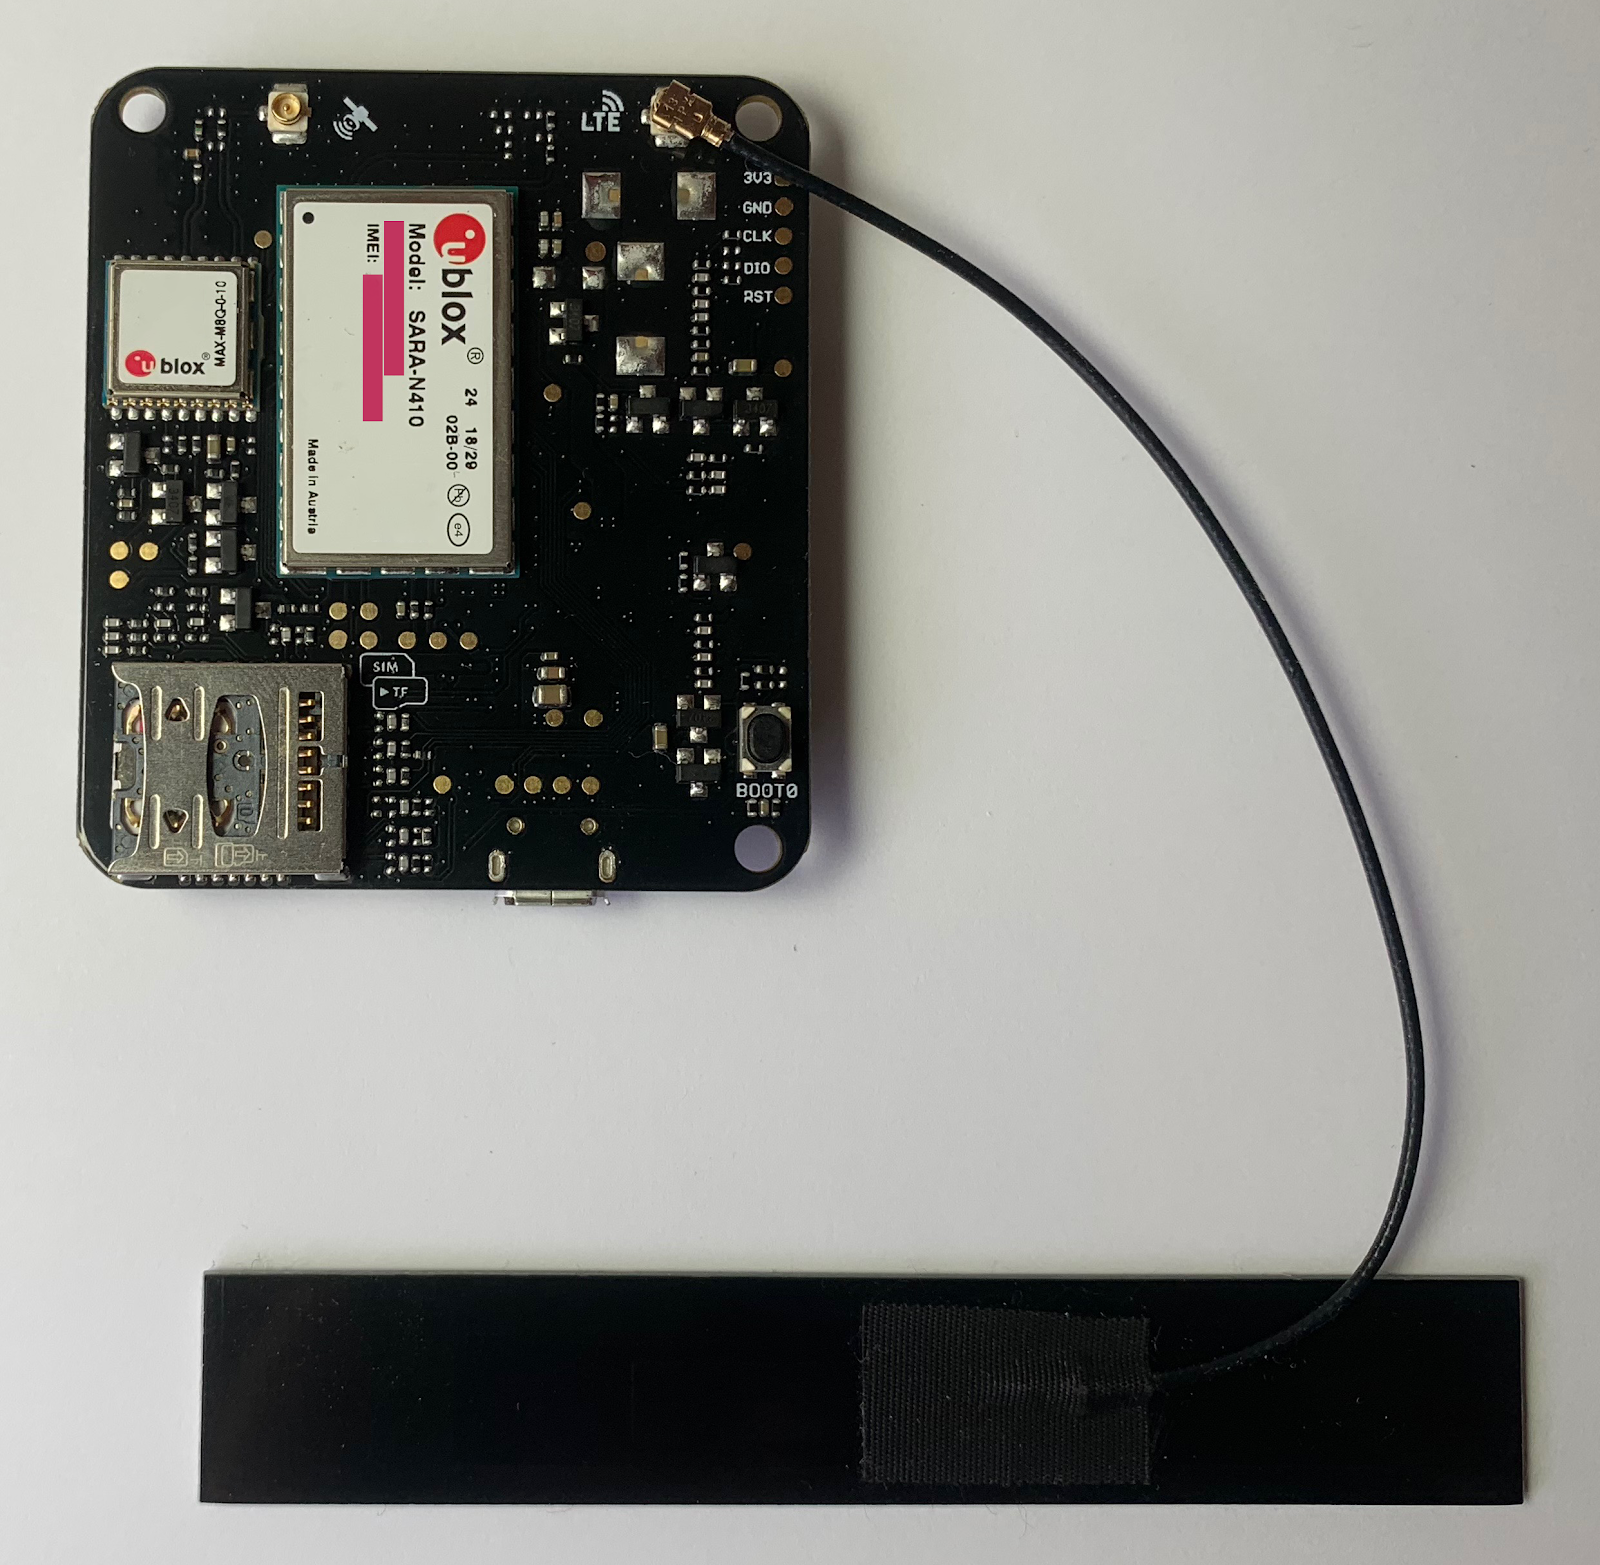
Next, attach the LTE antenna to the board.
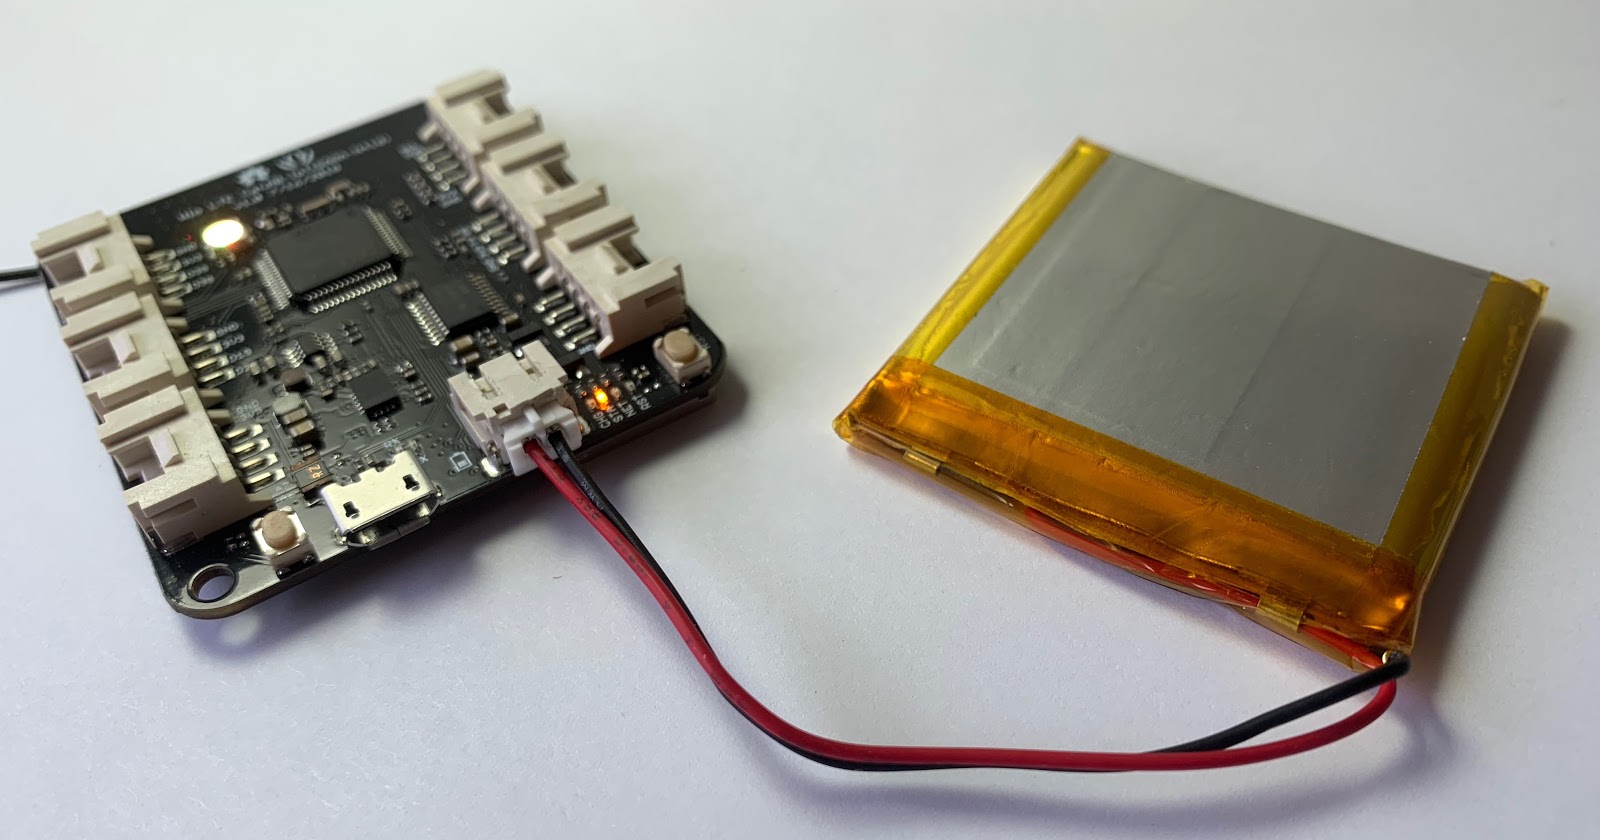
Attach the battery lithium battery. The lithium battery is recommended to be plugged in at all times since the USB power source does not provide sufficient power for the board at peak levels.
Connect the development board to the computer using the Micro-USB cable provided. You are geared up to connect to the network.
Configure the NB-IoT Kit Firmware
Before we can start programming the board we need to update the board’s firmware. To do this on a Macintosh we will need Homebrew to install dfu-util. Instructions for installing dfu-util for Windows and Linux can be found here.
If you don’t yet have it installed, open a terminal and paste the following to install Homebrew.
Once the installation is complete install the dfu-util package. This package is used to download and upload firmware to and from USB connected devices. dfu-util 0.9 or greater is preferred if available.
For Windows users there is a different set of USB Drivers that are needed.
Set up the software environment
The development board uses the Arduino IDE to program the microcontroller. Twilio has developed a NB-IoT specific software development kit called Breakout. This SDK makes it possible for devices to send M2M Commands over the T-Mobile NB-IoT network. The Breakout SDK can be found on GitHub.
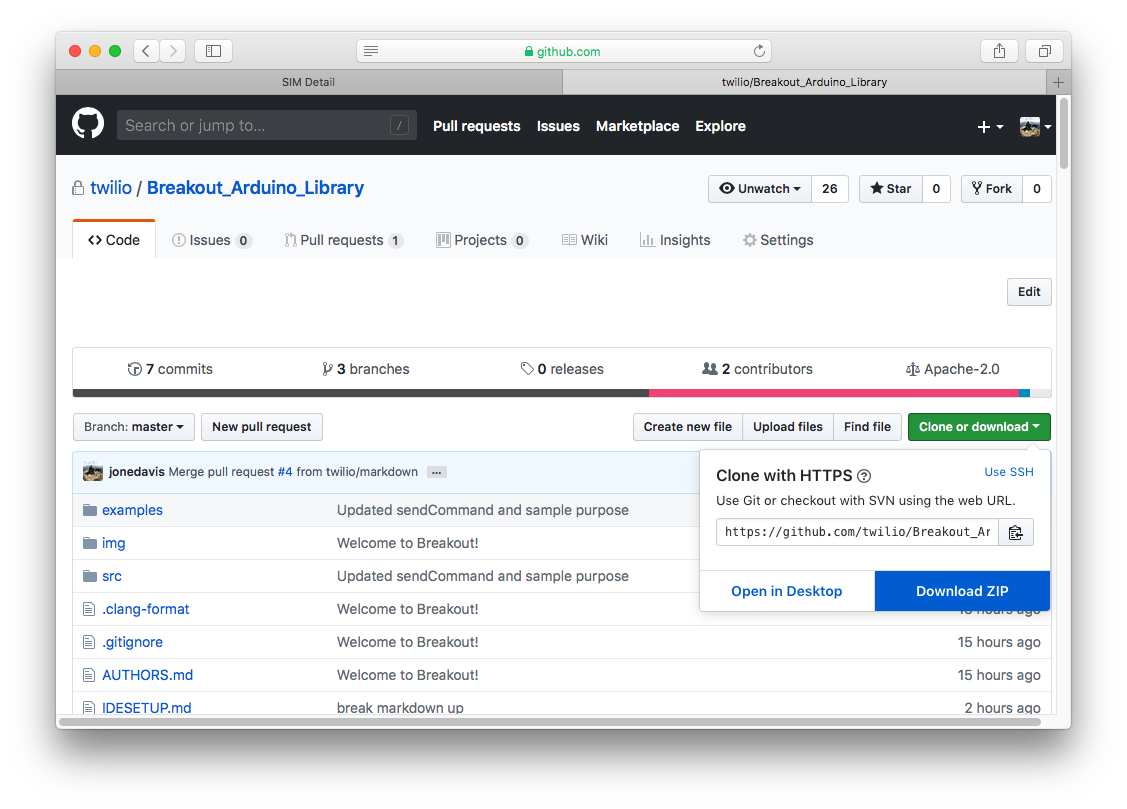
Download the Breakout_Arduino_Library.zip from GitHub. Open the Arduino IDE and add the .zip to the Arduino IDE Library.
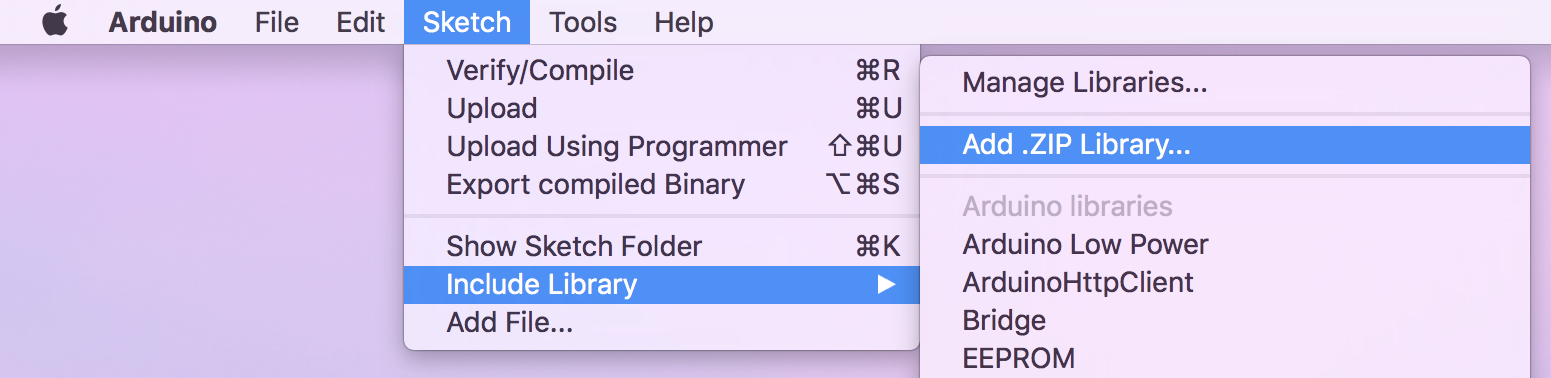
Go to Sketch > Include Library > Add .ZIP library and select the Breakout_Arduino_Library.zip.
After the .zip file has been installed we need to install a set of board cores. The development board is based on the STM32F4 chipset. To develop on the board we need to download the STM32F4 cores in the Arduino IDE.
Go to Arduino > Preferences. Copy the following URL into the Additional Boards Manager URLs field:
https://raw.githubusercontent.com/Seeed-Studio/Seeed_Platform/master/package_seeeduino_boards_index.json
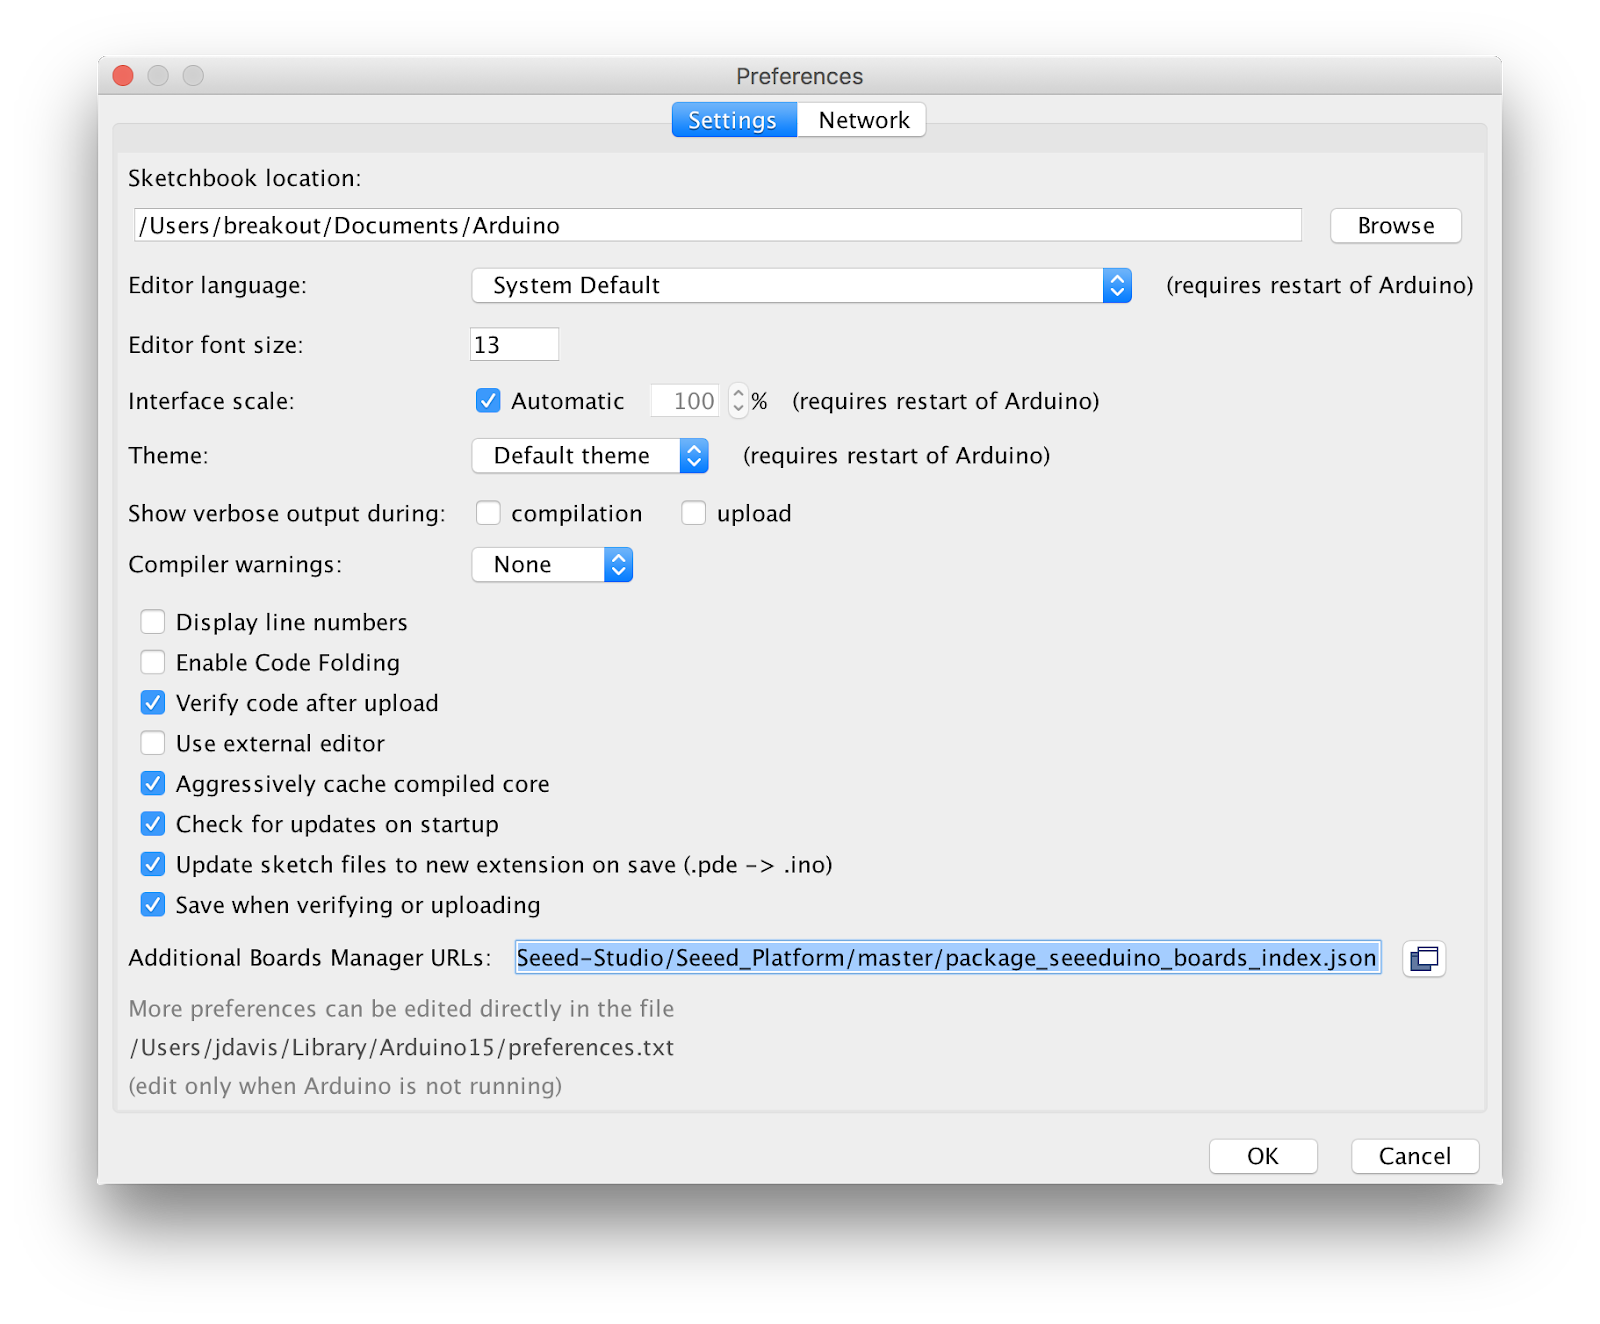
Click OK.
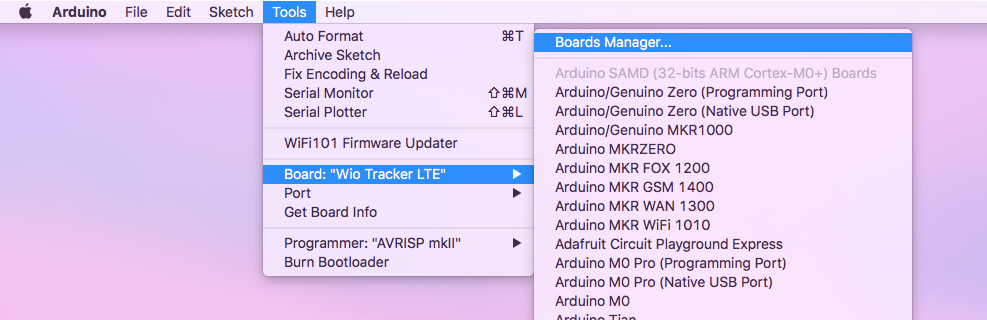
The STM32F4 boards will now be available in the Arduino IDE Boards Manager. Next open the Boards Manager to install the STM32F4 board cores.
In the Boards Manager search for “Seeed”. Find and select the “Seeed STM32F4 Boards” version “1.2.3+” and click install.
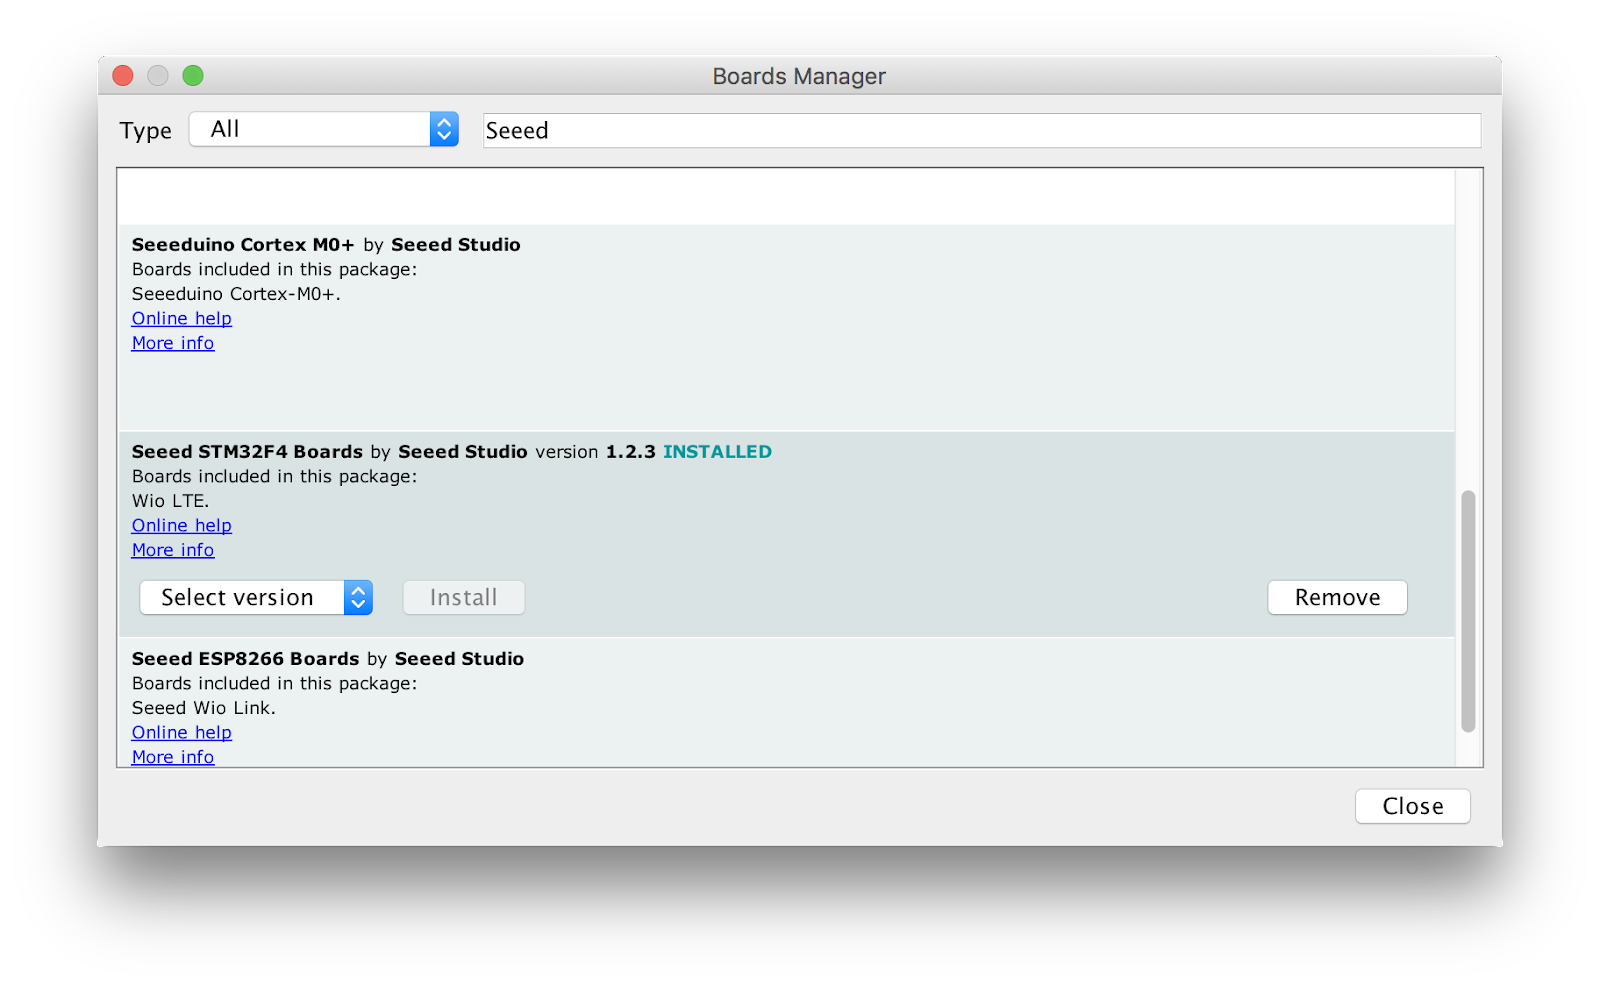
Restart the Arduino IDE.
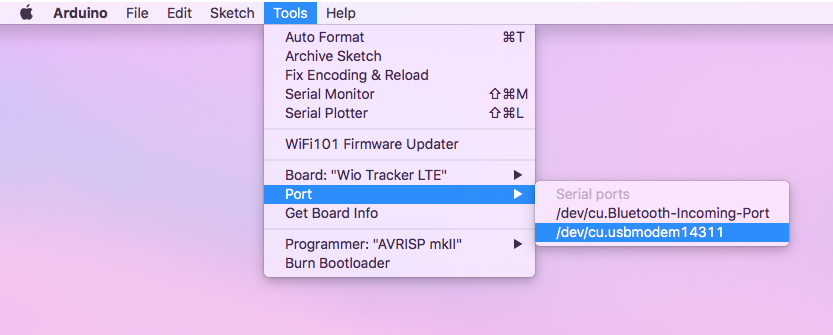
With the STM32F4 cores installed the development board is now ready to be programmed. Next select the board and the board port.
- Click Tools > Boards > Wio Tracker LTE
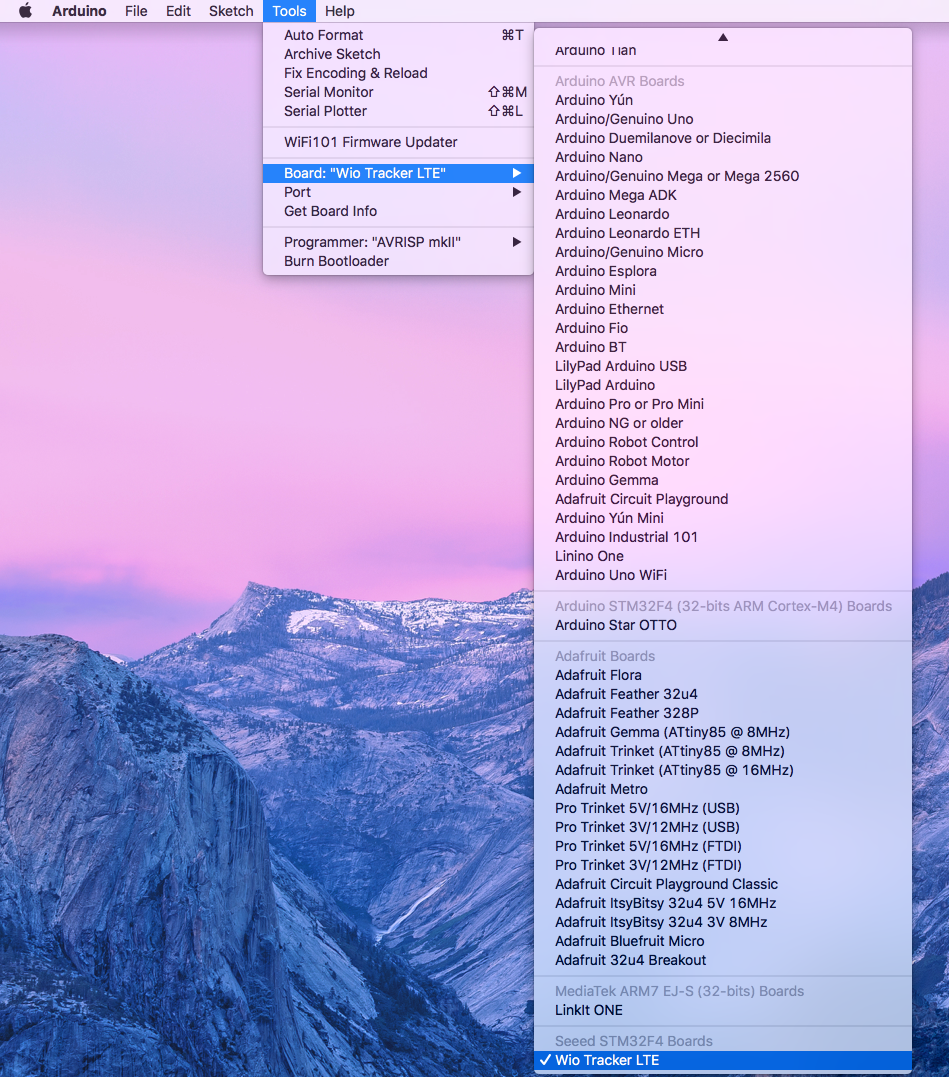
- Click Tools > Port > {Your Modem Port Here}
- OSX: /dev/{cu|tty}.usbmodem{XXXX}
- Linux: /dev/ttyACM{X}
- Windows: COM{X}
Configure the HelloWorld.ino file
Open the Hello World example provided by the Breakout SDK in the Arduino IDE.
- Click File > Examples > Breakout Arduino Library > HelloWorld

In the HelloWorld.ino we need to make a few modifications so we can connect to the T-Mobile NB-IoT network. Find the psk_key in the “HelloWorld.ino” file.
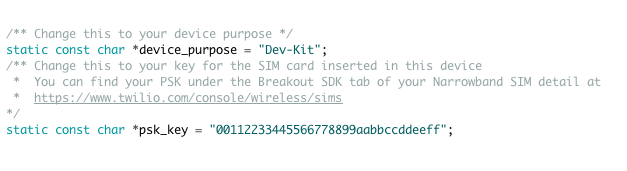
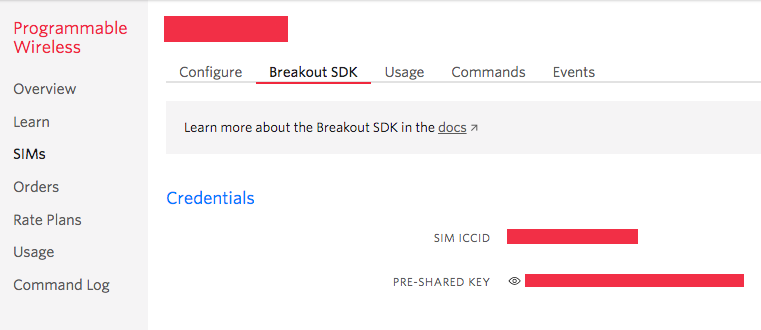
Each development board has a unique SIM ICCID and Pre-Shared Key (psk). The psk for the board we are using needs to be copied into the HelloWorld.ino sketch. This key is required to connect to the T-Mobile Narrowband network.
- Navigate to Programmable Wireless in the Twilio Console
- Click SIMs
- Find the Narrowband SIM that was previously registered
- Under the tab Breakout SDK find Credentials
- Where it says Pre-Shared Key (psk) click the eye logo to reveal the key
- Copy the psk
- Paste your psk into the HelloWorld.ino file in the code above
After the psk is set let’s change the setPollingInterval. This determines how often the Breakout SDK will poll for a new Command. Find the line breakout->setPollingInterval.

Change the ‘setPollingInterval’ interval from 10 to 1. This will change the polling time from 10 minutes to 1 minute.
Below is the complete Arduino sketch. Further details on how to the Breakout SDK can found on GitHub.
Enter Bootloader Mode
To upload code to the development board the unit needs to be put into Bootloader mode.
Press and hold the BOOT0 button underneath the Developer Board.
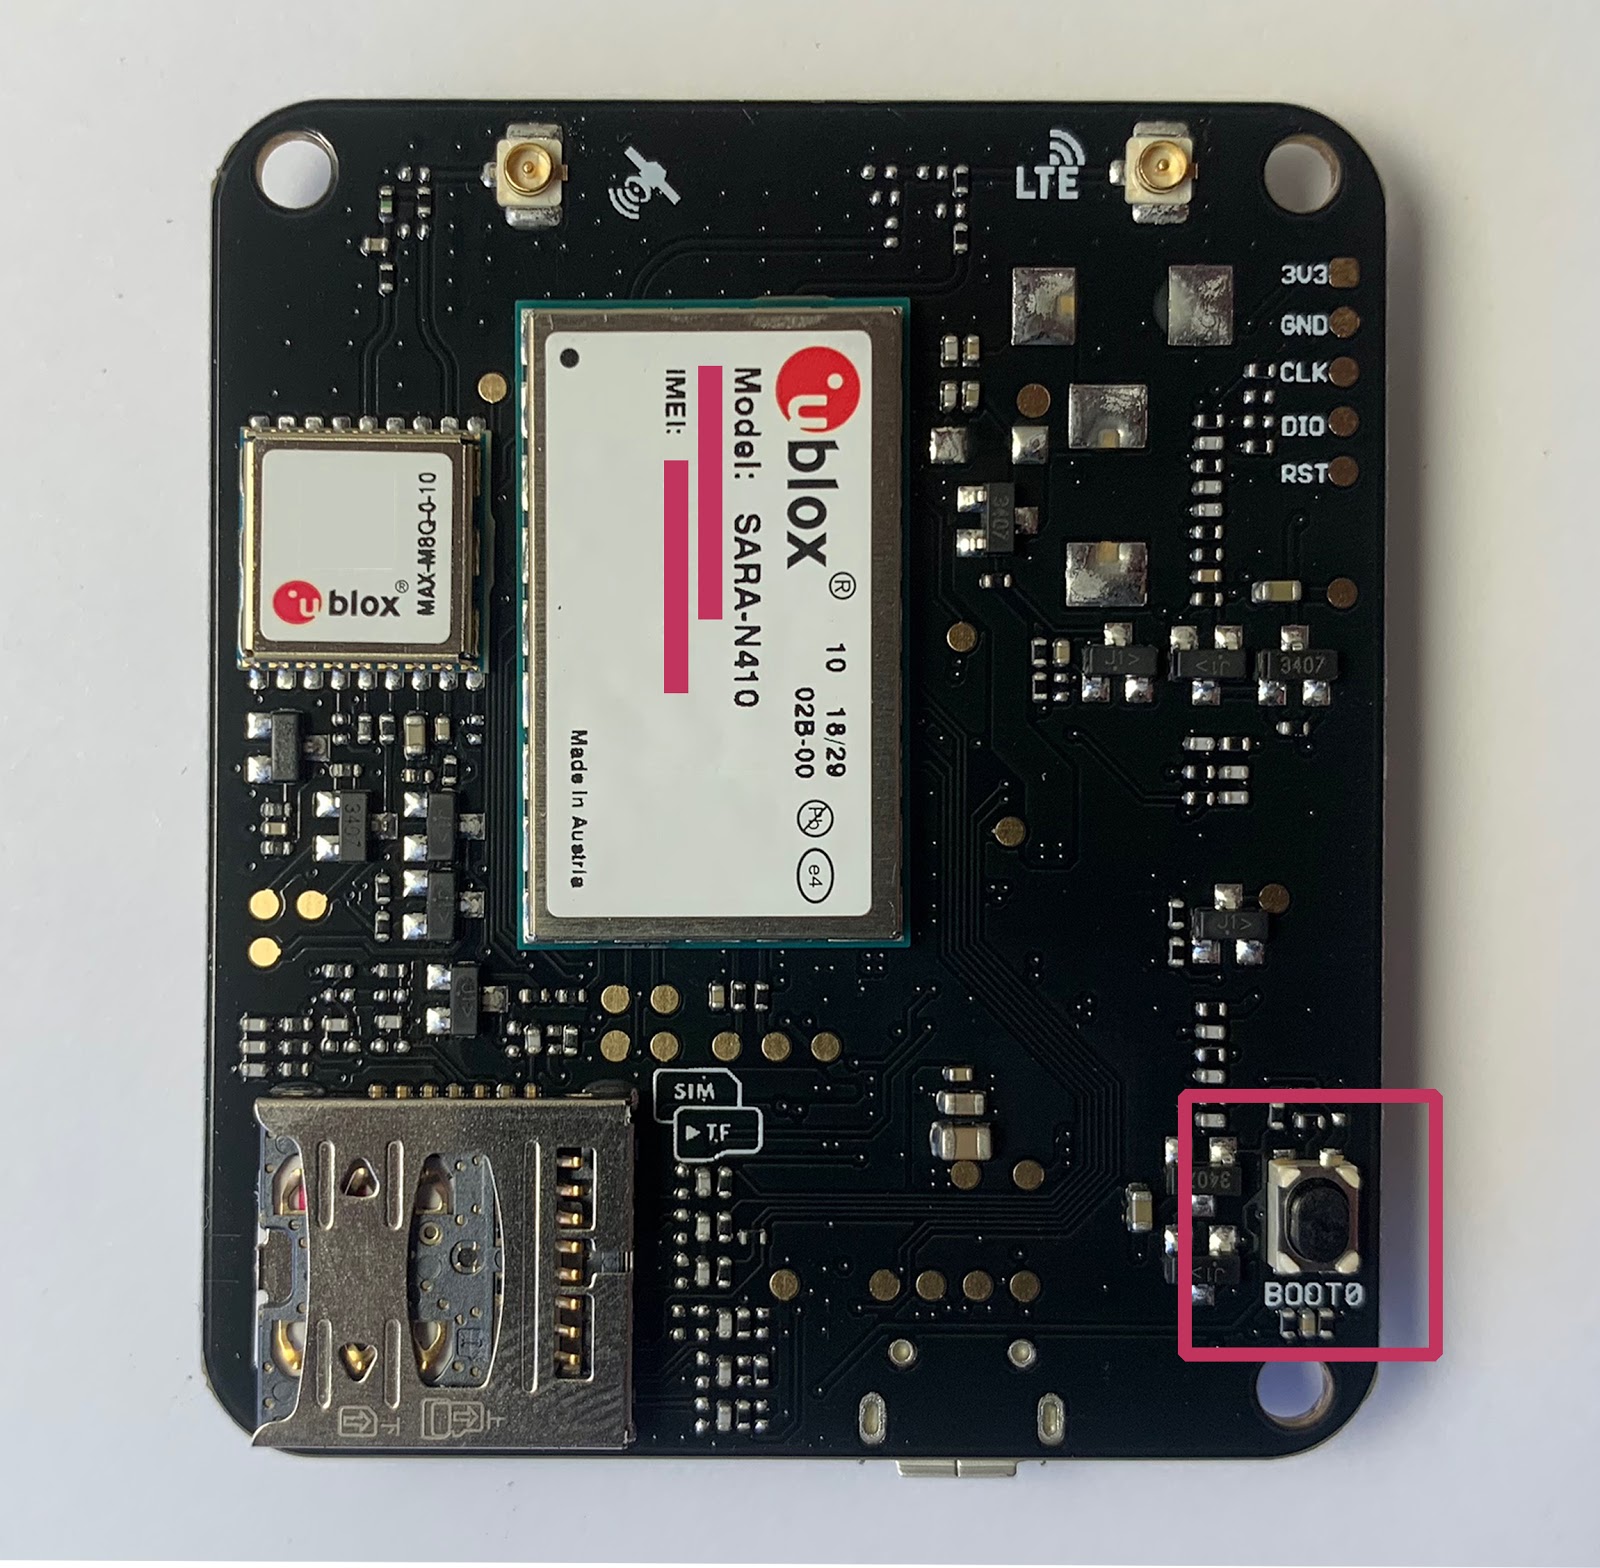
Press and hold the RST on the top of the Developer Board.
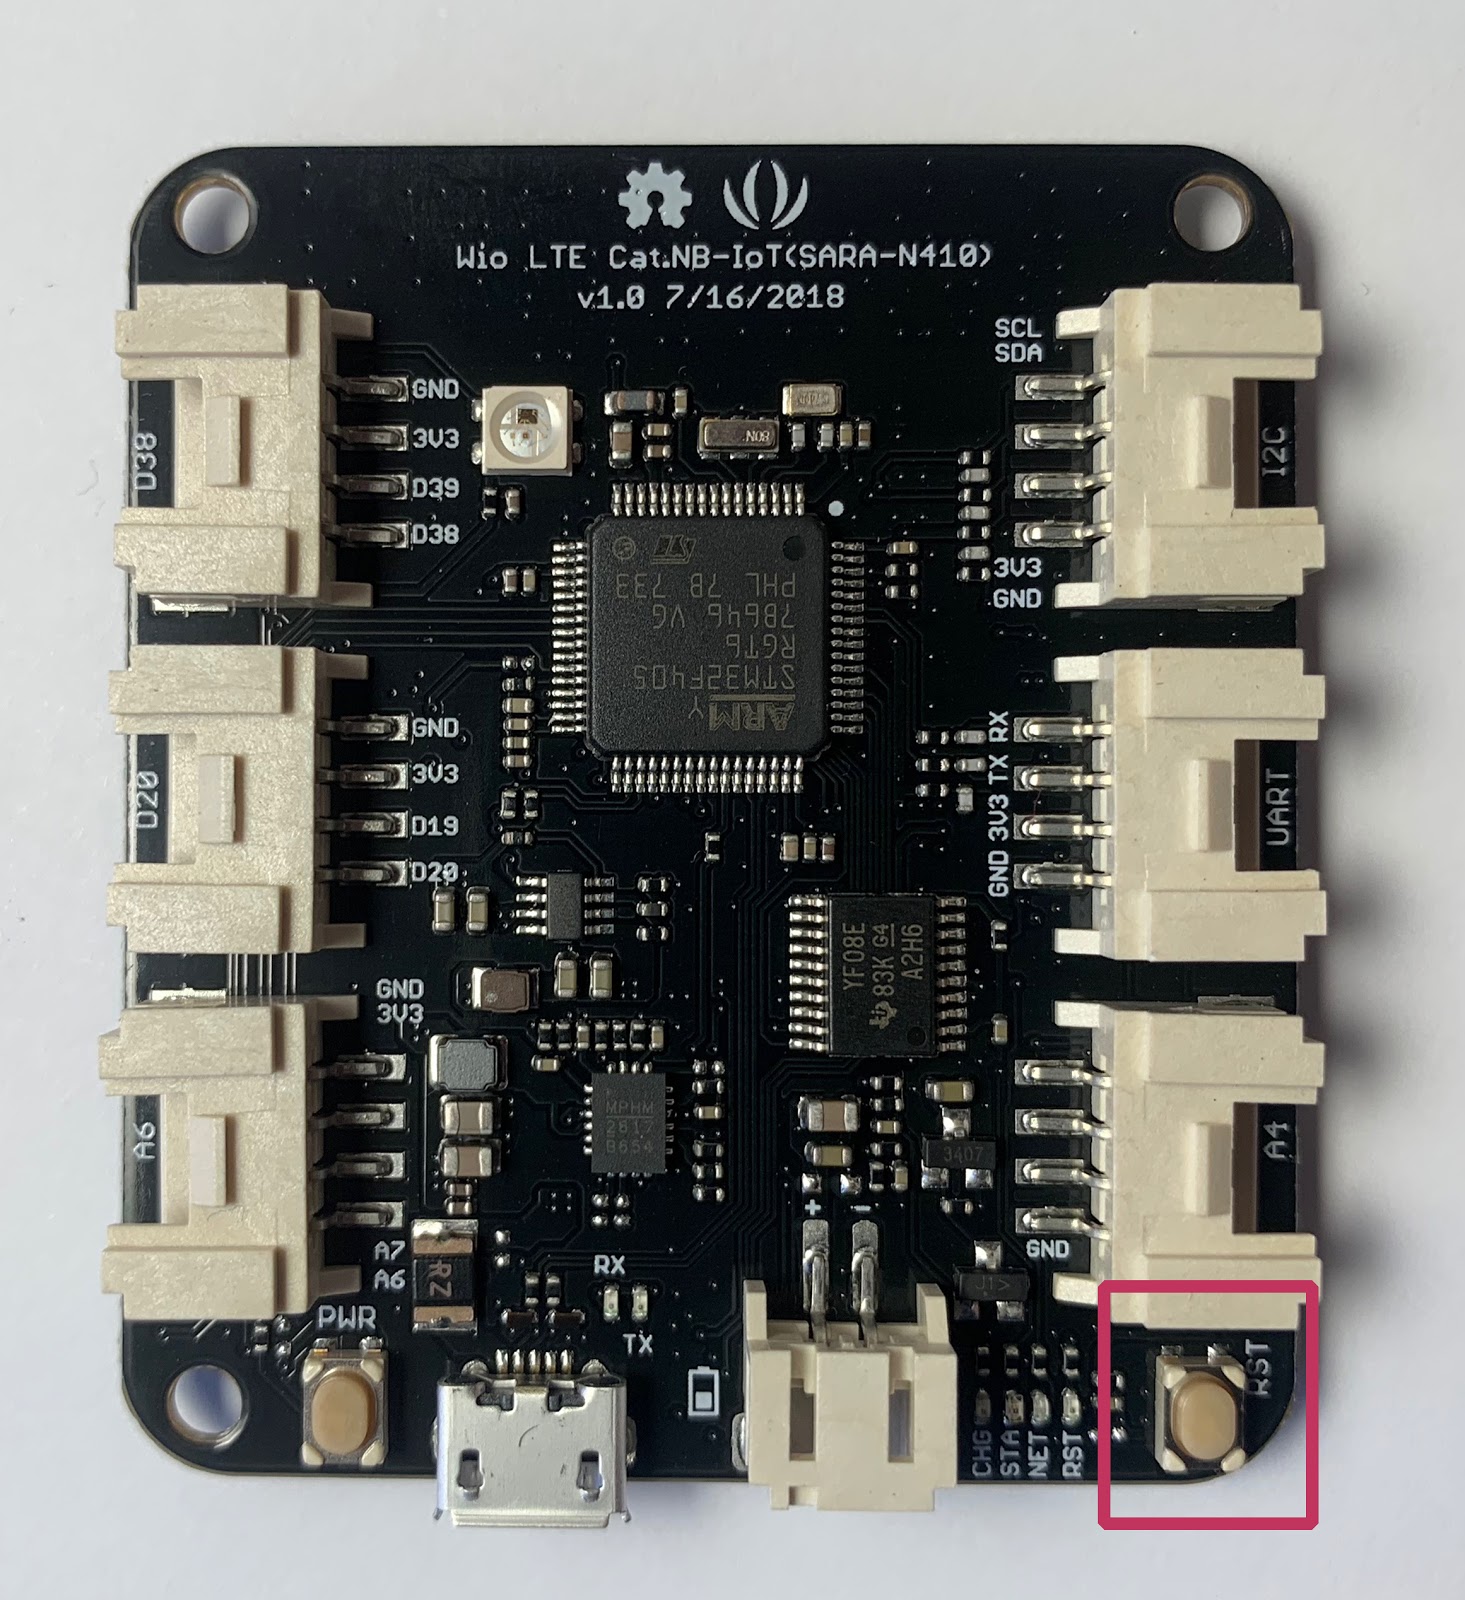
Release the RST on the top of the Developer Board.
Release the BOOT0 button to enable Bootloader mode.

Press Upload in the Arduino IDE.

After the code has been uploaded to the development board press the RST button. This will take the board out of Bootloader mode. The completed code can be found on the TwilioIoT GitHub.
Connect to the network and sending a Command
After resetting the board start the NB-IoT network registration process. This will register the board on the network and allocate bandwidth for the device. During this process the Network Connectivity LED will glow orange.
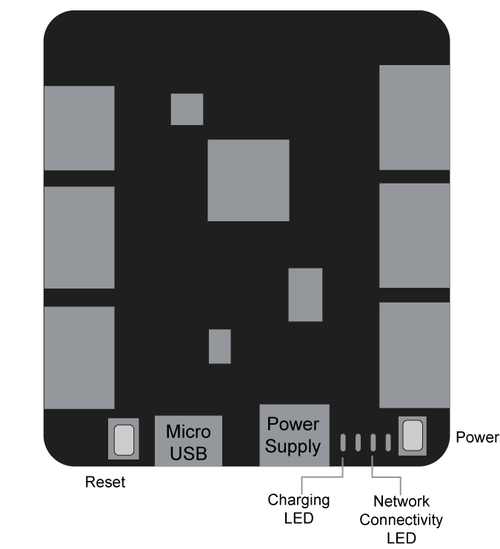
Open the Serial Monitor to observe the board registering and connecting to the network.
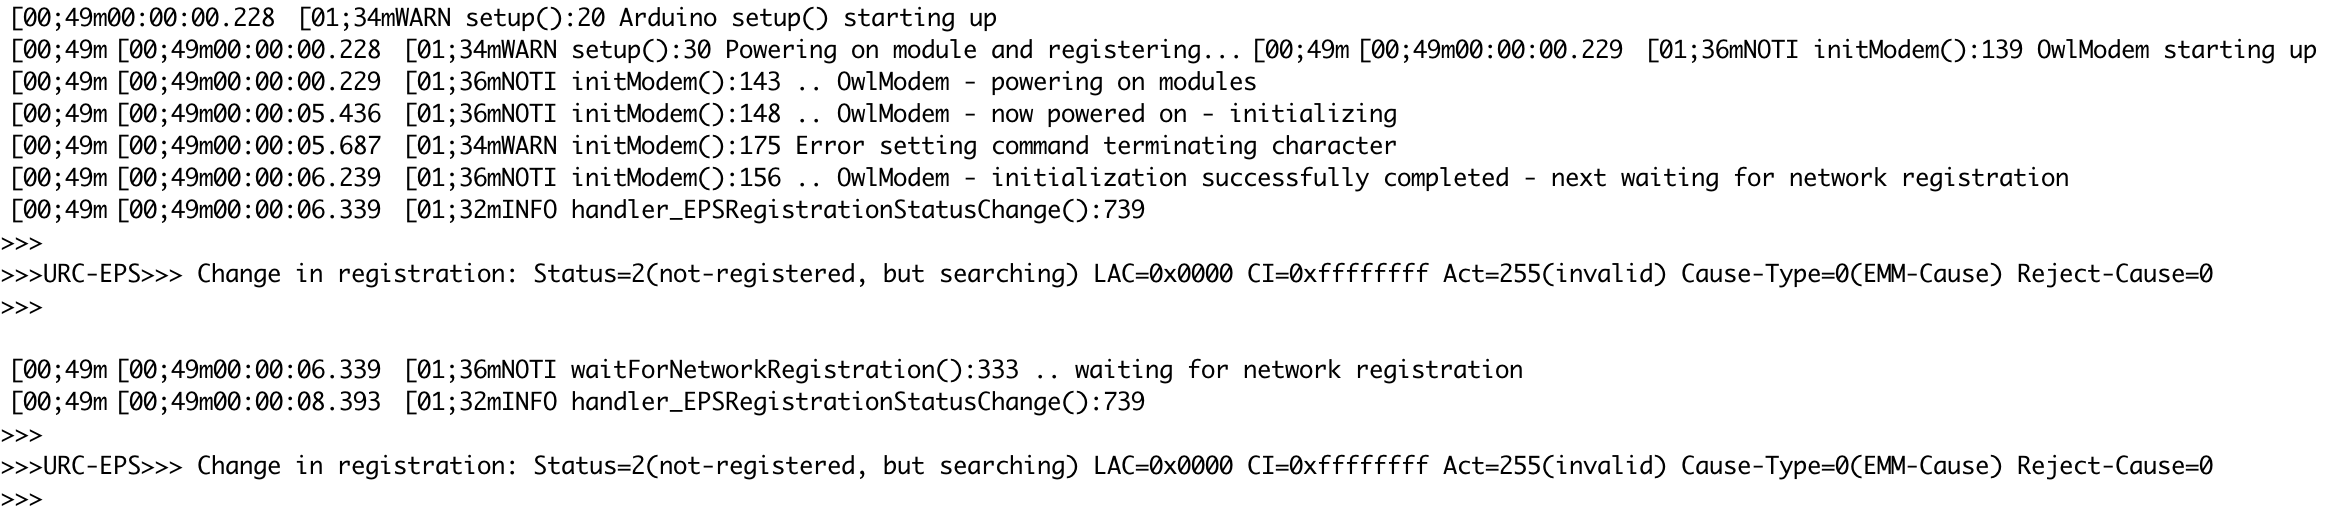
When the development board successfully registers to the NB-IoT network the Network Connectivity LED will glow blue. The following message will display in the Arduino Serial Monitor when the connection is stable:

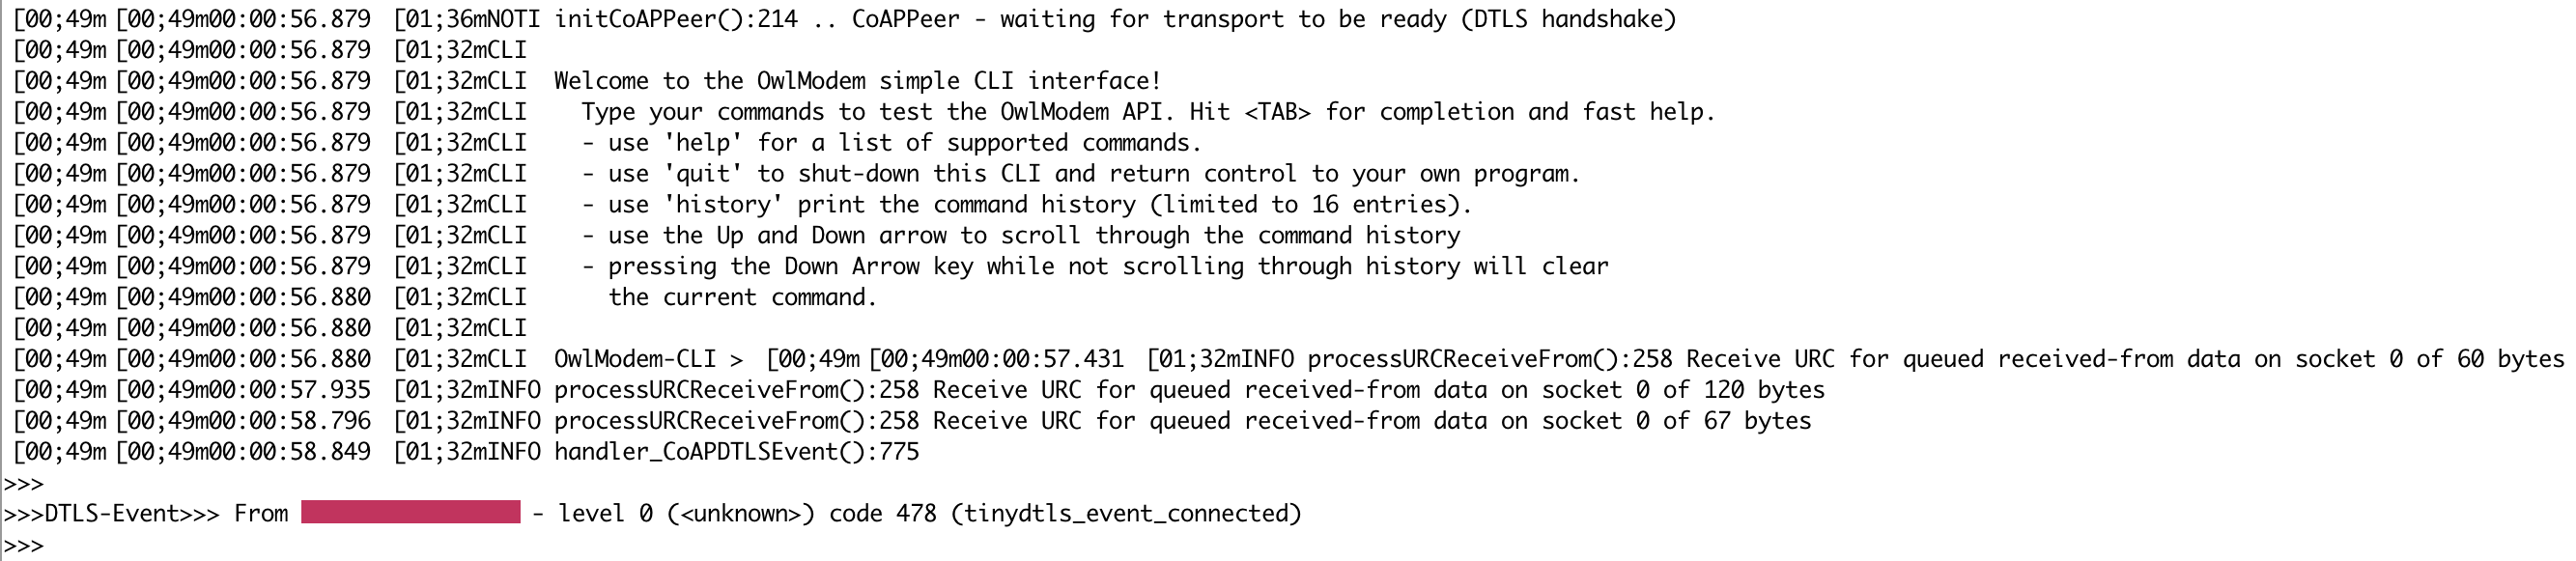
When the board successfully connects to the NB-IoT network, the Breakout SDK will be initialized.

This is the Serial Monitor output when the Breakout SDK sends a Command to Twilio.

Every Command sent and received by the Breakout SDK is logged. Commands sent over the NB-IoT network can be found in the Twilio Console under Programmable Wireless.
- Navigate to Programmable Wireless in the Twilio Console
- Click SIMs
- Find the Narrowband SIM that was previously registered
- Click the Commands tab

Receive a Command with the Breakout SDK
The Breakout SDK will poll for a new Command every minute. Using curl, you can send a Command to the NB-IoT board by using the Sim unique name.
Watch the Arduino IDE Serial Monitor to see the Command as it is received:

How does it feel to be one of the first pioneers of NB-IoT?

The future of “things” using NB-IoT
It’s a special time for IoT development on both the hardware and software side. Many processes are becoming optimized... and many are still shrouded in mystery.
These “things” impact our daily lives – often without us even realizing it. Every segment from scooters to home automation now has some element of interconnectivity.
NB-IoT takes it a step further still. The low cost, low power consumption, wide area coverage and long battery life of Narrowband make “Smart Devices” even smarter. Become an IoT pioneer with Twilio Narrowband. Let’s build dreams together.
If you ever want to chat about IoT, hardware or modular synthesizers ping me anytime on Twitter or via Email. Let’s connect.
- Email: ckonopka@twilio.com
- Github: cskonopka
- Twitter: @cskonopka
Related Posts


Related Resources
Twilio Docs
From APIs to SDKs to sample apps
API reference documentation, SDKs, helper libraries, quickstarts, and tutorials for your language and platform.
Resource Center
The latest ebooks, industry reports, and webinars
Learn from customer engagement experts to improve your own communication.
Ahoy
Twilio's developer community hub
Best practices, code samples, and inspiration to build communications and digital engagement experiences.